Overview
SonarCloud is a cloud-based clean code (code quality and security) service that is free for open source projects and offers a free trial for private projects. It features:
- 26 languages, including Java, JS, C#, C/C++, Objective-C, TypeScript, Python, ABAP, PLSQL, T-SQL, and more.
- More than 5,000 rules to track down hard-to-find bugs and quality issues thanks to powerful static code analyzers.
- Cloud CI Integrations, with Travis, Azure DevOps, BitBucket, AppVeyor and more.
- Deep code analysis, to explore all source files, whether in branches or pull requests, to reach a green Quality Gate and promote the build.
- Fast, automatic analysis of most languages - no configuration required.
- Free analysis for open-source projects and a no-commitment, free 14-day trial for your private repositories.
- IDE support with SonarLint when using Connected Mode to find code issues on the fly. SonarCloud rules and quality profiles synchronize with SonarLint, aligning teams around a single standard of Clean Code.
What’s covered in this lab
In this lab, you will learn how to integrate Azure DevOps Services with SonarCloud:
- Setup an Azure DevOps project and CI build to integrate with SonarCloud.
- Analyze SonarCloud reports.
- Integrate static analysis into the Azure DevOps pull request process.
Prerequisites for the lab
-
You will need a Microsoft account.
-
Using this account, sign in to Azure DevOps Services.
-
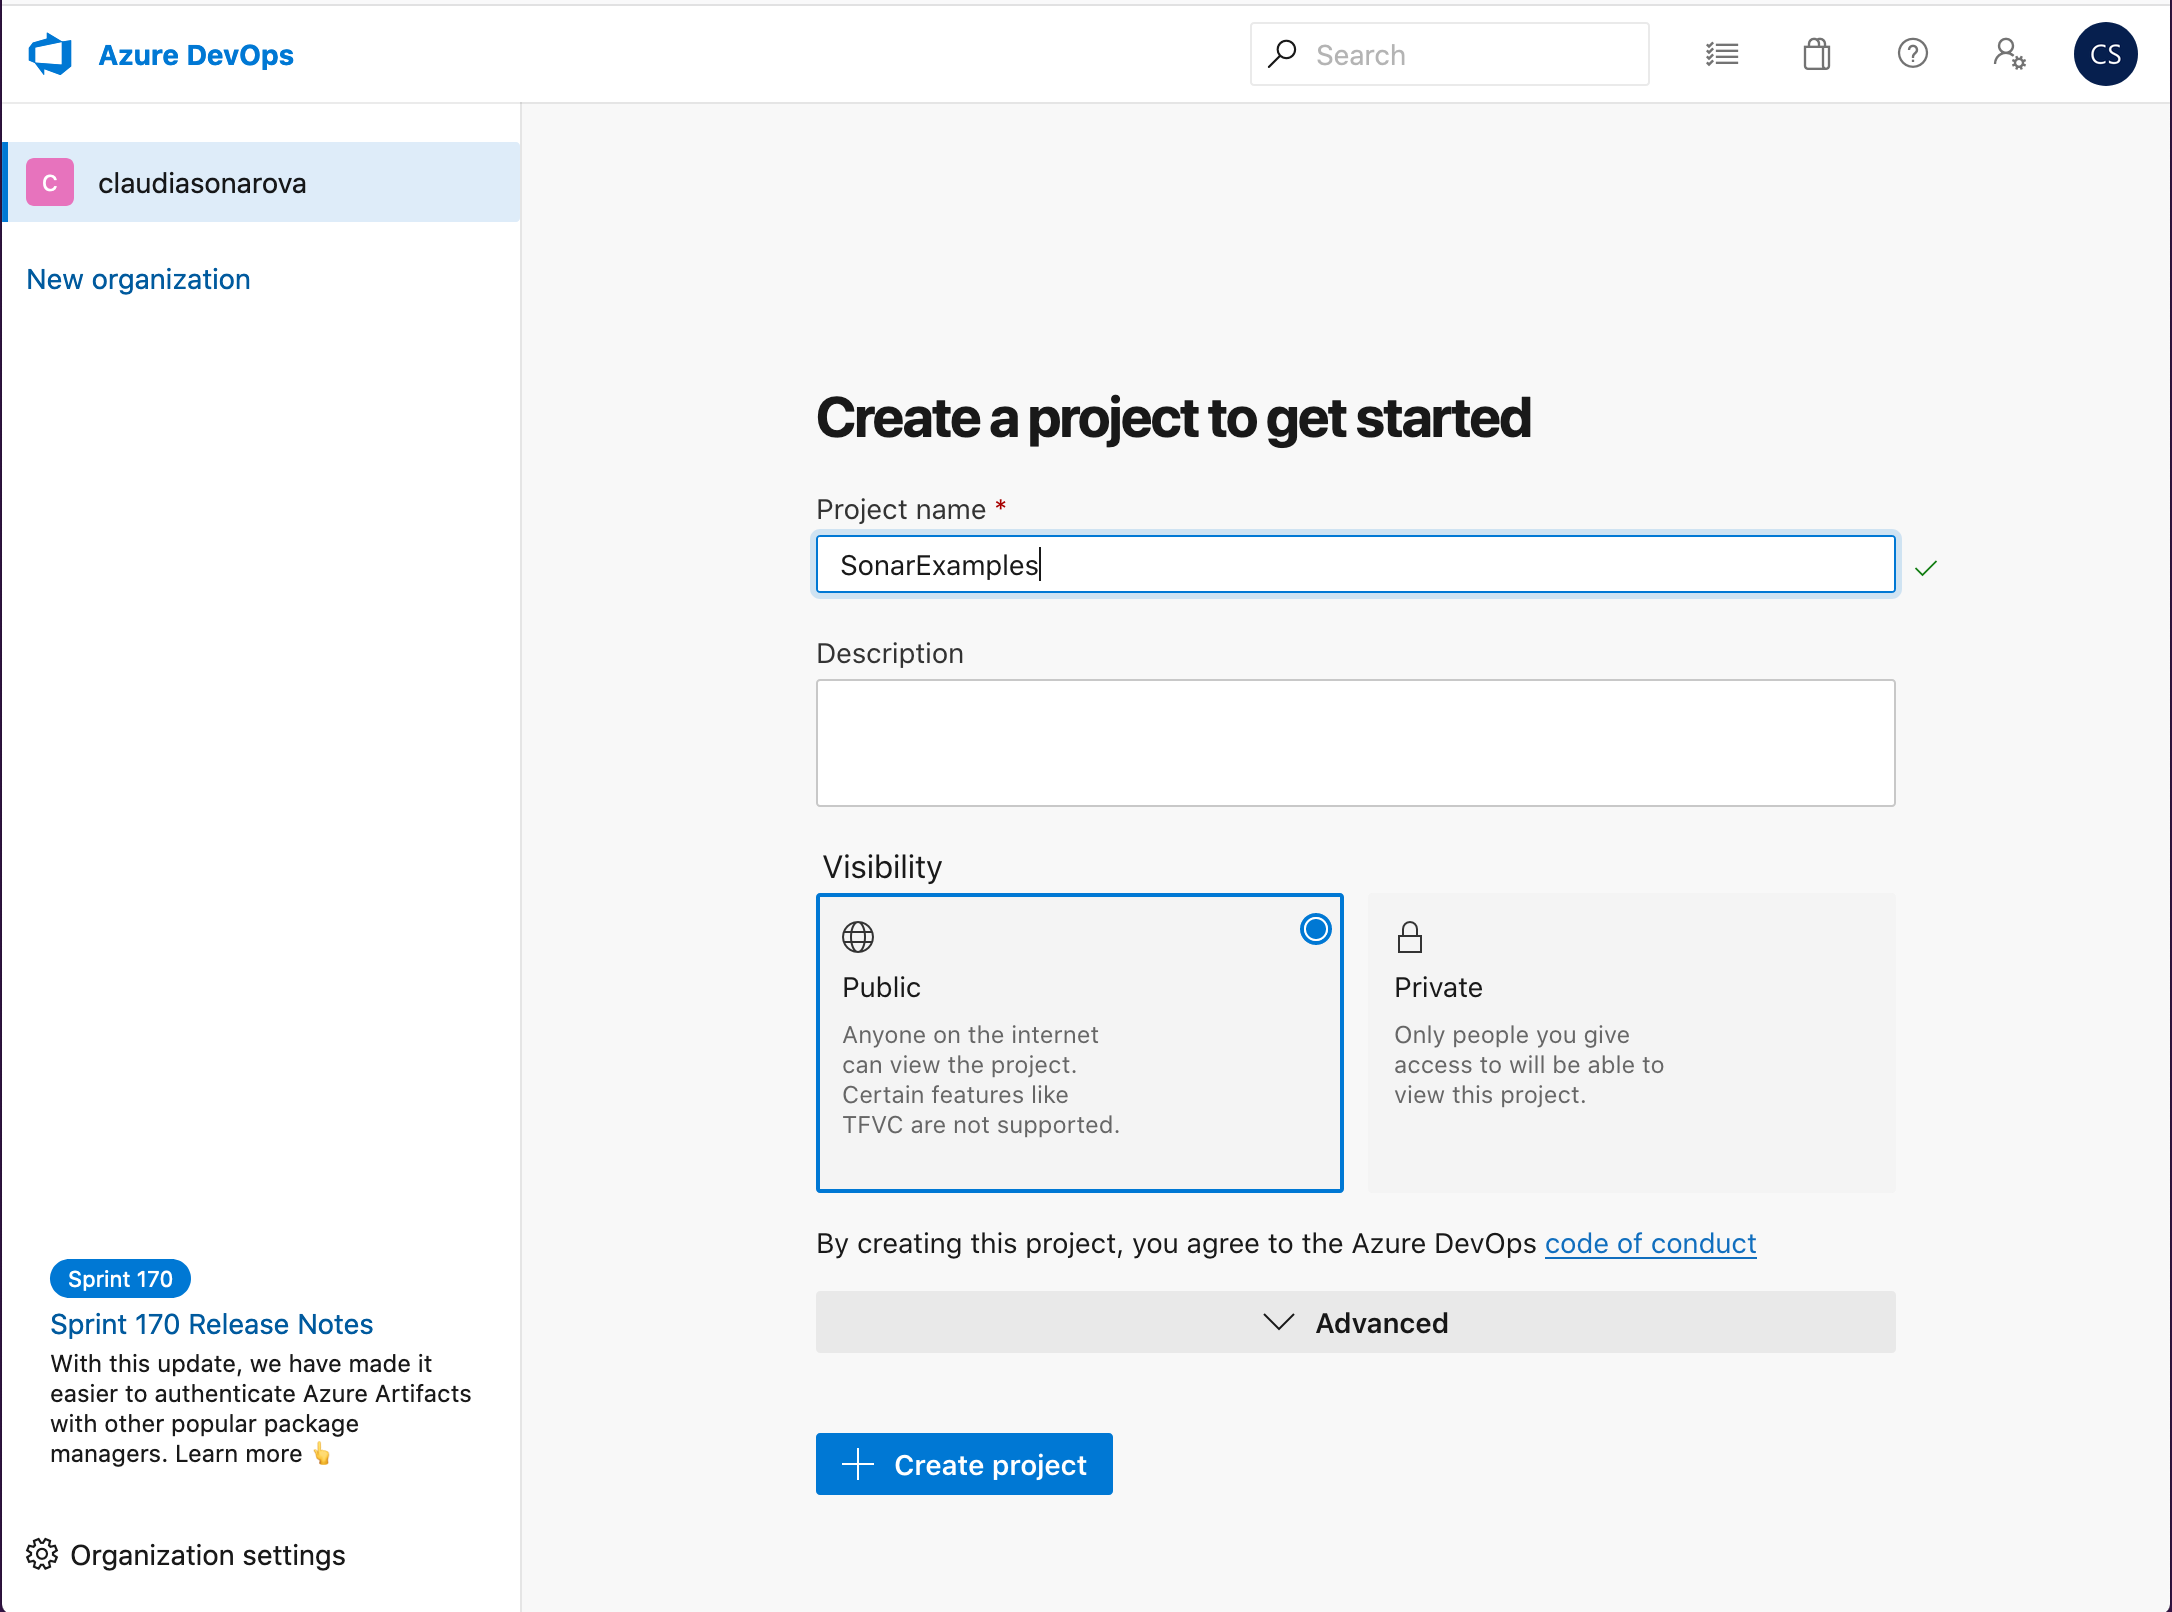
Create a new Azure DevOps project for this lab:
Every project in Azure DevOps belongs to an organization. You will be placed into an automatically created default organization on sign in, the name of which is based on your user name (in our example, the user Claudia Sonarova has been given the organization claudiasonarova).
Inside this organization, create a project called SonarExamples:
SonarCloud supports both private and public projects and offers a no-commitment, 14-day trial of SonarCloud for your private repositories completely free. Remember, SonarCloud analysis is always free for open-source projects! More details about Pricing is explained in the docs.
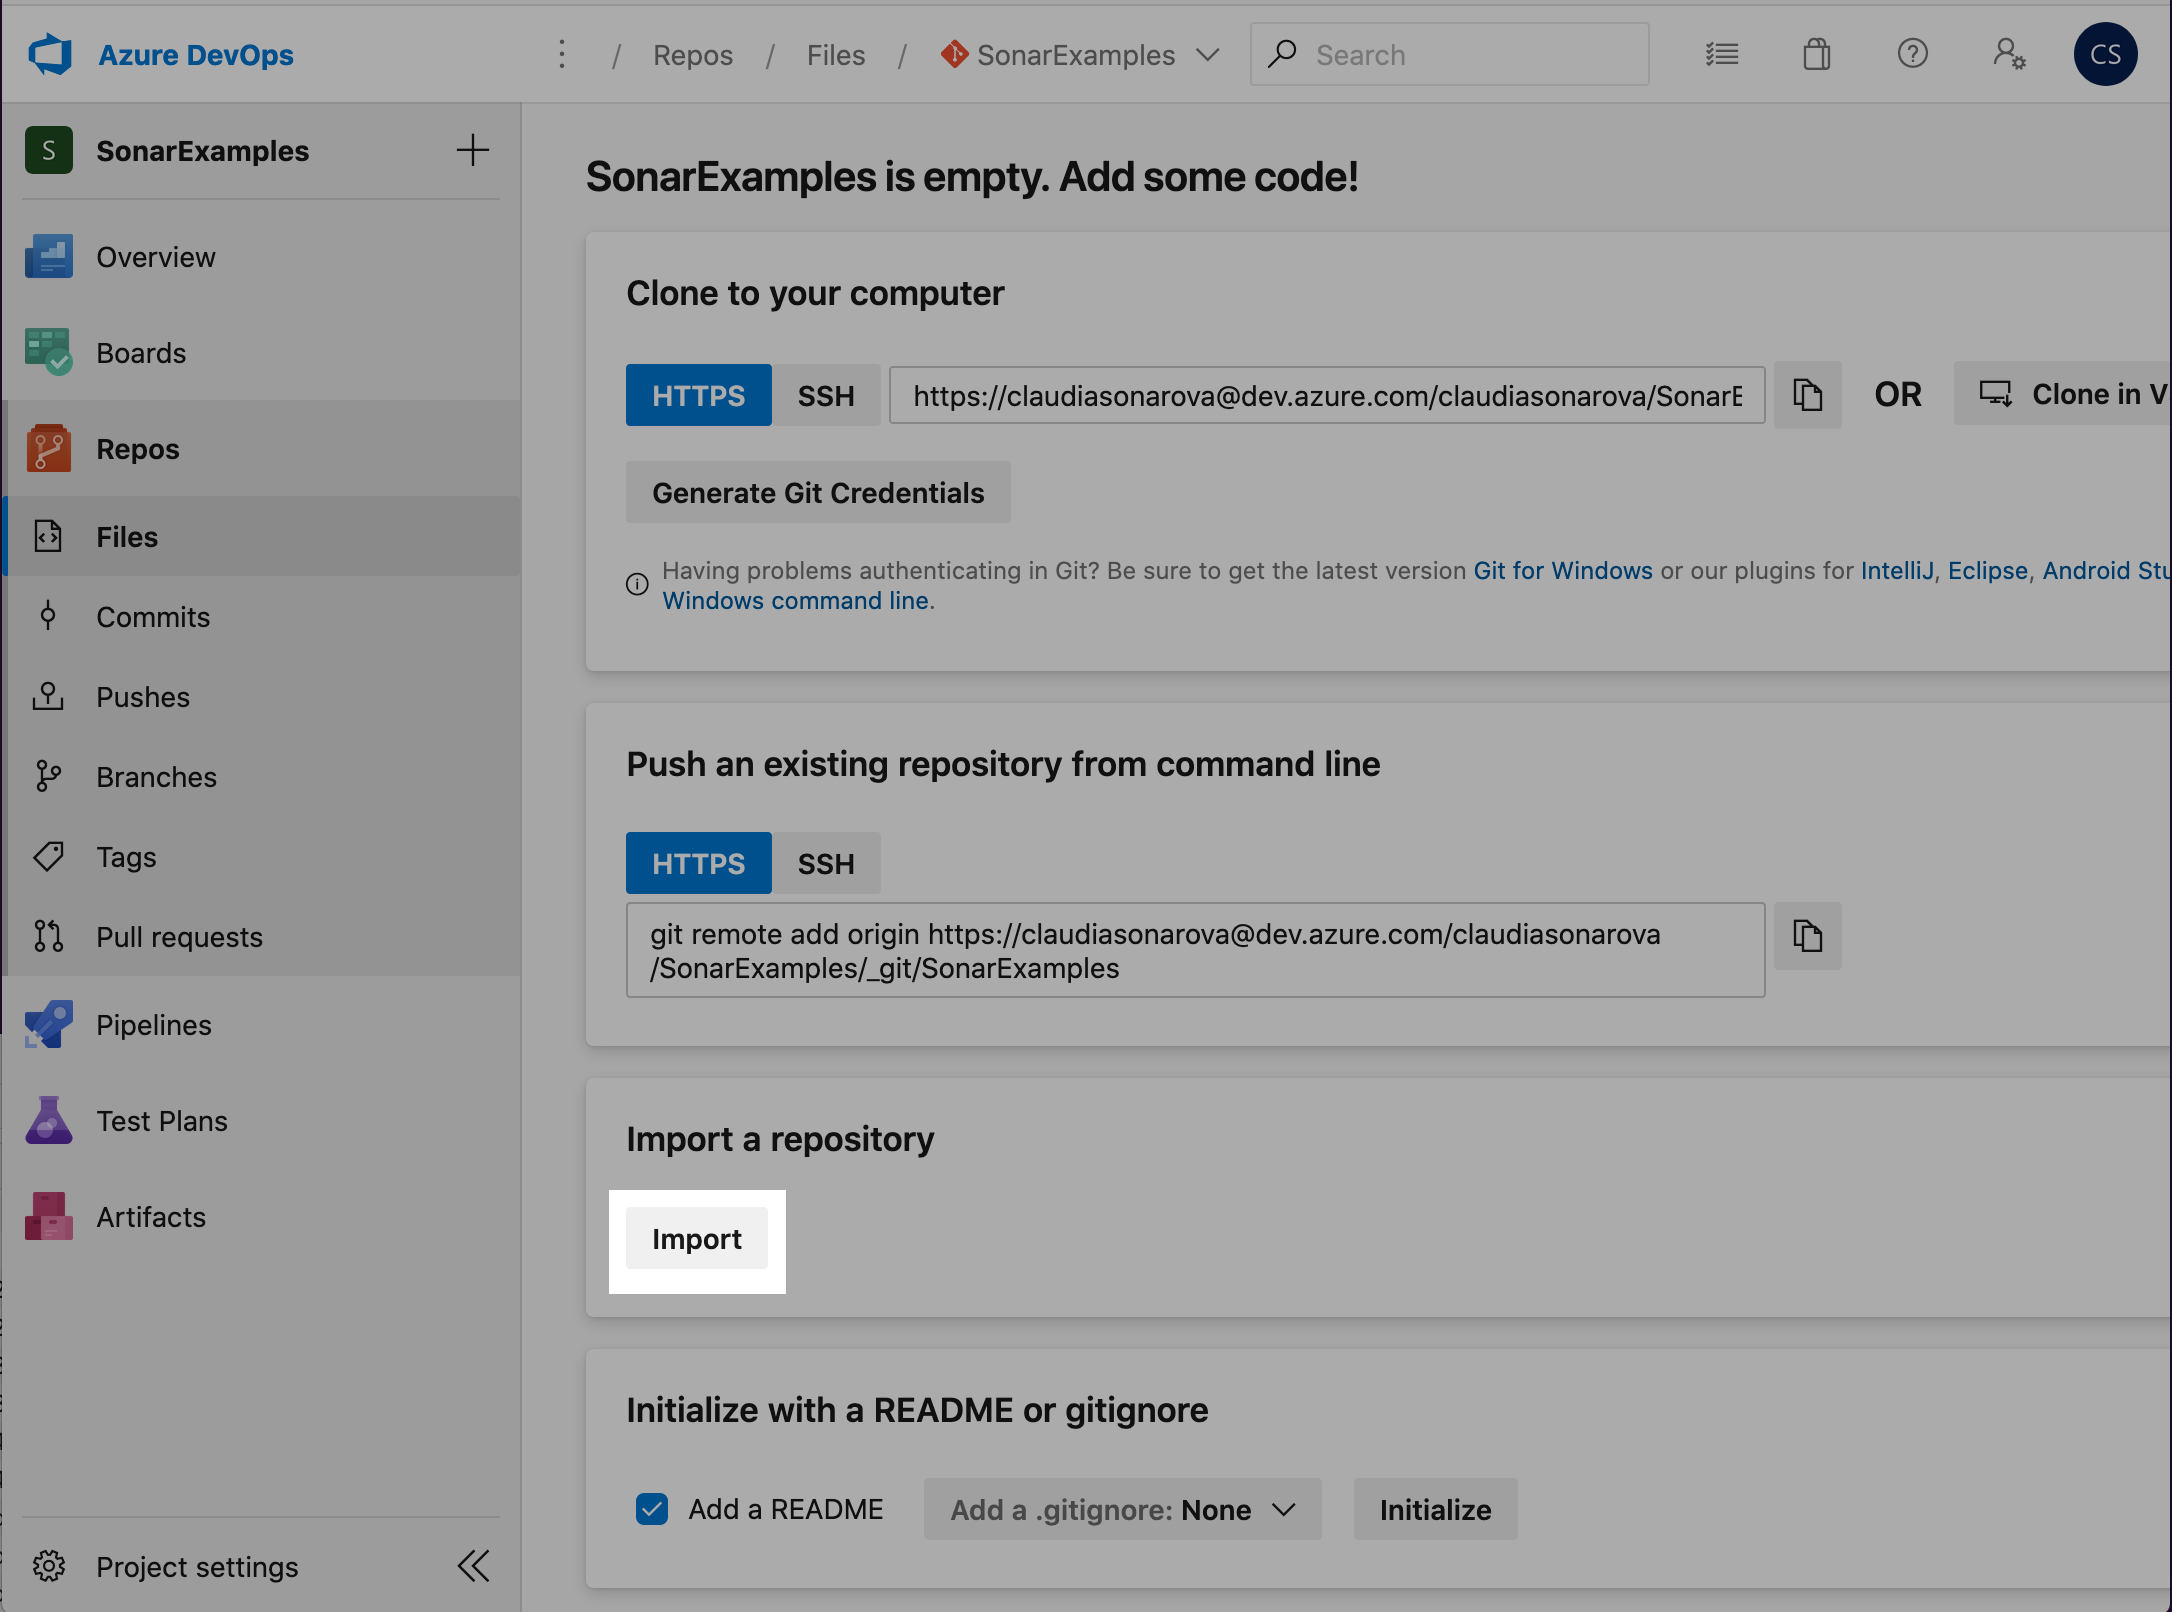
Import the Sonar Scanning Examples repository from GitHub at https://github.com/SonarSource/sonar-scanning-examples.git or use the HTTPS address of your own repo. The scanning examples repository contains sample projects for a number of build systems and languages including C# with MSBuild, Maven, and Gradle with Java.
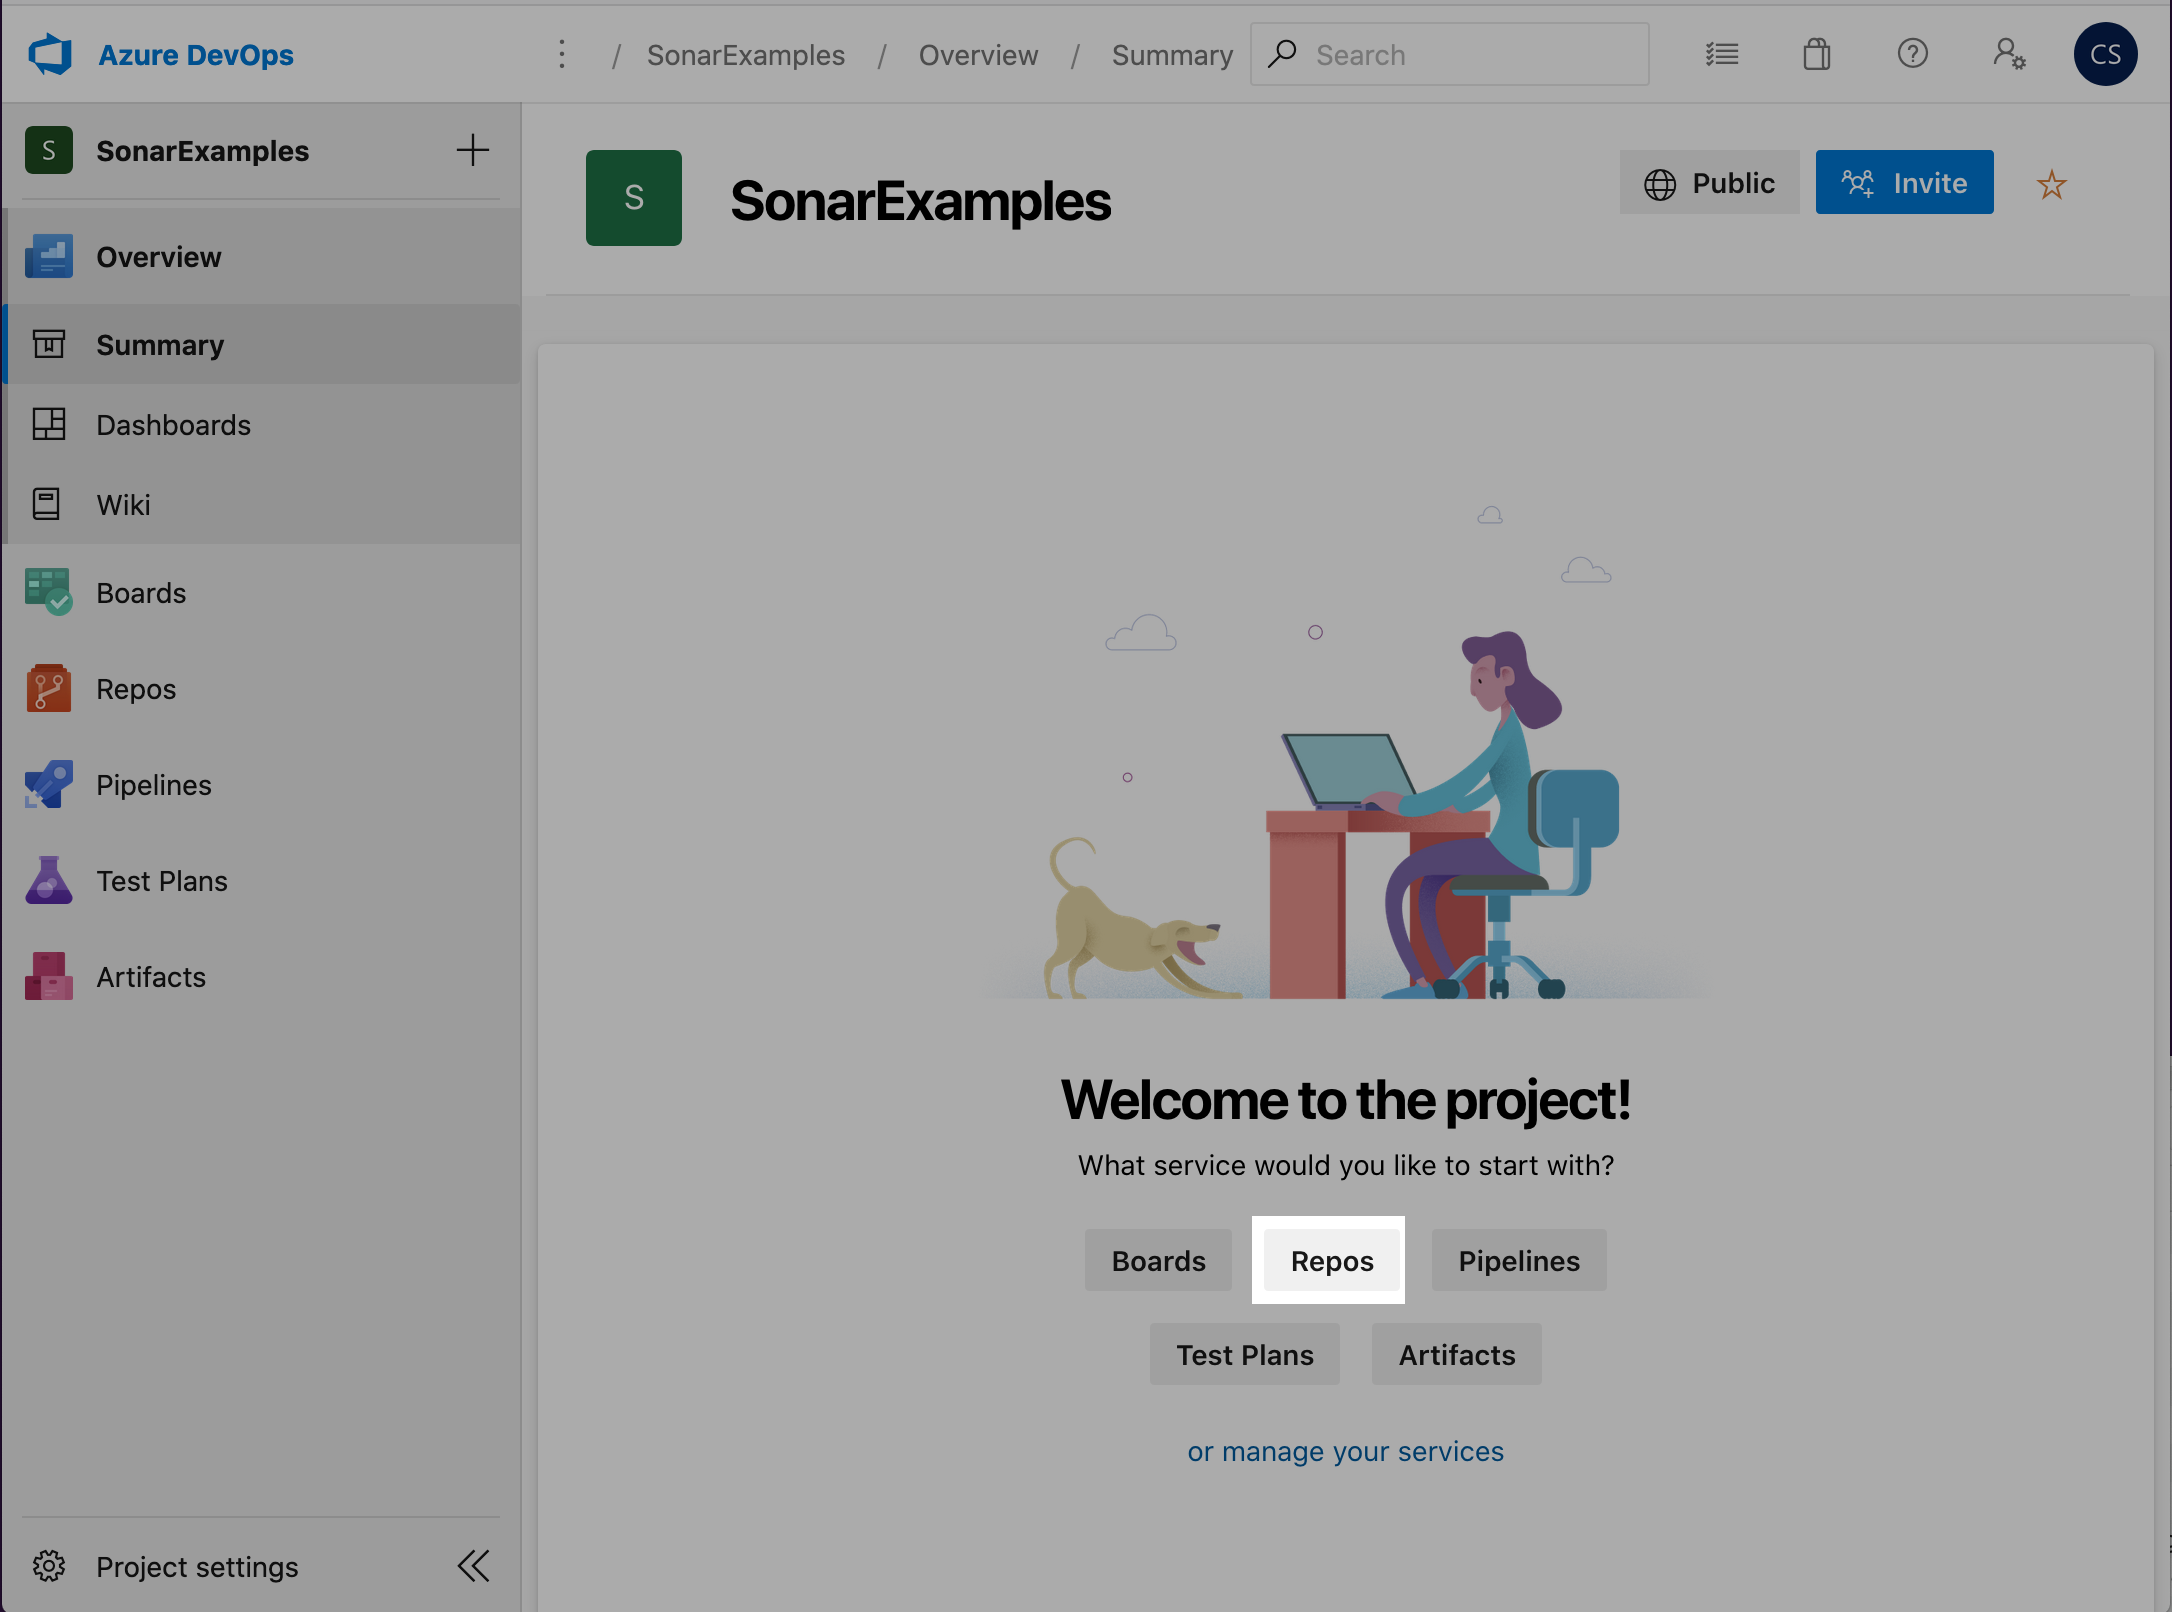
Go to Your project > Repos:
Then, select Import:
See this Microsoft documentation for detailed instructions on importing a repository.
-
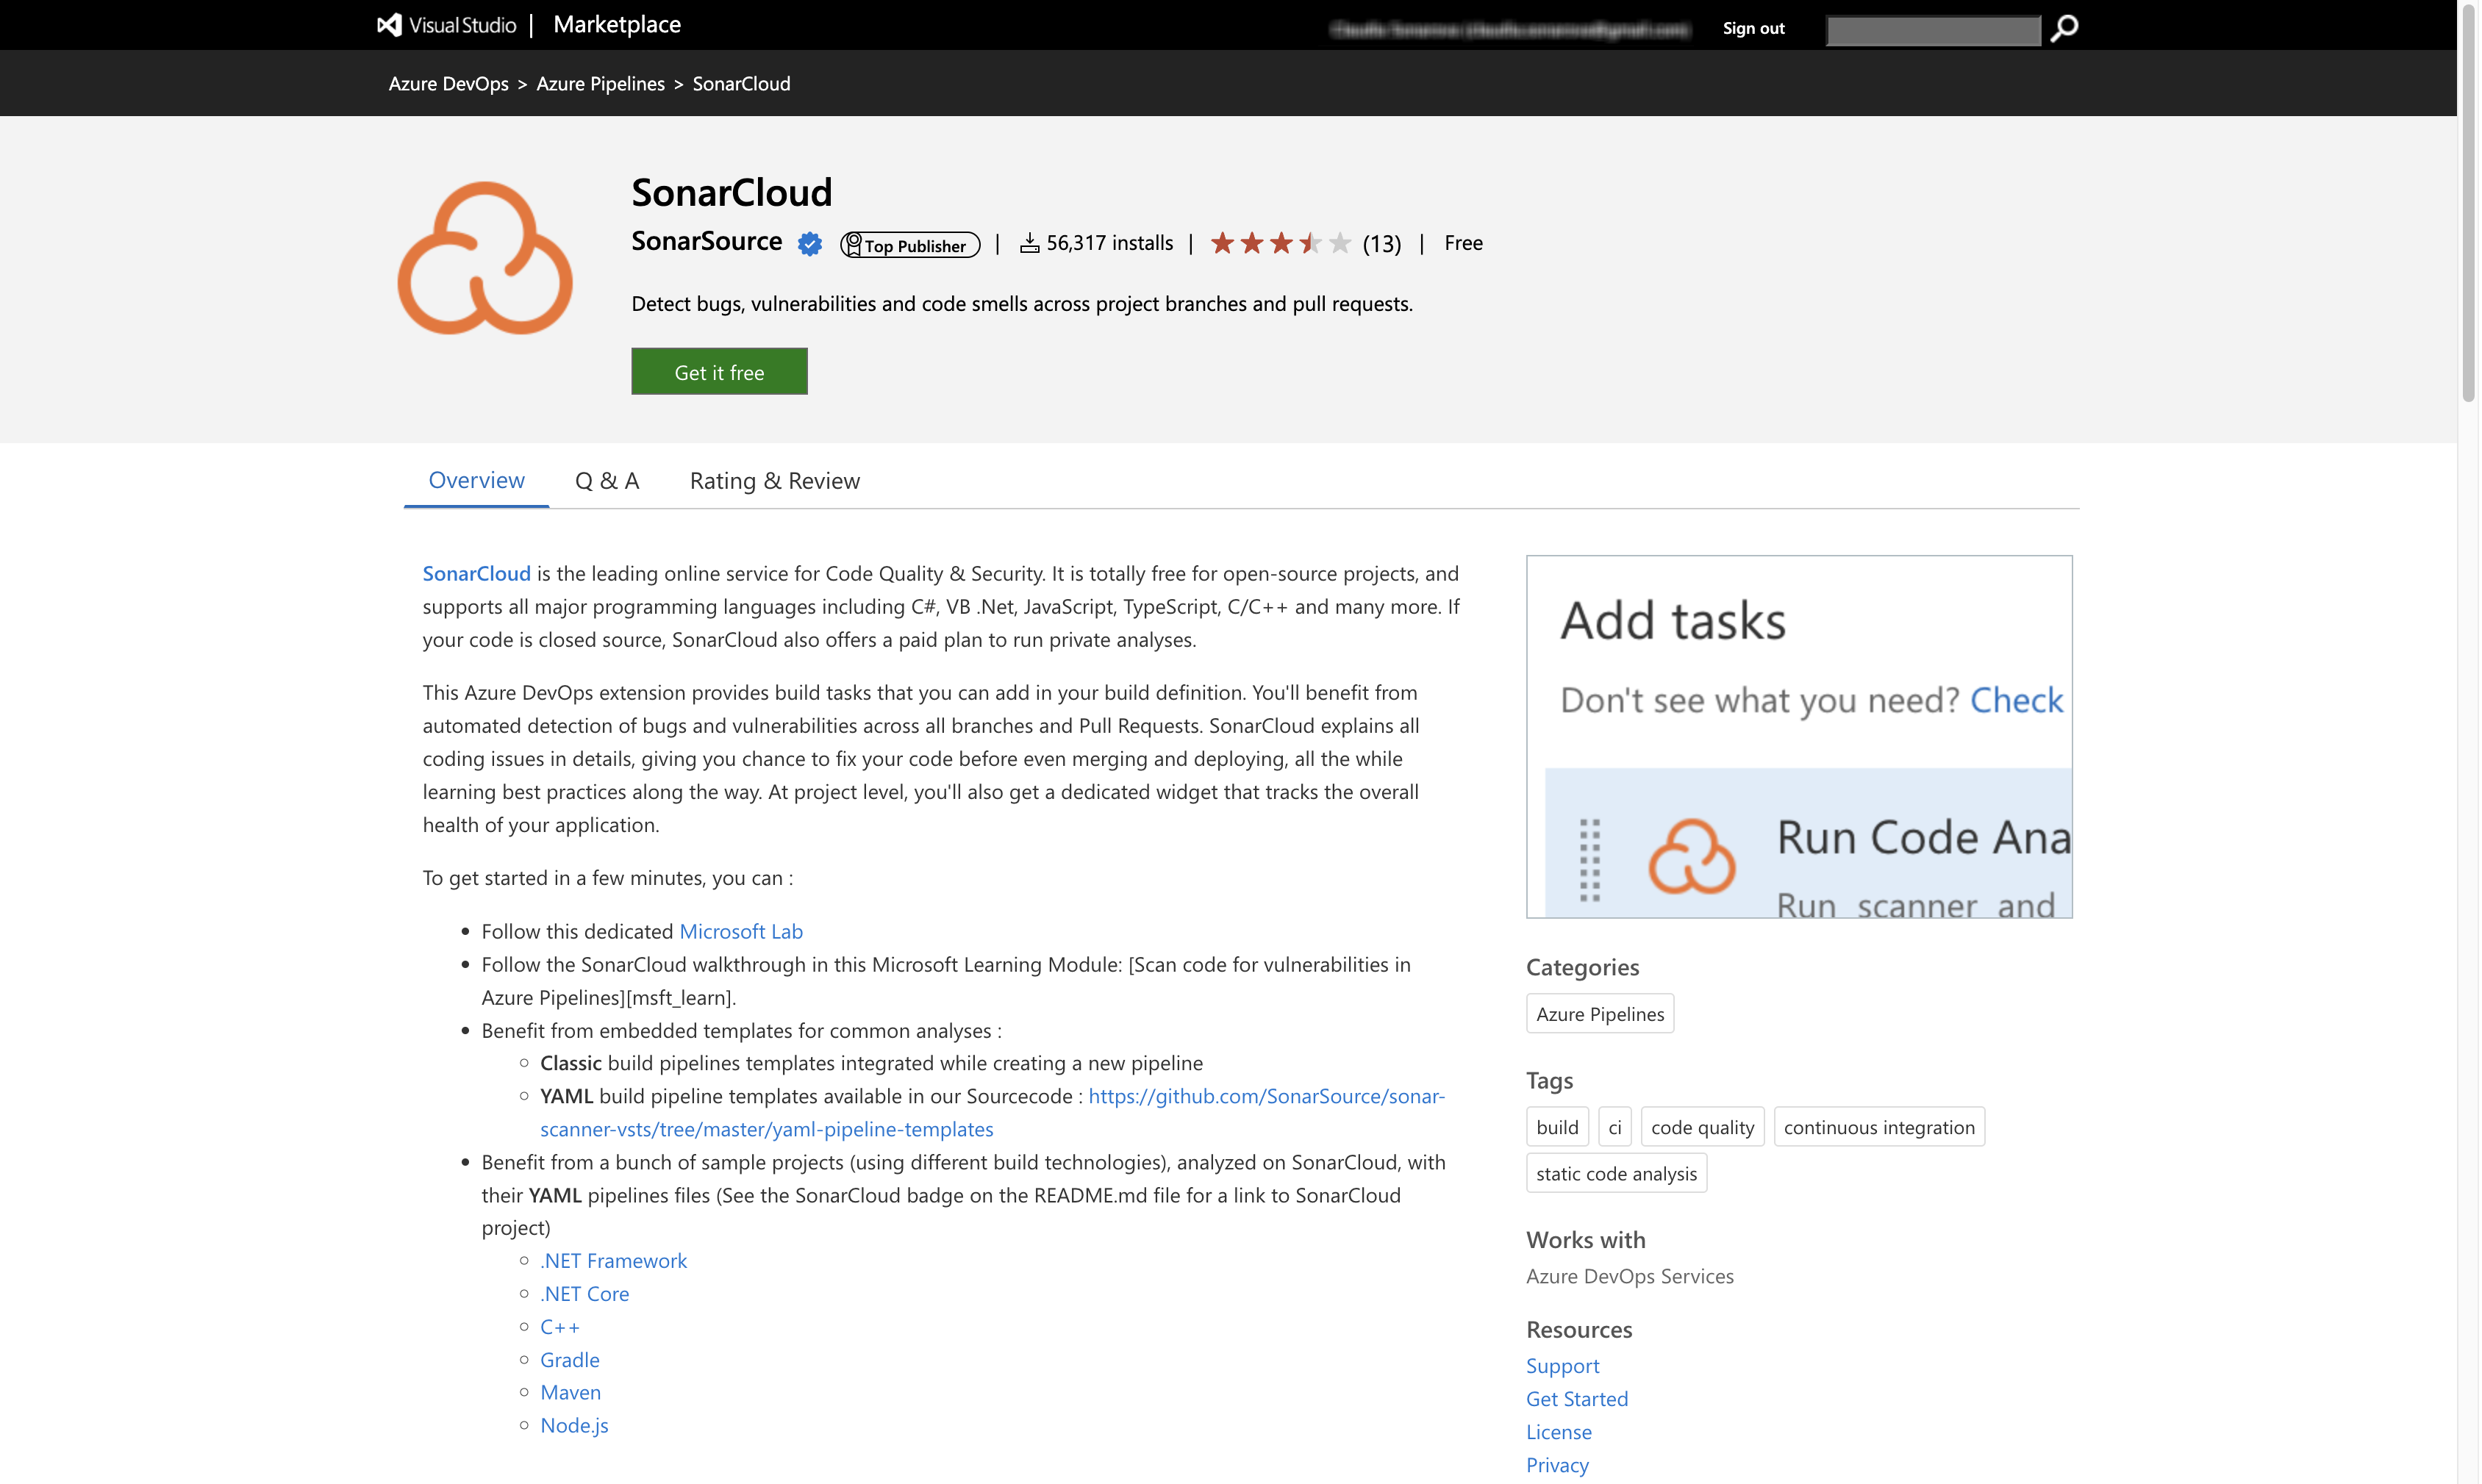
Install the SonarCloud Azure DevOps extension in your Azure DevOps account. The SonarCloud extension contains build tasks, build templates and a custom dashboard widget to help with the construction of your pipeline.
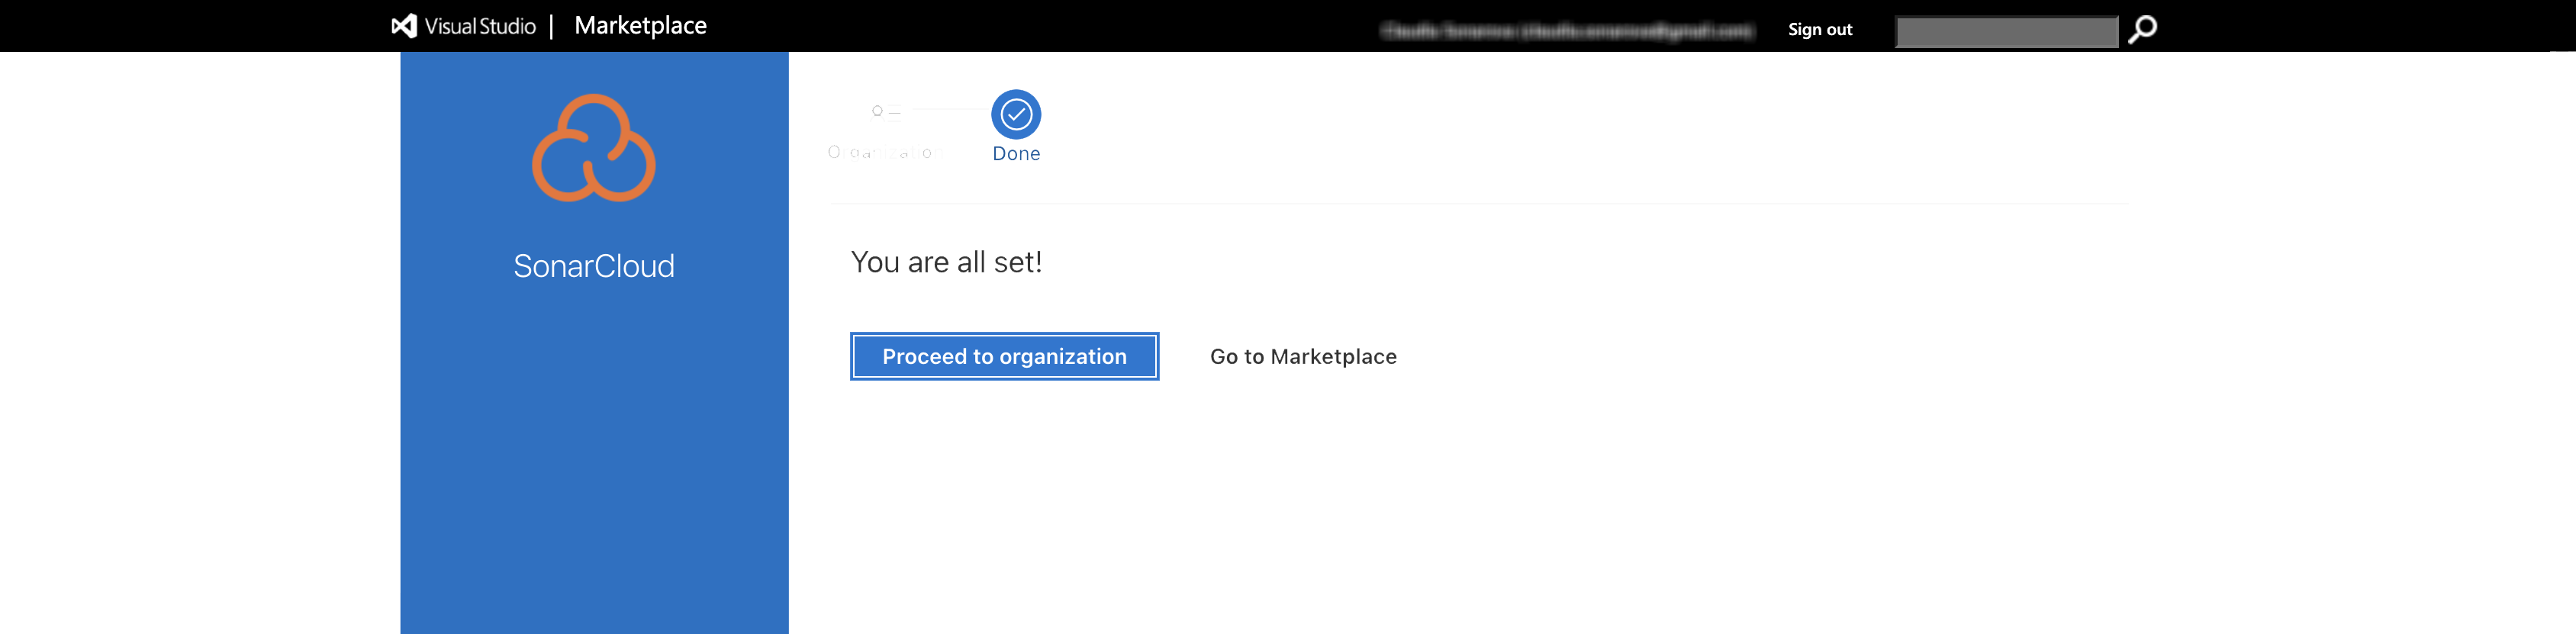
Find the SonarCloud extension on the Visual Studio Marketplace and click Get it free to install it, then select Proceed to organization after the installation has finished.
The page will update when your installation is complete.
If you do not have the appropriate permissions to install an extension from the marketplace, a request will be sent to the account administrator to ask them to approve the installation.
-
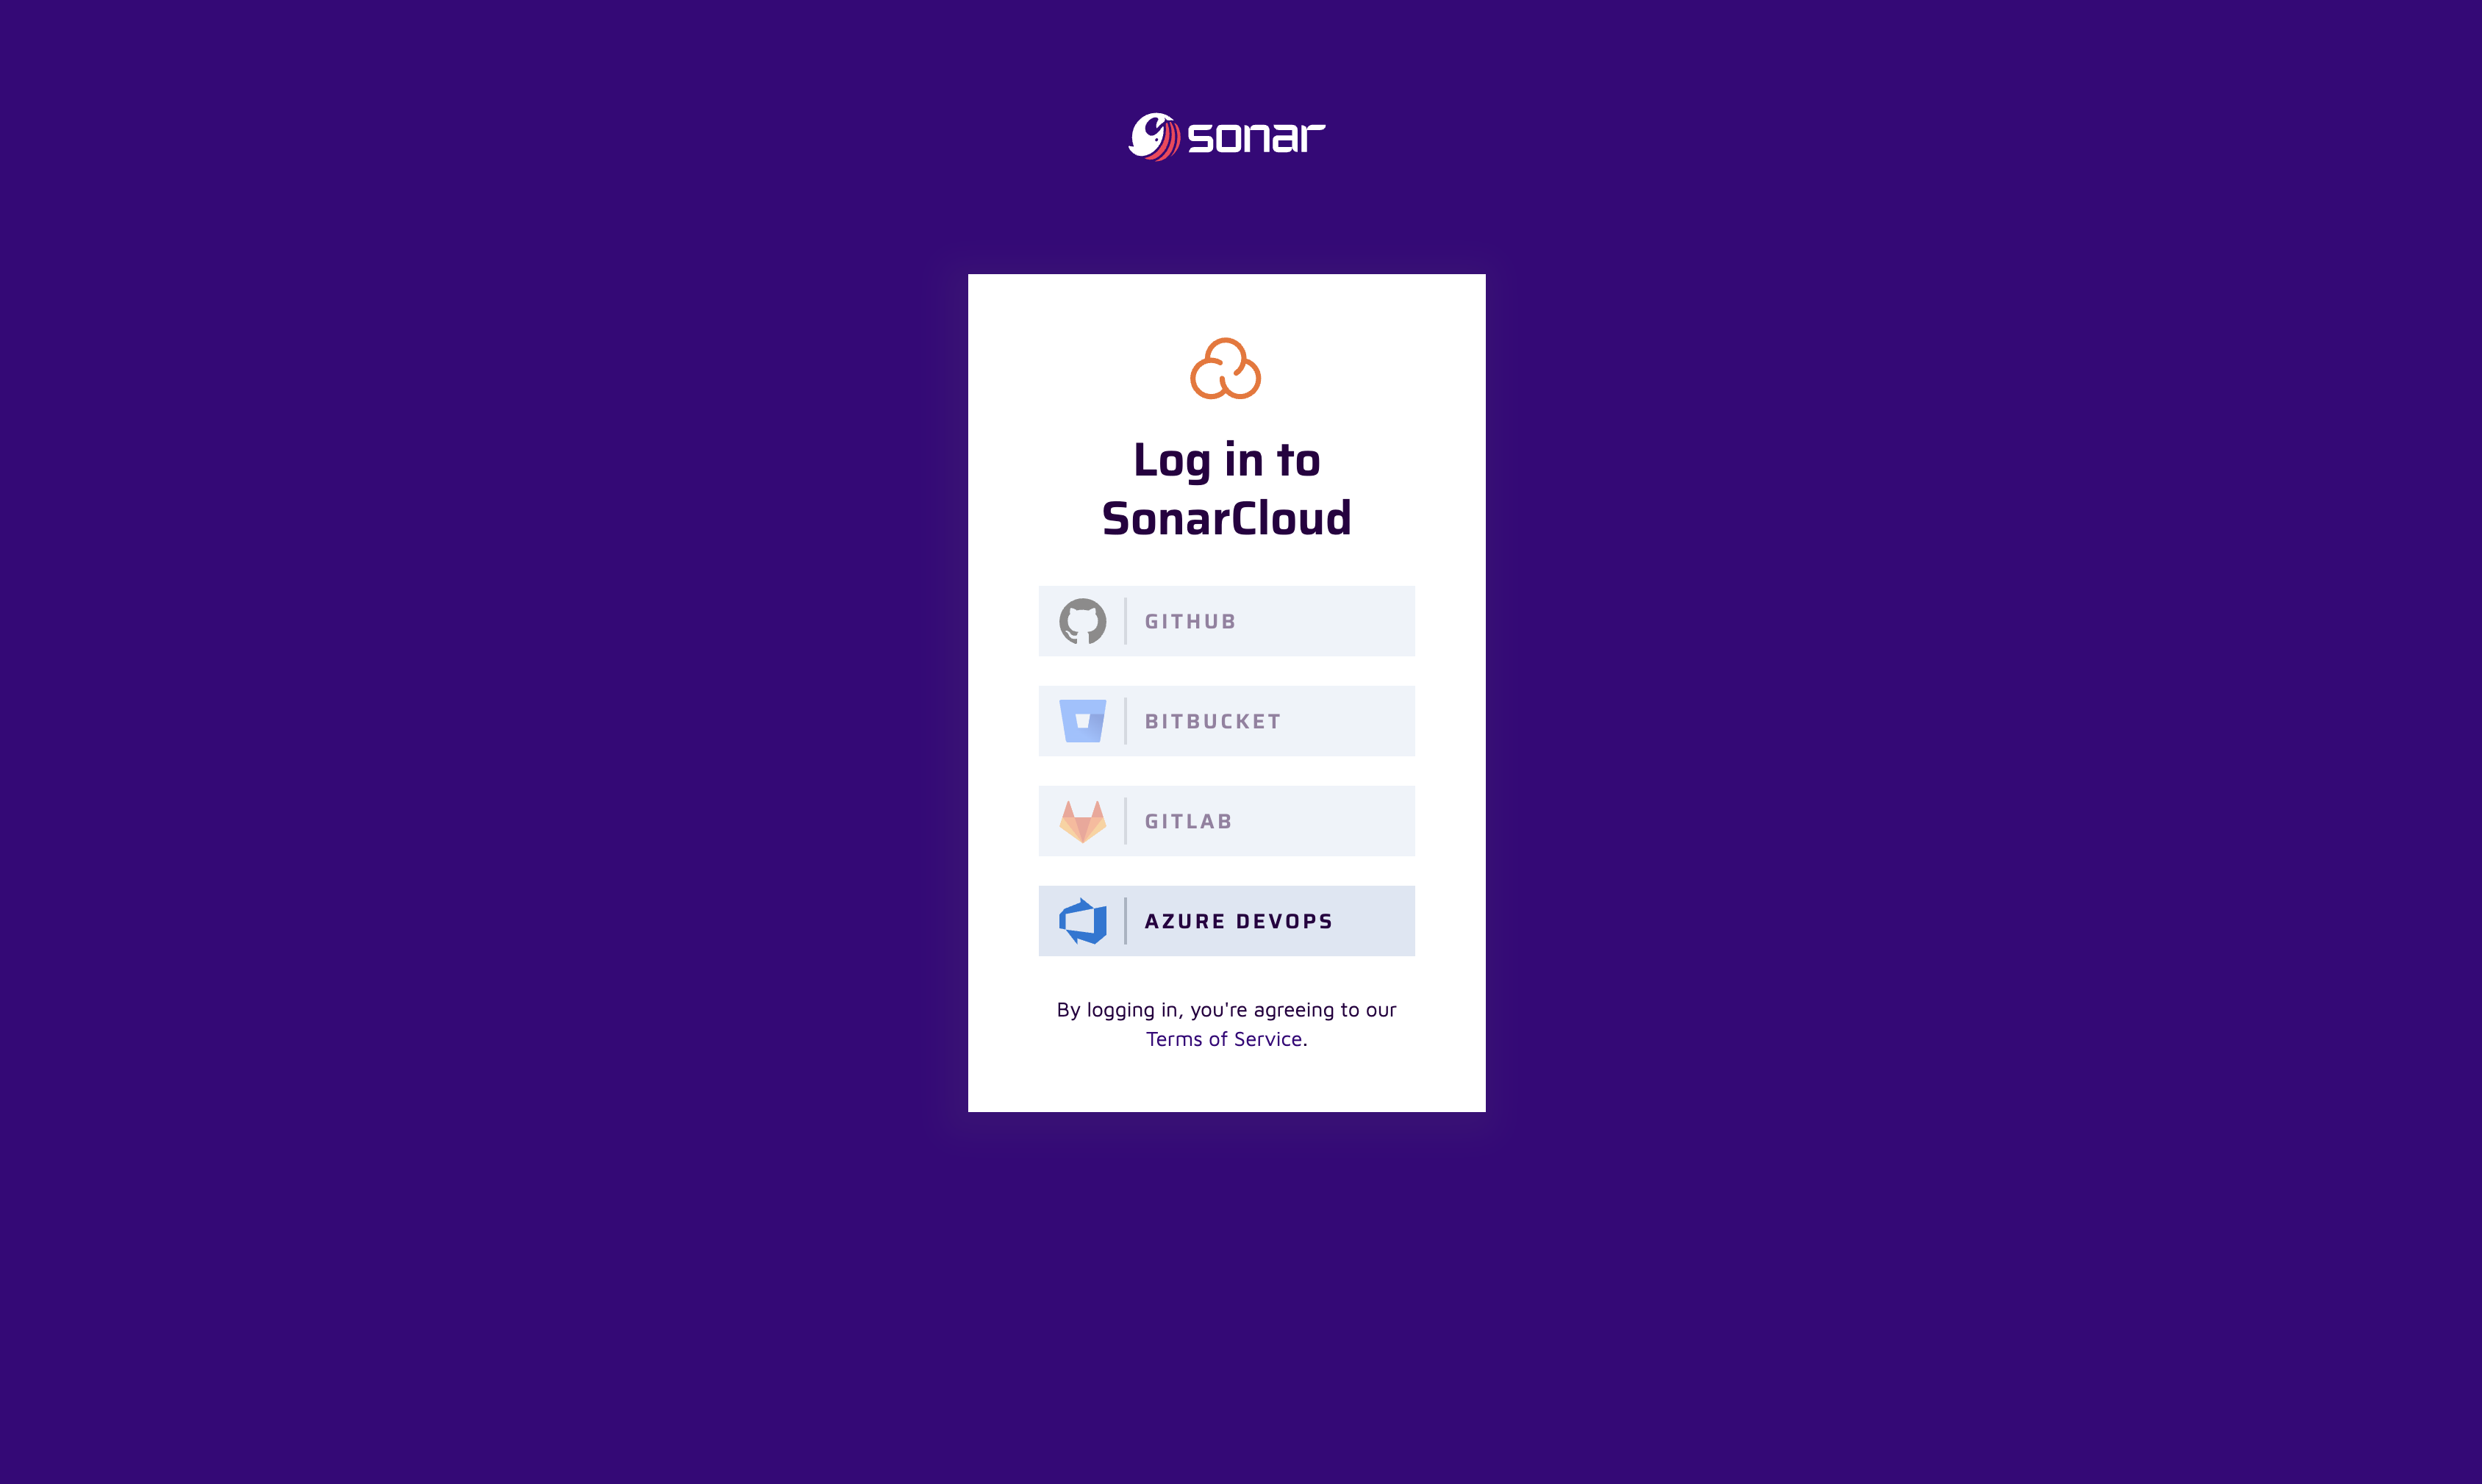
Using the same account as you used for Azure DevOps, sign into SonarCloud: https://sonarcloud.io/login
-
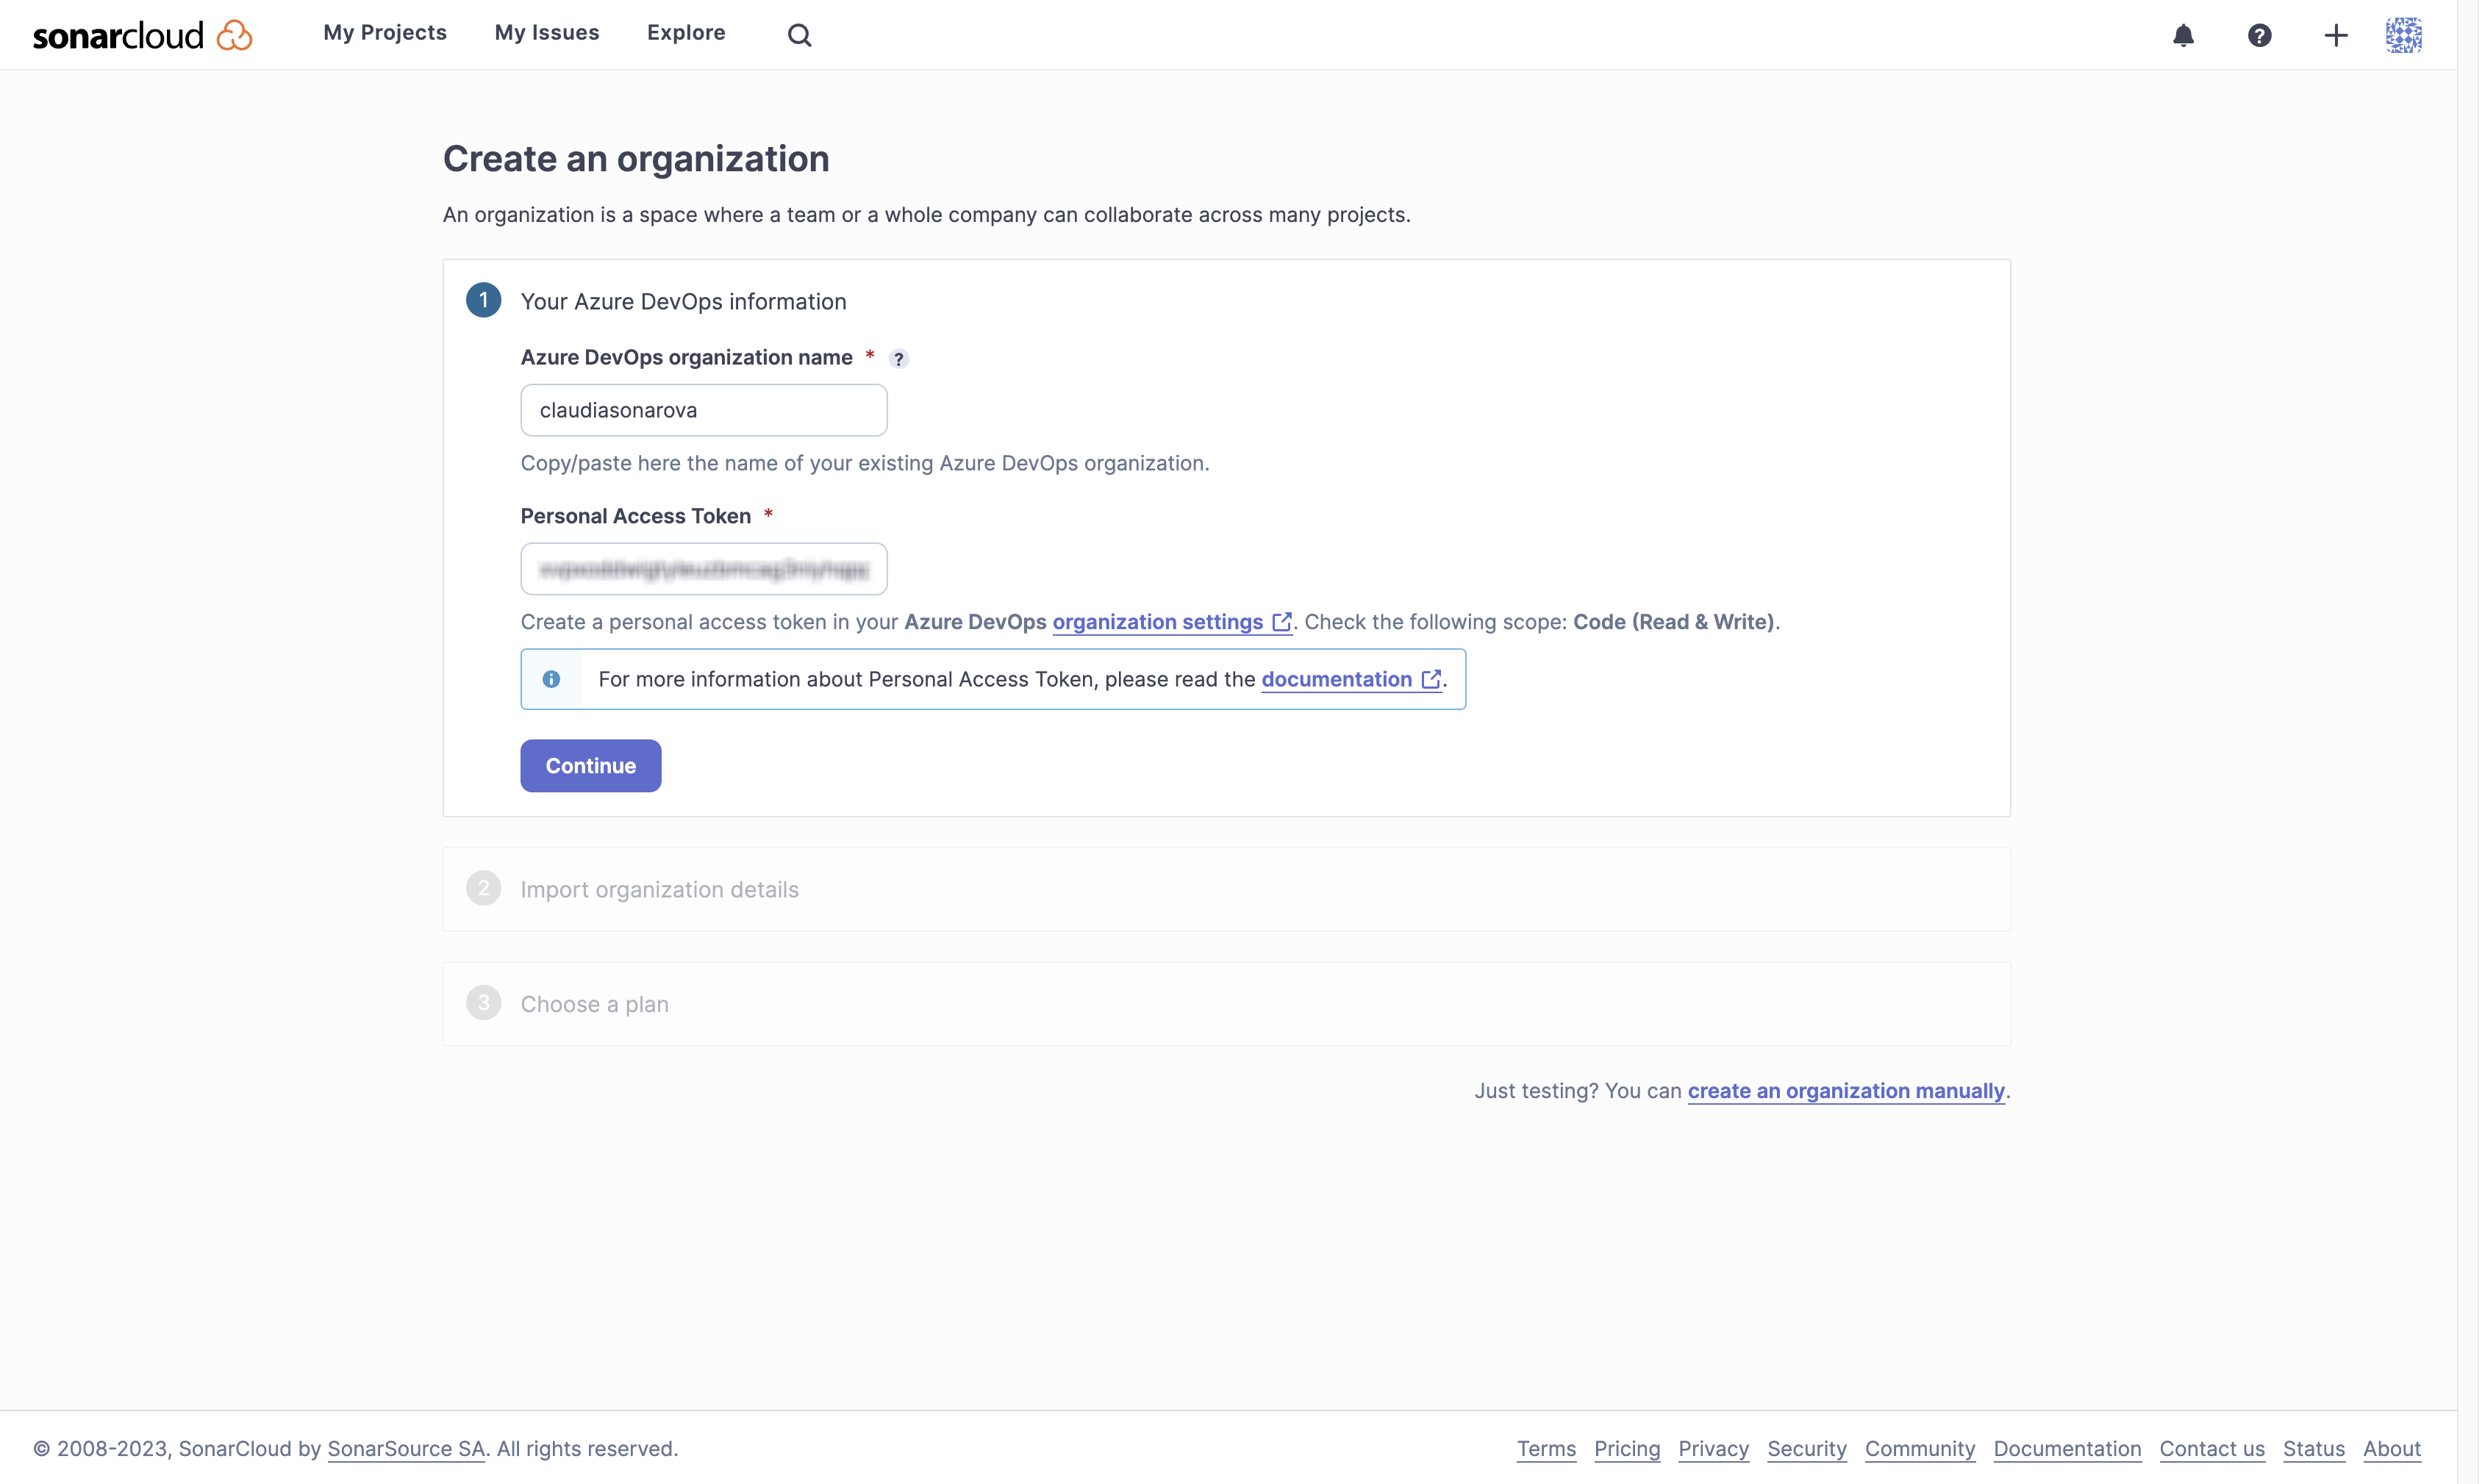
In SonarCloud, create an organization and, within that, a new project. The organization and project you set up in SonarCloud will mirror the organization and project that you set up in Azure DevOps.
Once you sign in, select Import an organization from Azure on the Welcome to SonarCloud page.

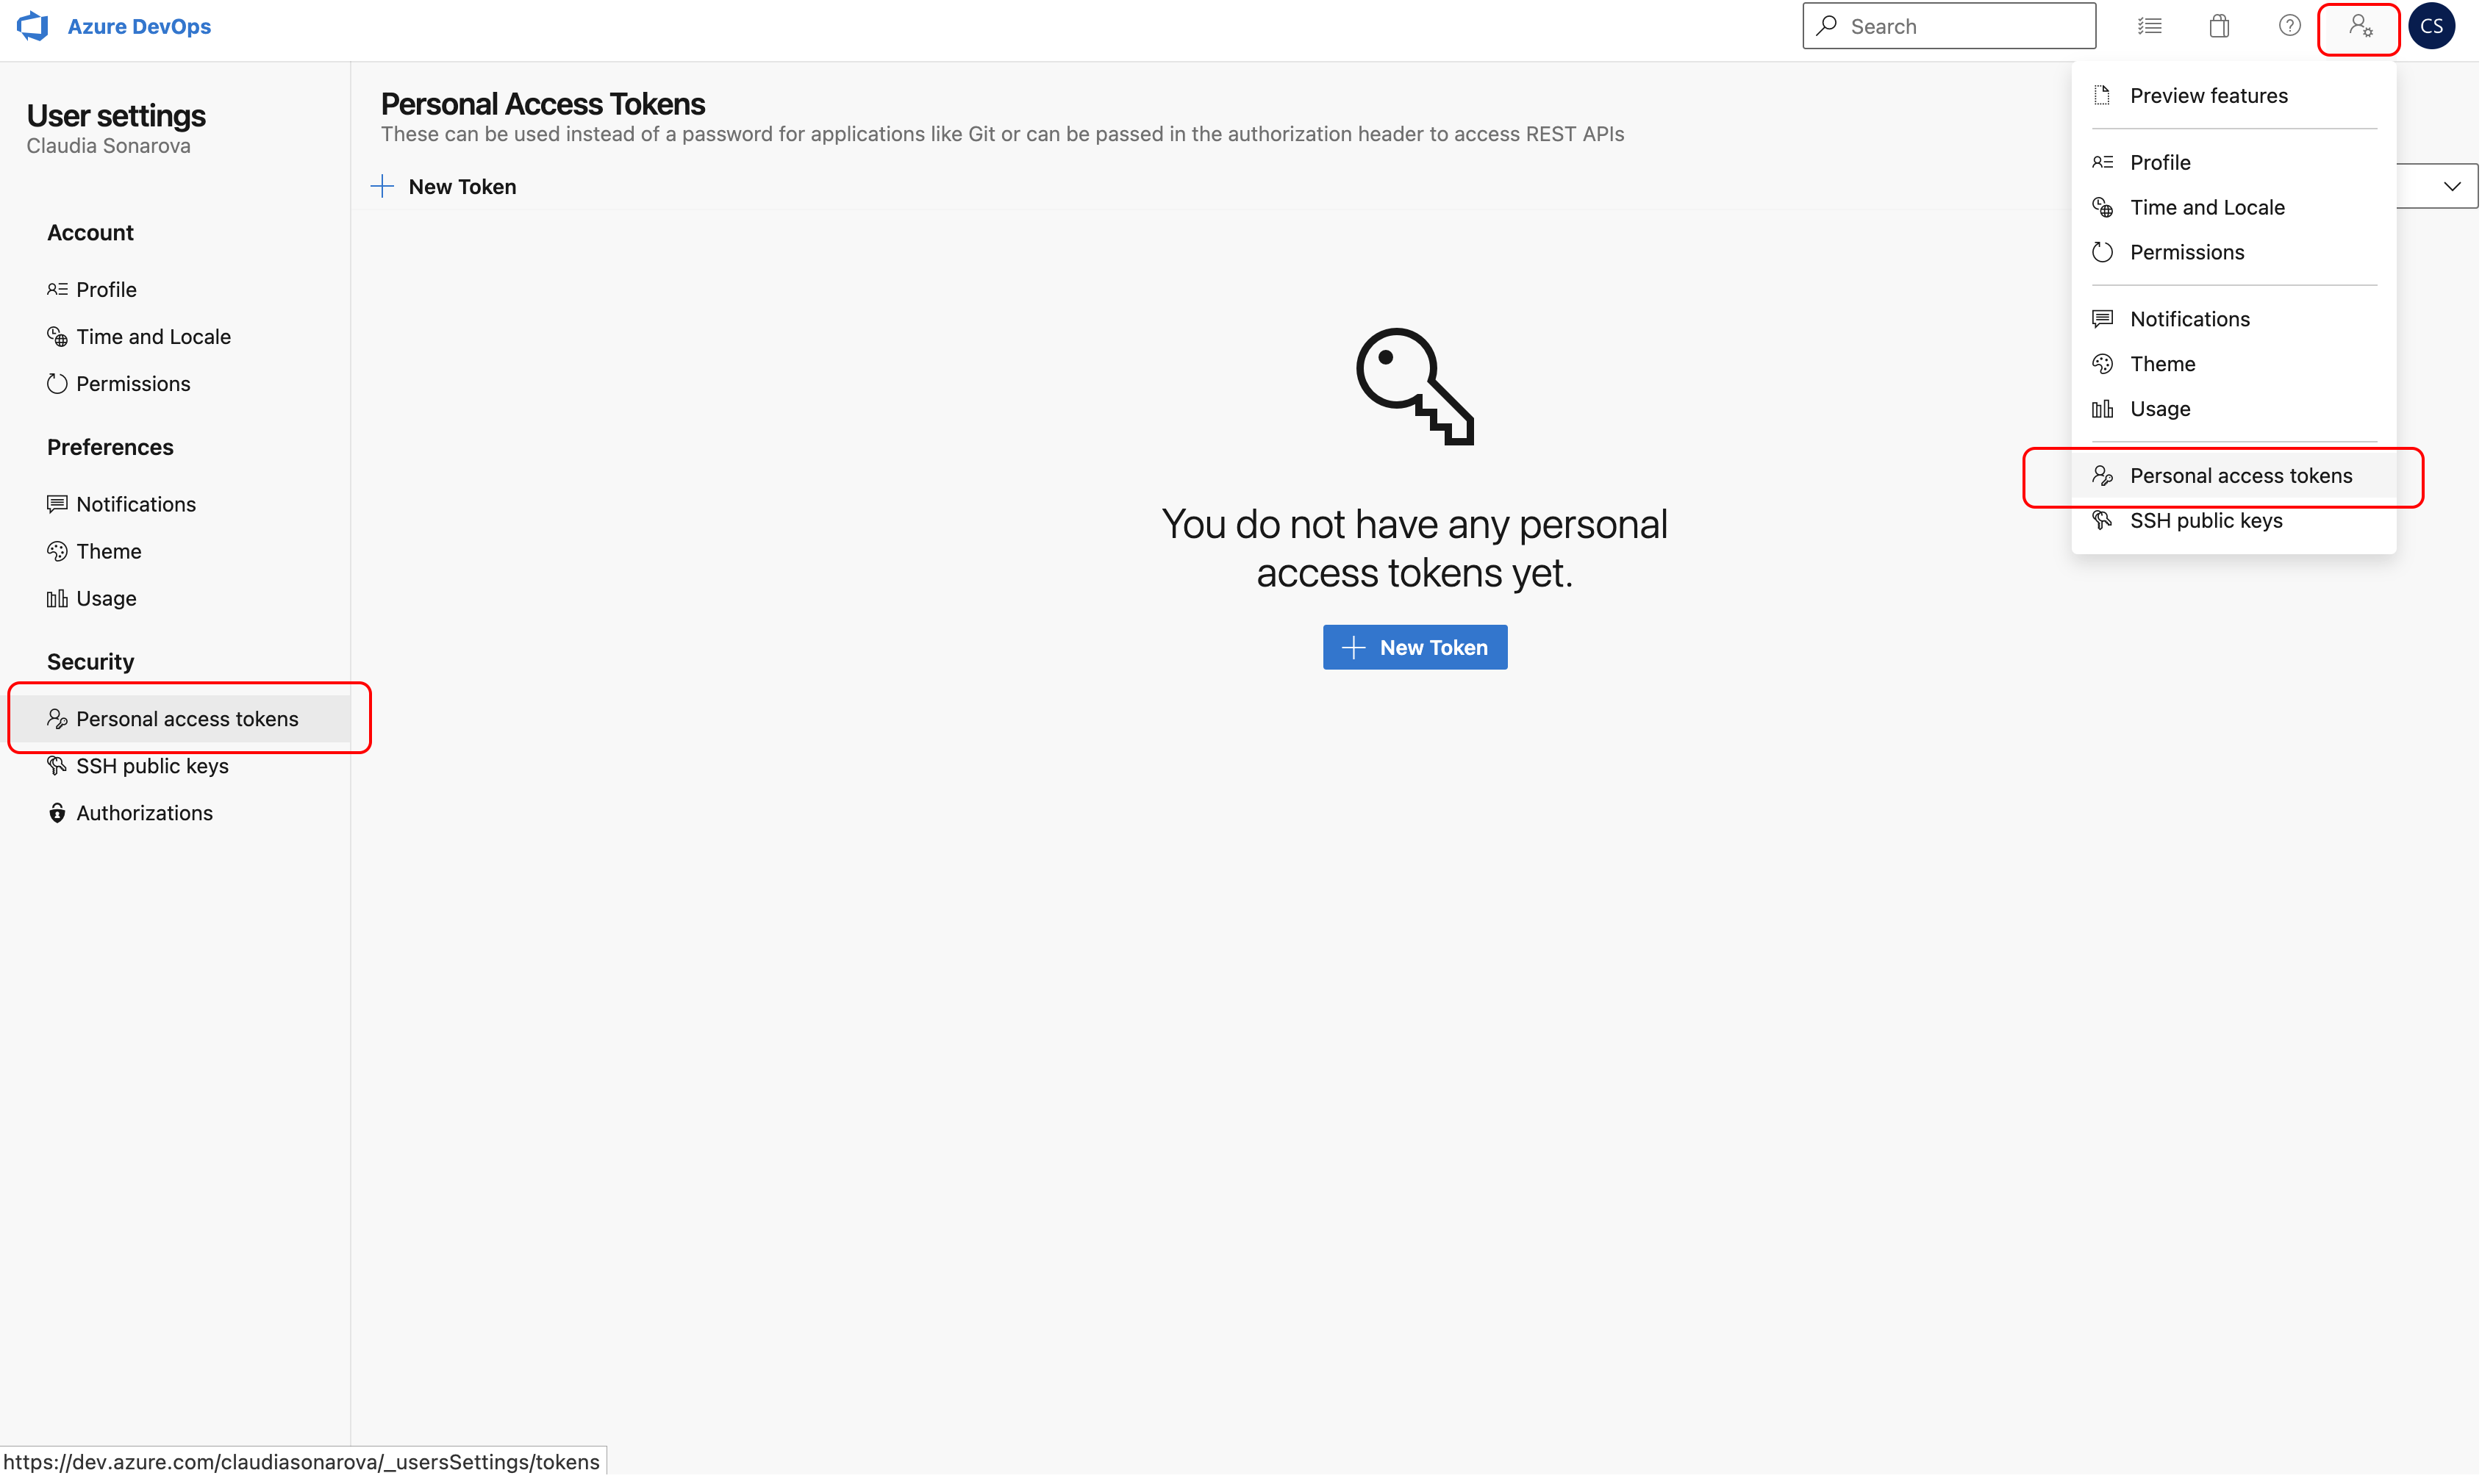
Follow the SonarCloud in-product tutorial to create an organization. First, add your Azure DevOps organization name (dev.azure.com/{YOUR-ORG}) in SonarCloud. Next in Azure, go to Azure DevOps > User settings > Security > Personal access tokens to create a new Personal Access Token (PAT); the SonarCloud in-product tutorial provides a link to Azure’s User settings so if you are doing this in parallel, creating a PAT will be easy. See the Microsoft documentation to Create a PAT if more details are needed.
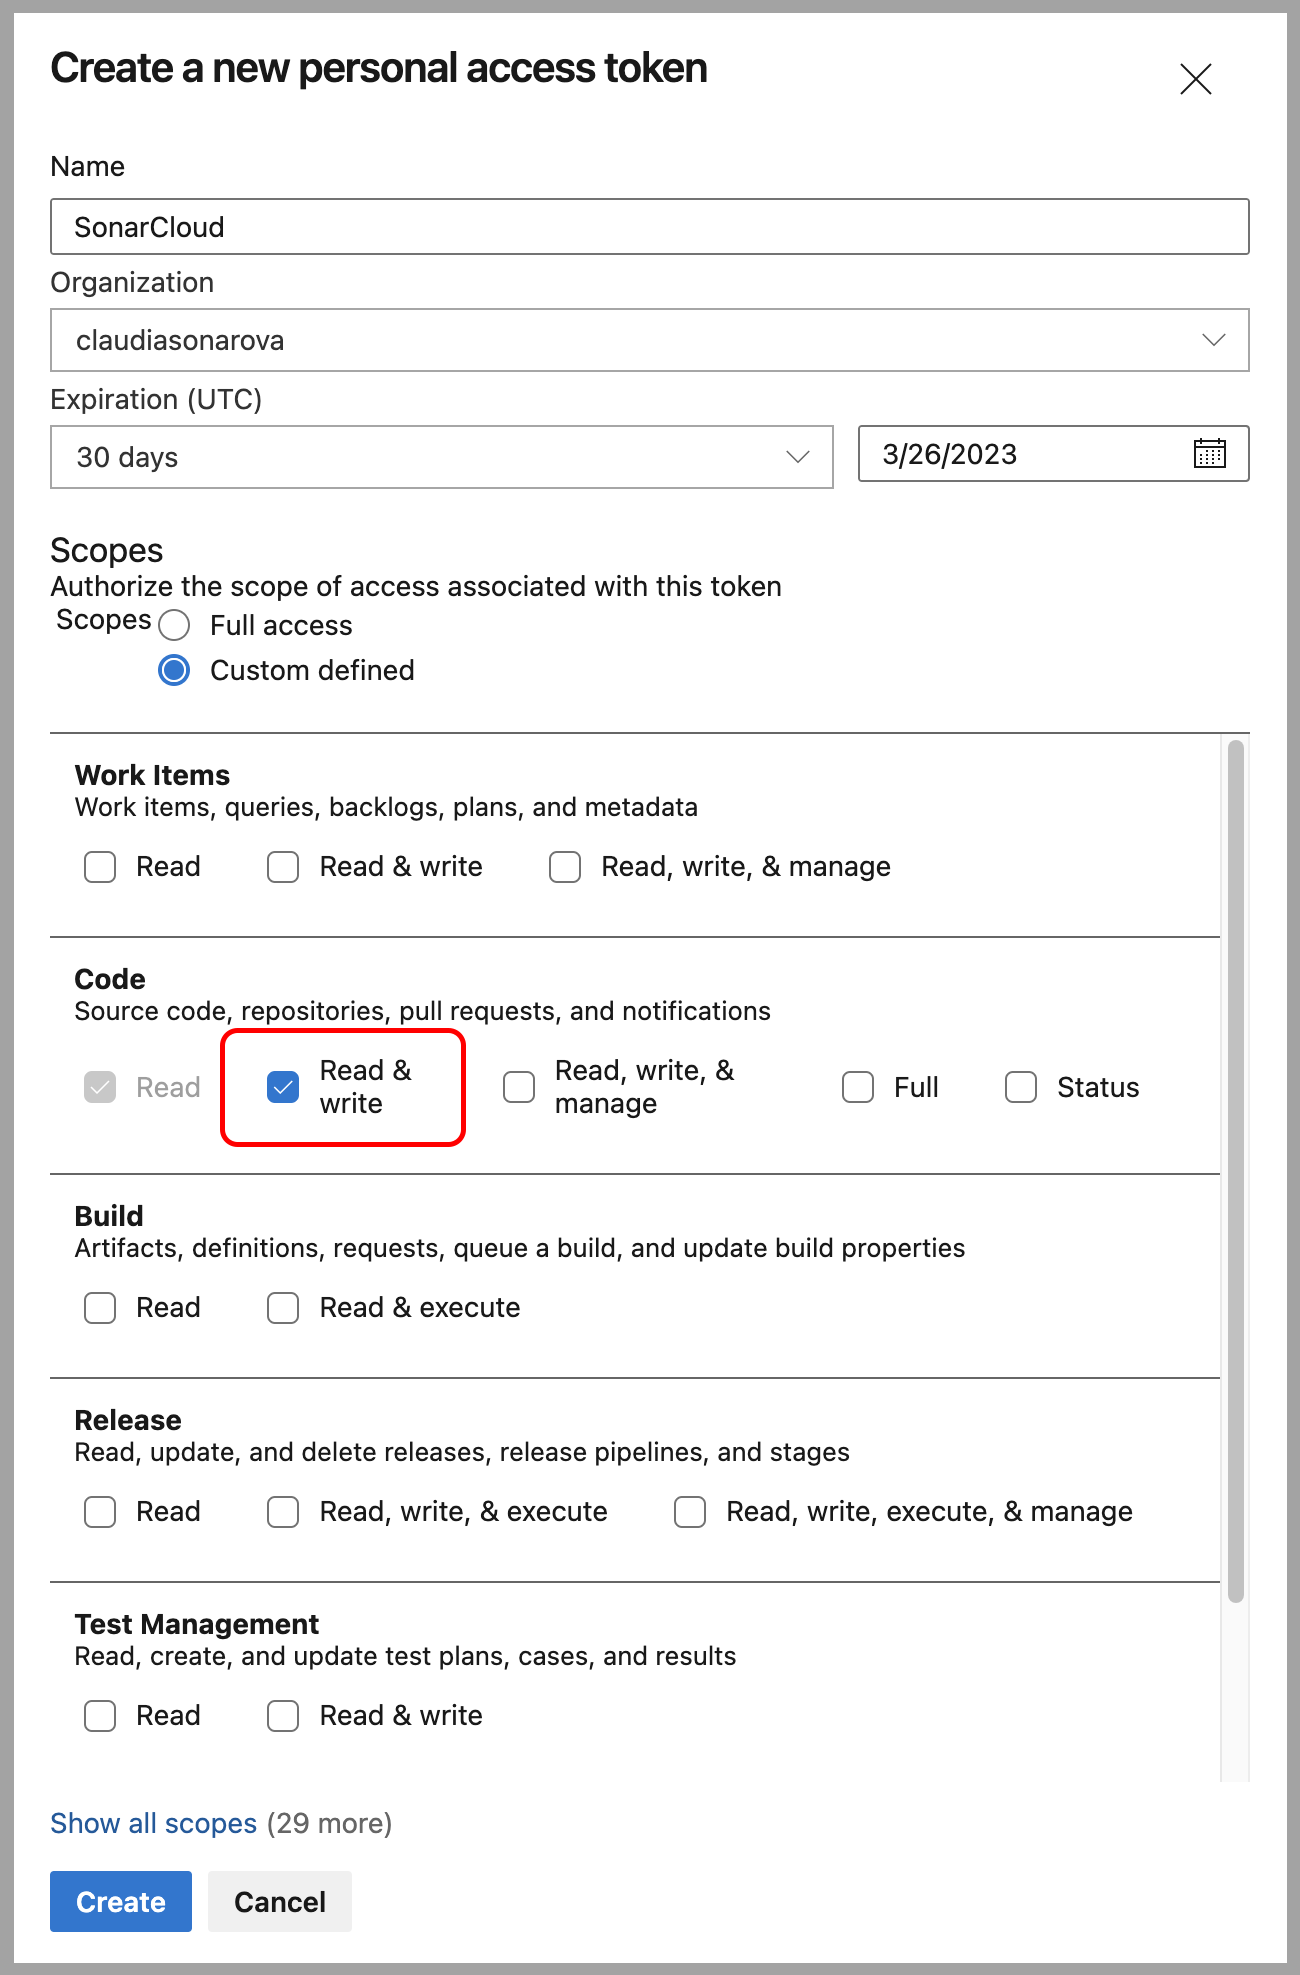
In Azure, define the token’s Name and select the correct Organization (if you have multiple) from the list. Then, navigate to Scopes > Code and select Read & Write before you Create the new token.
Copy your PAT from Azure and paste it into SonarCloud before continuing with the SonarCloud in-product tutorial.
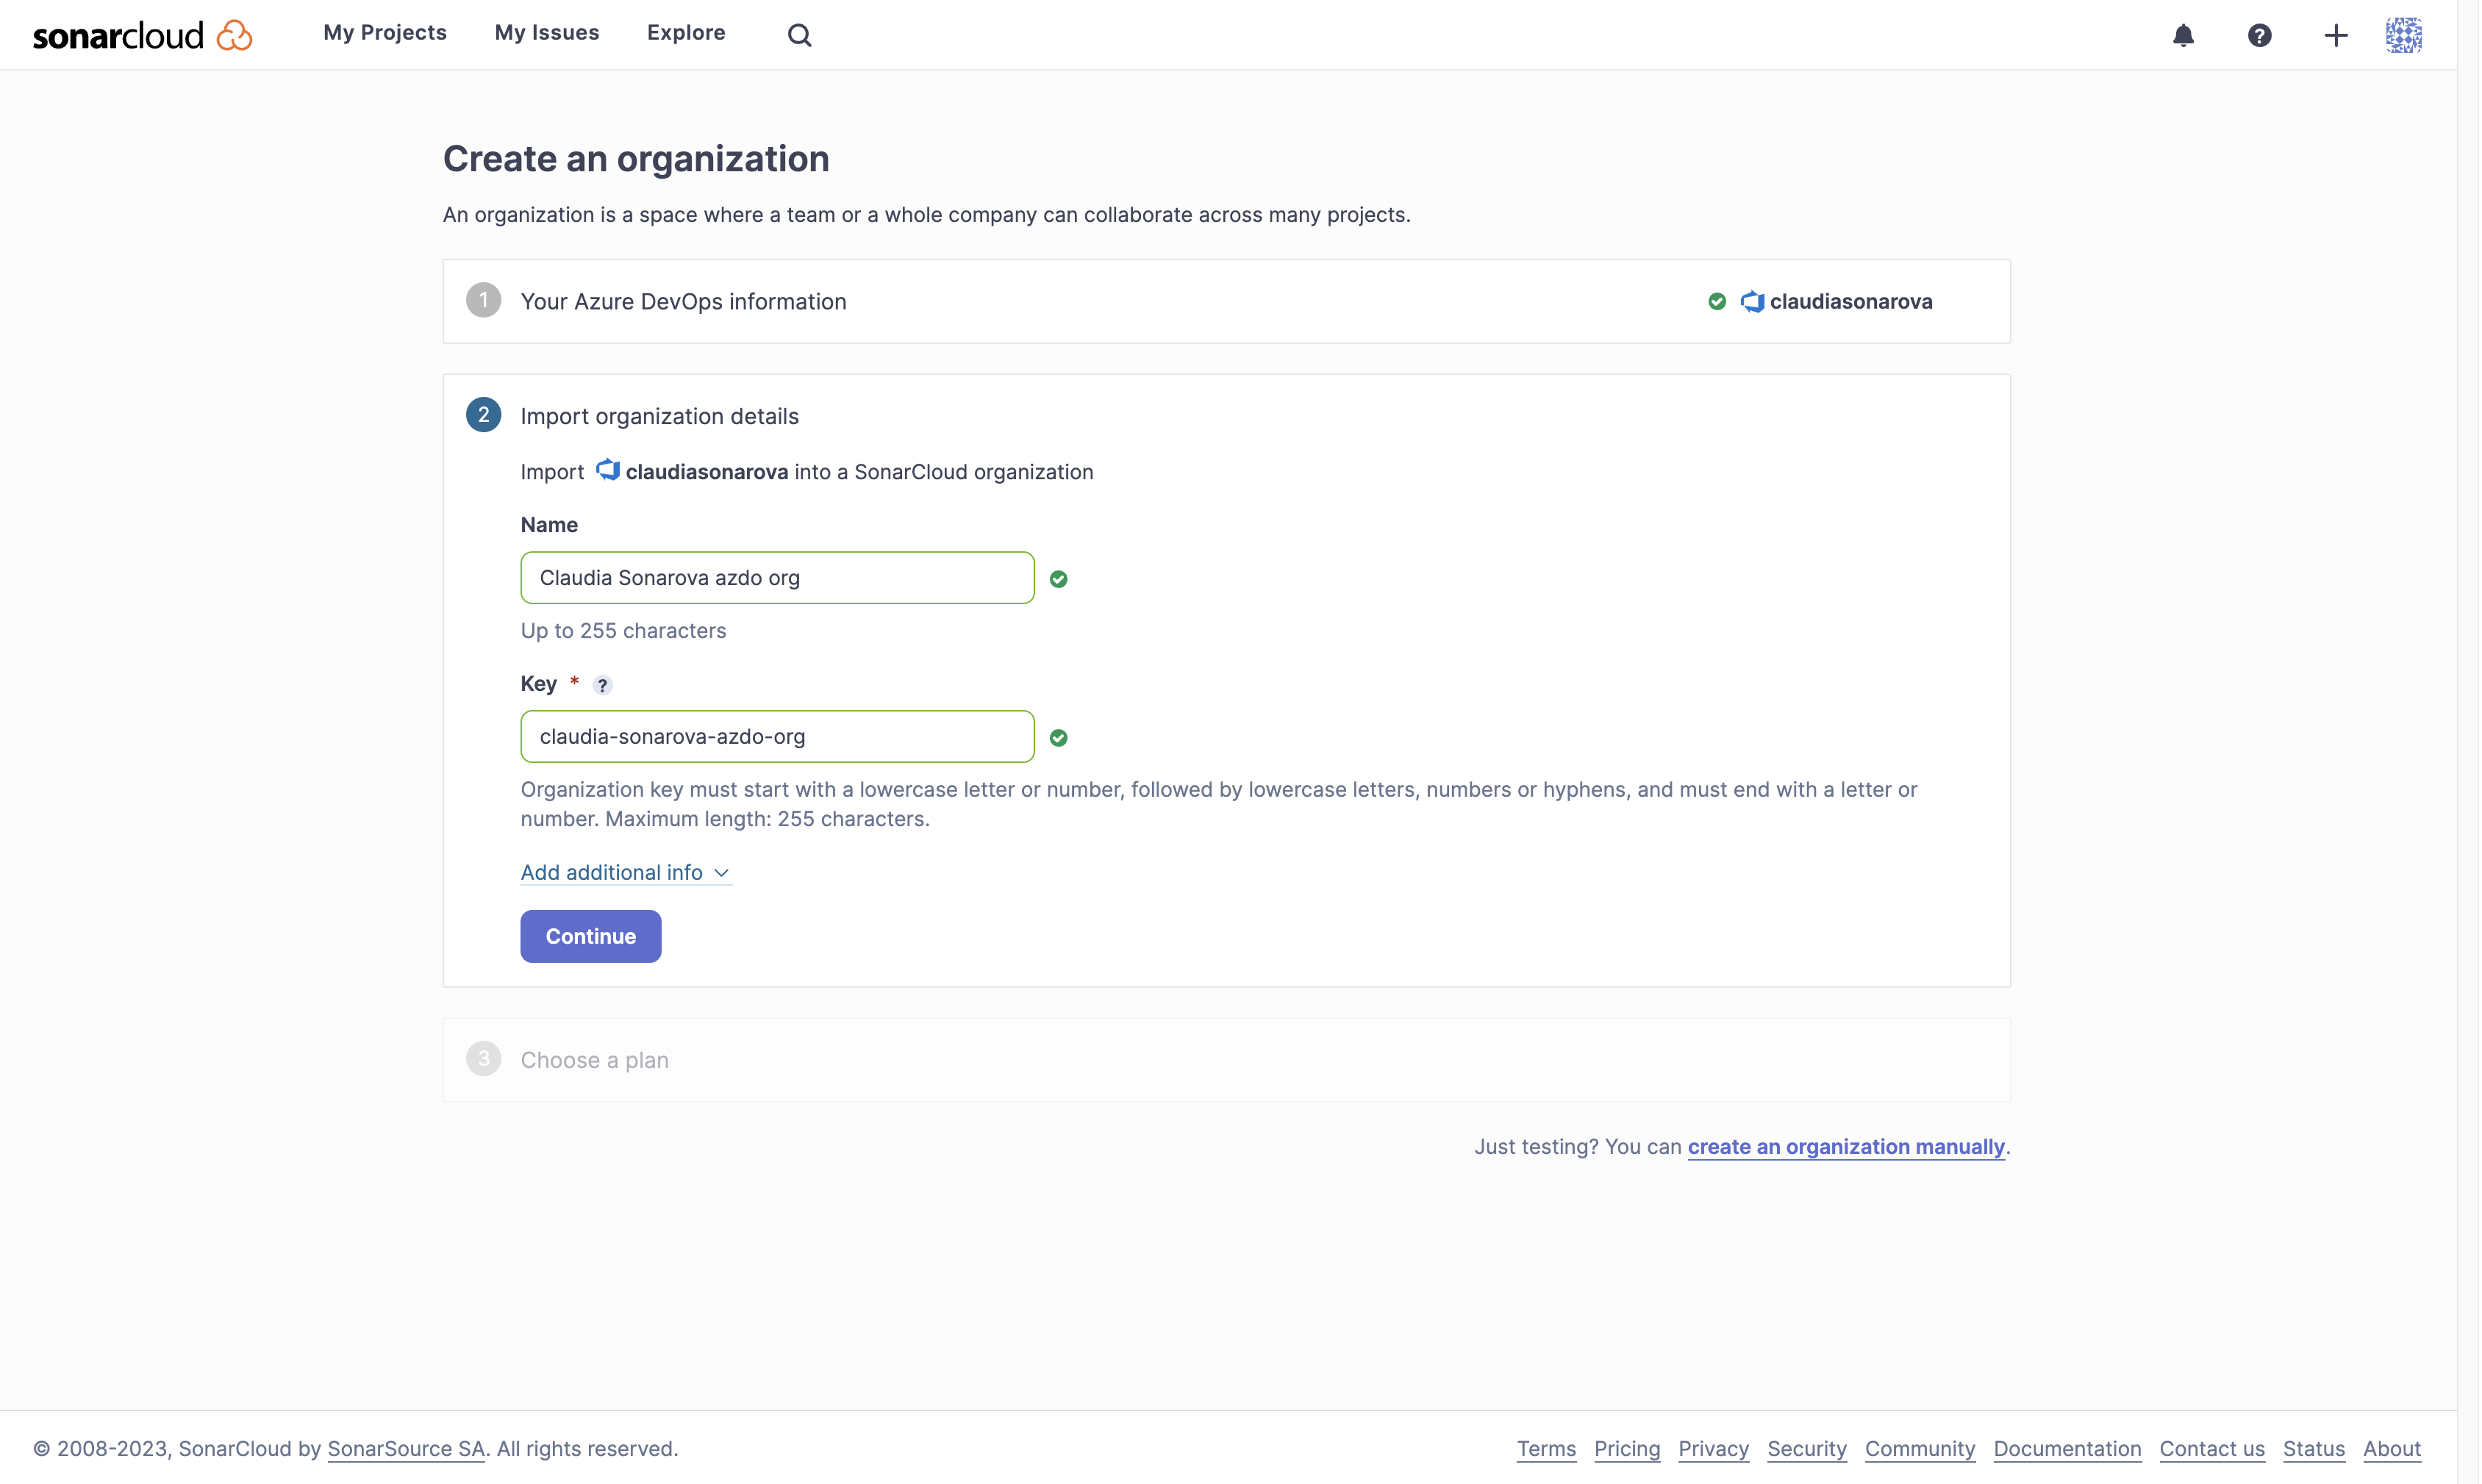
Define an Organization Key. A key will be automatically formatted for you if you define the Name above. Note that the name/key must be unique within the SonarCloud system or you cannot continue. You have an opportunity to add additional info if desired.
Select Continue to move to the final step.
Lastly, choose your plan. For this example, we selected a free plan (that is, one for public repos only), but you can choose a paid plan if you intend to have private repos:
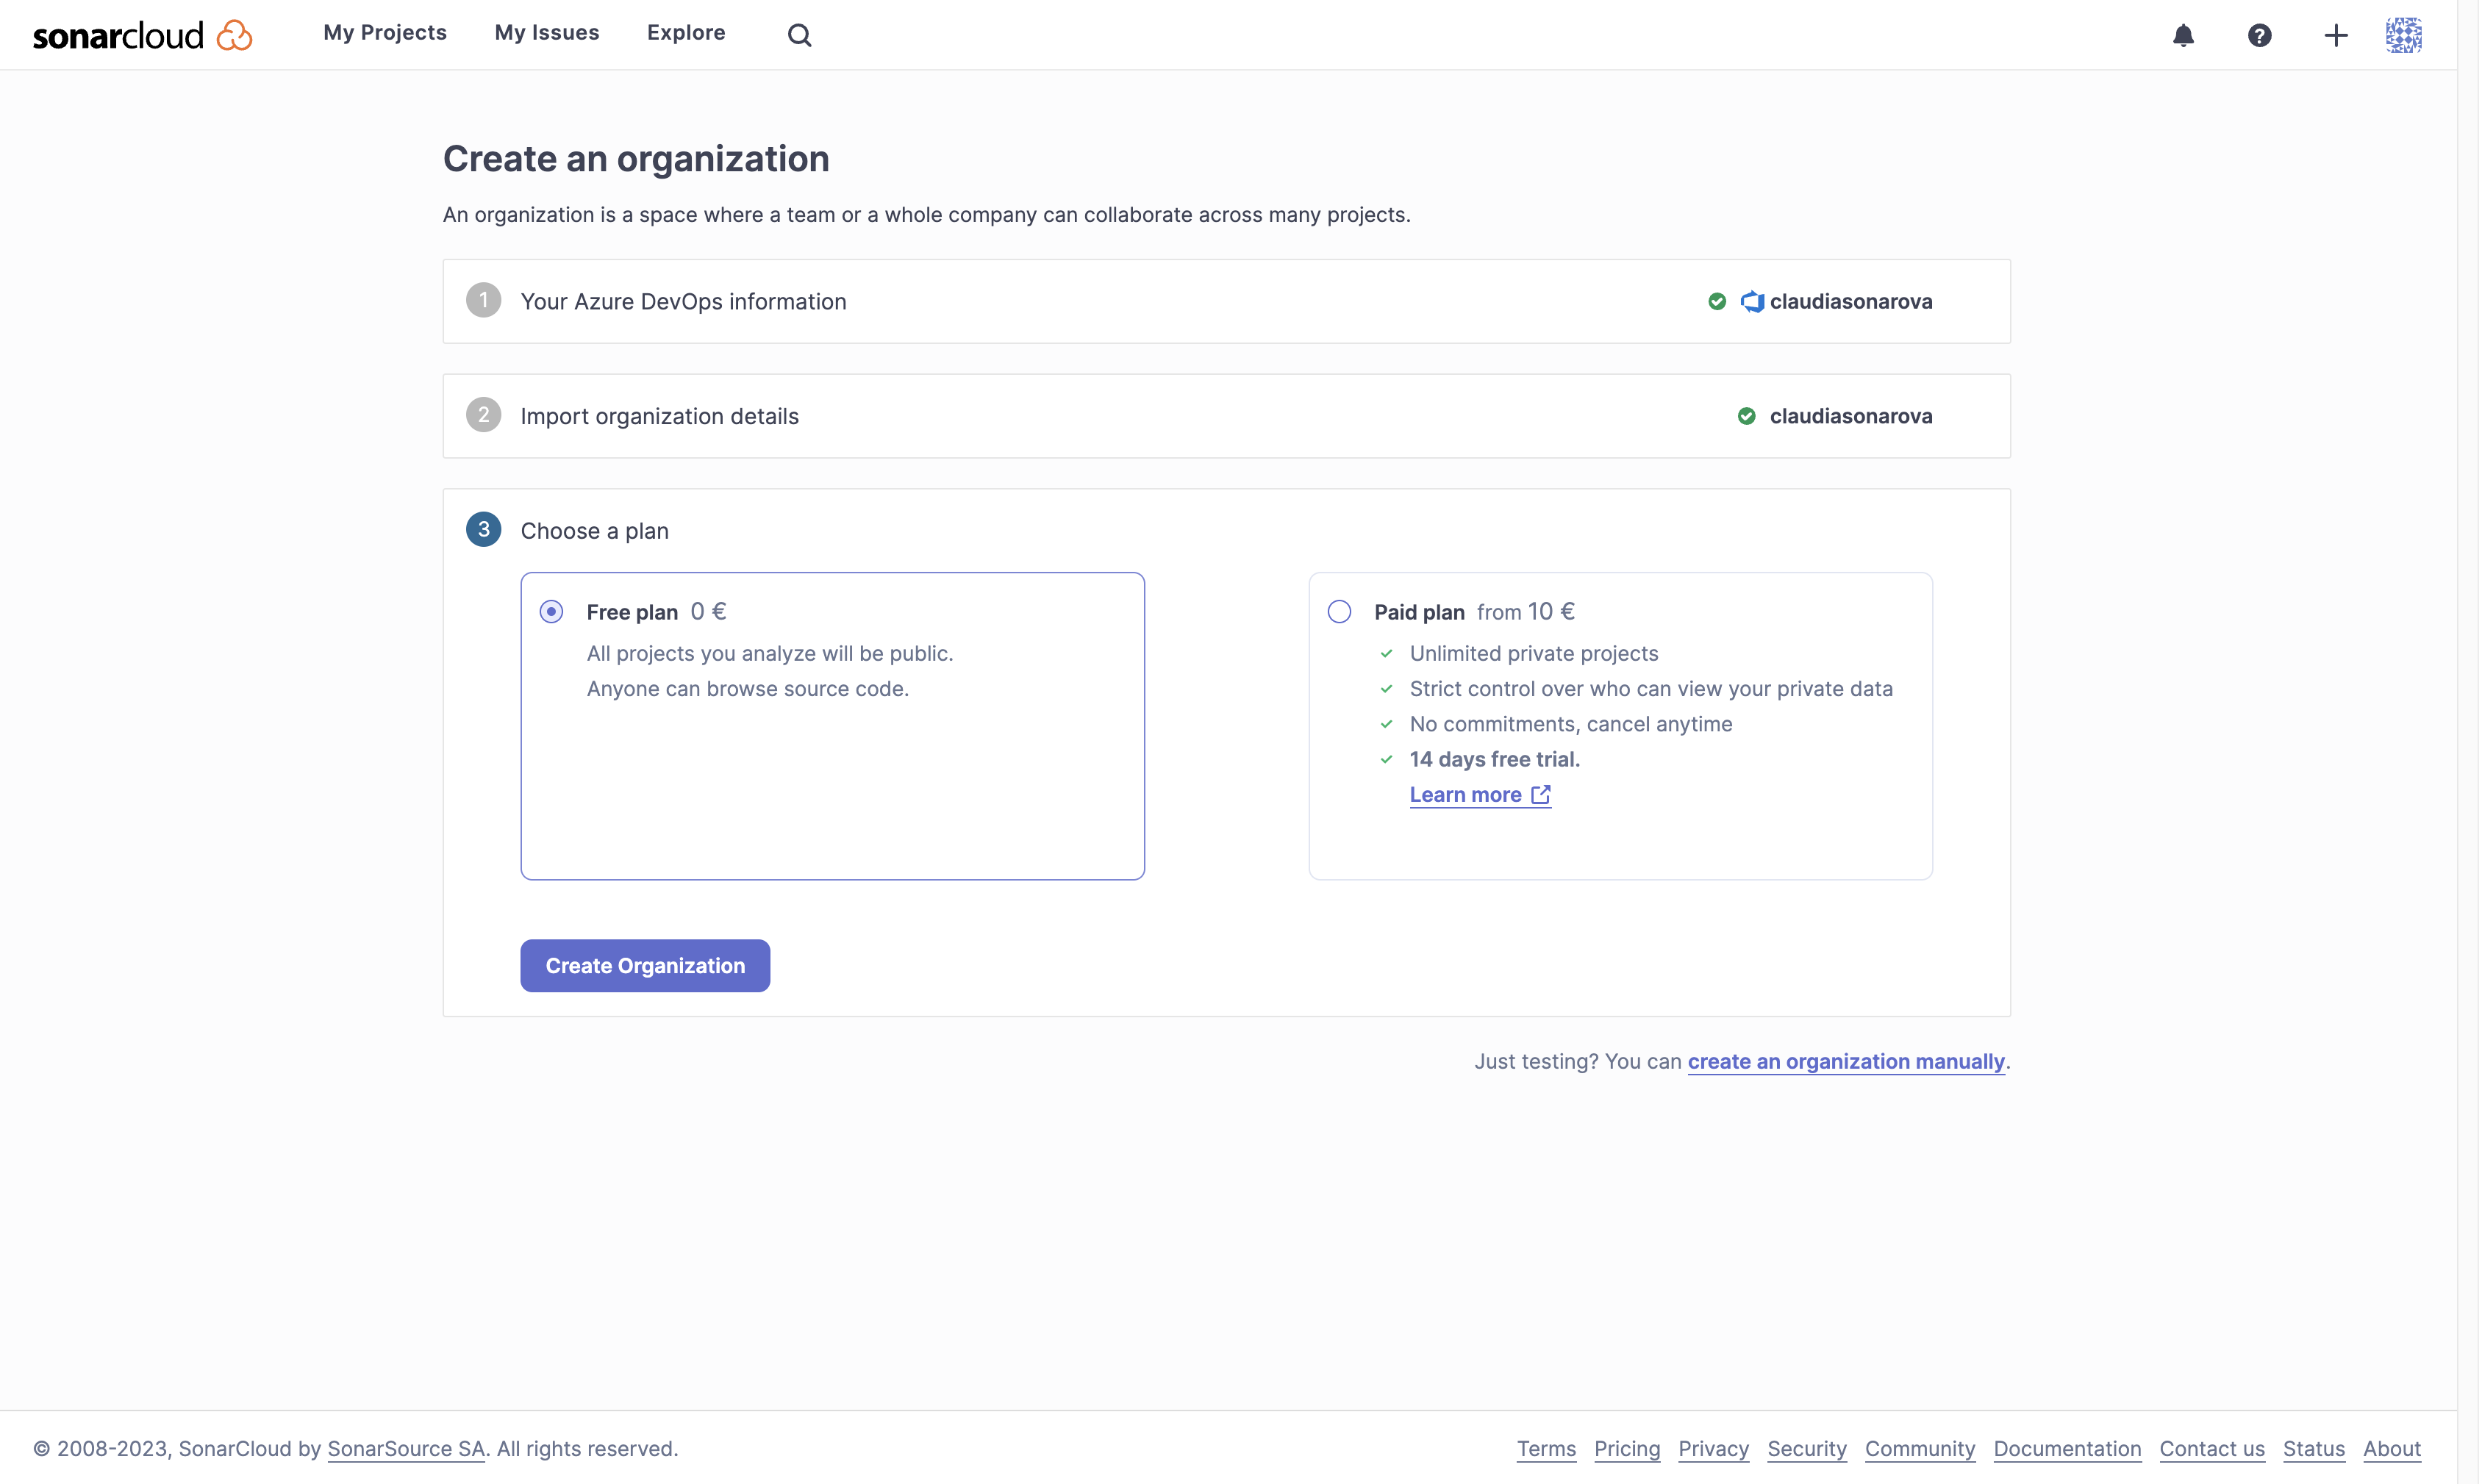
You have now created the SonarCloud organization that will mirror your Azure DevOps organization.
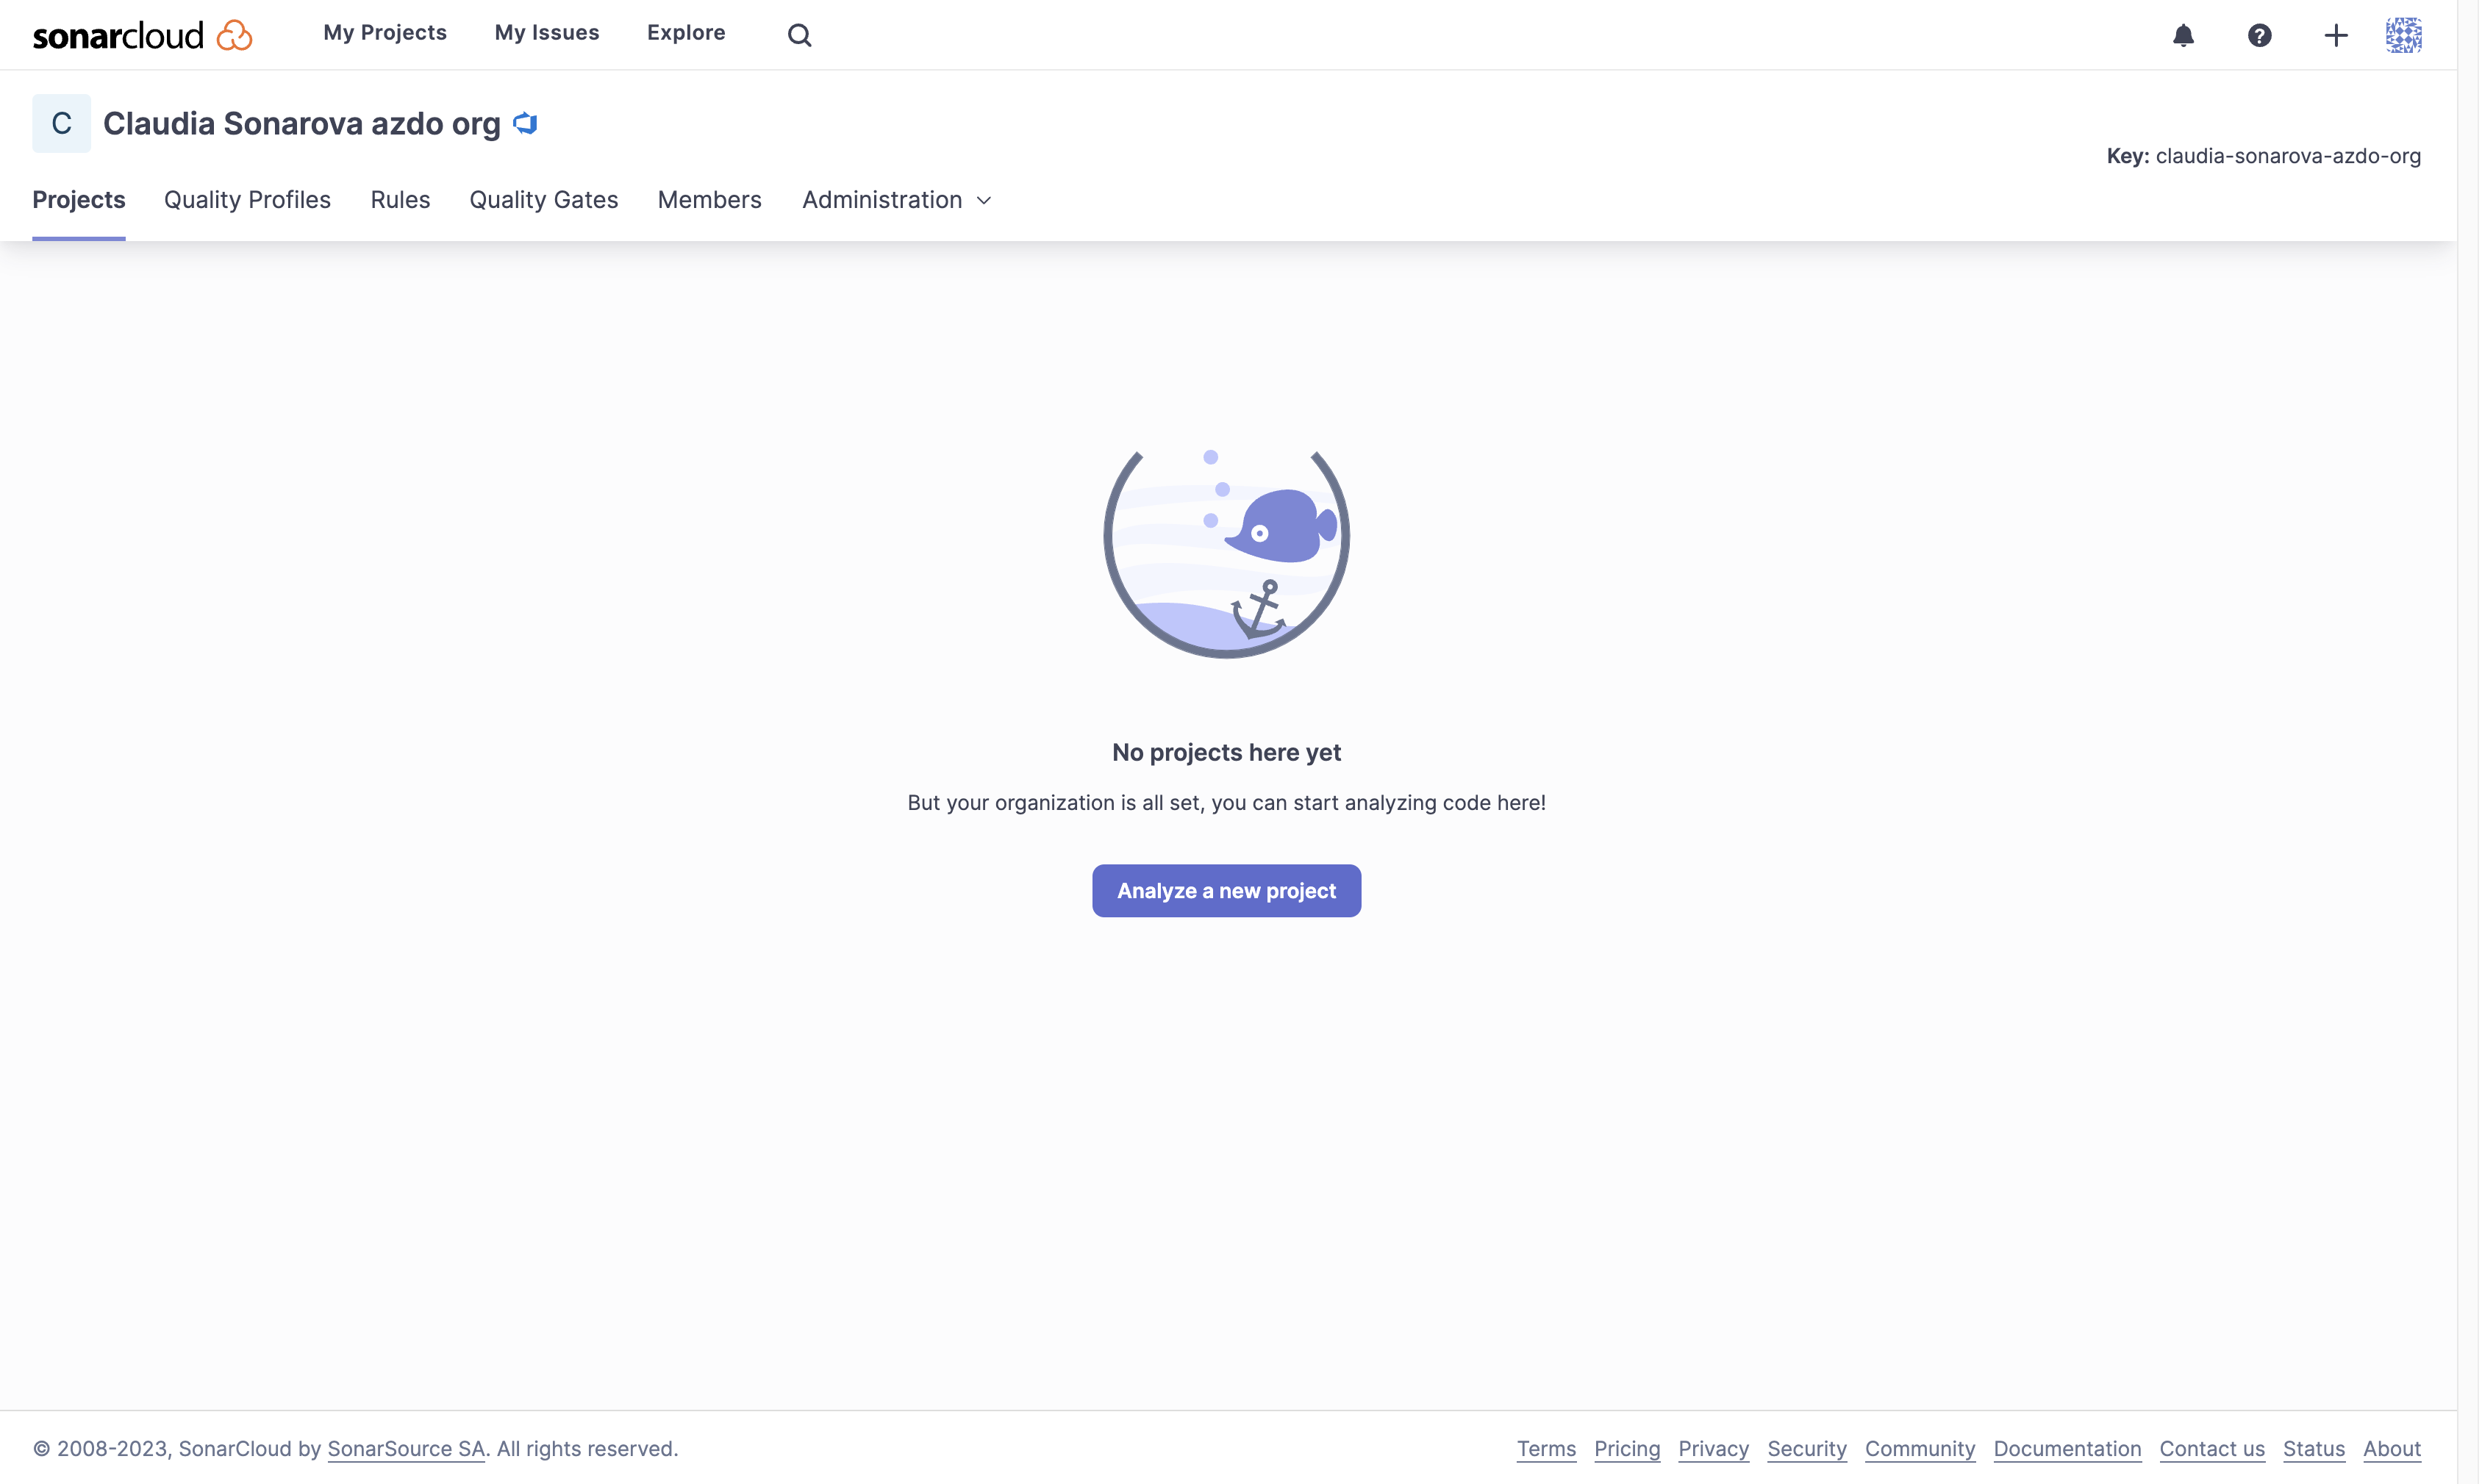
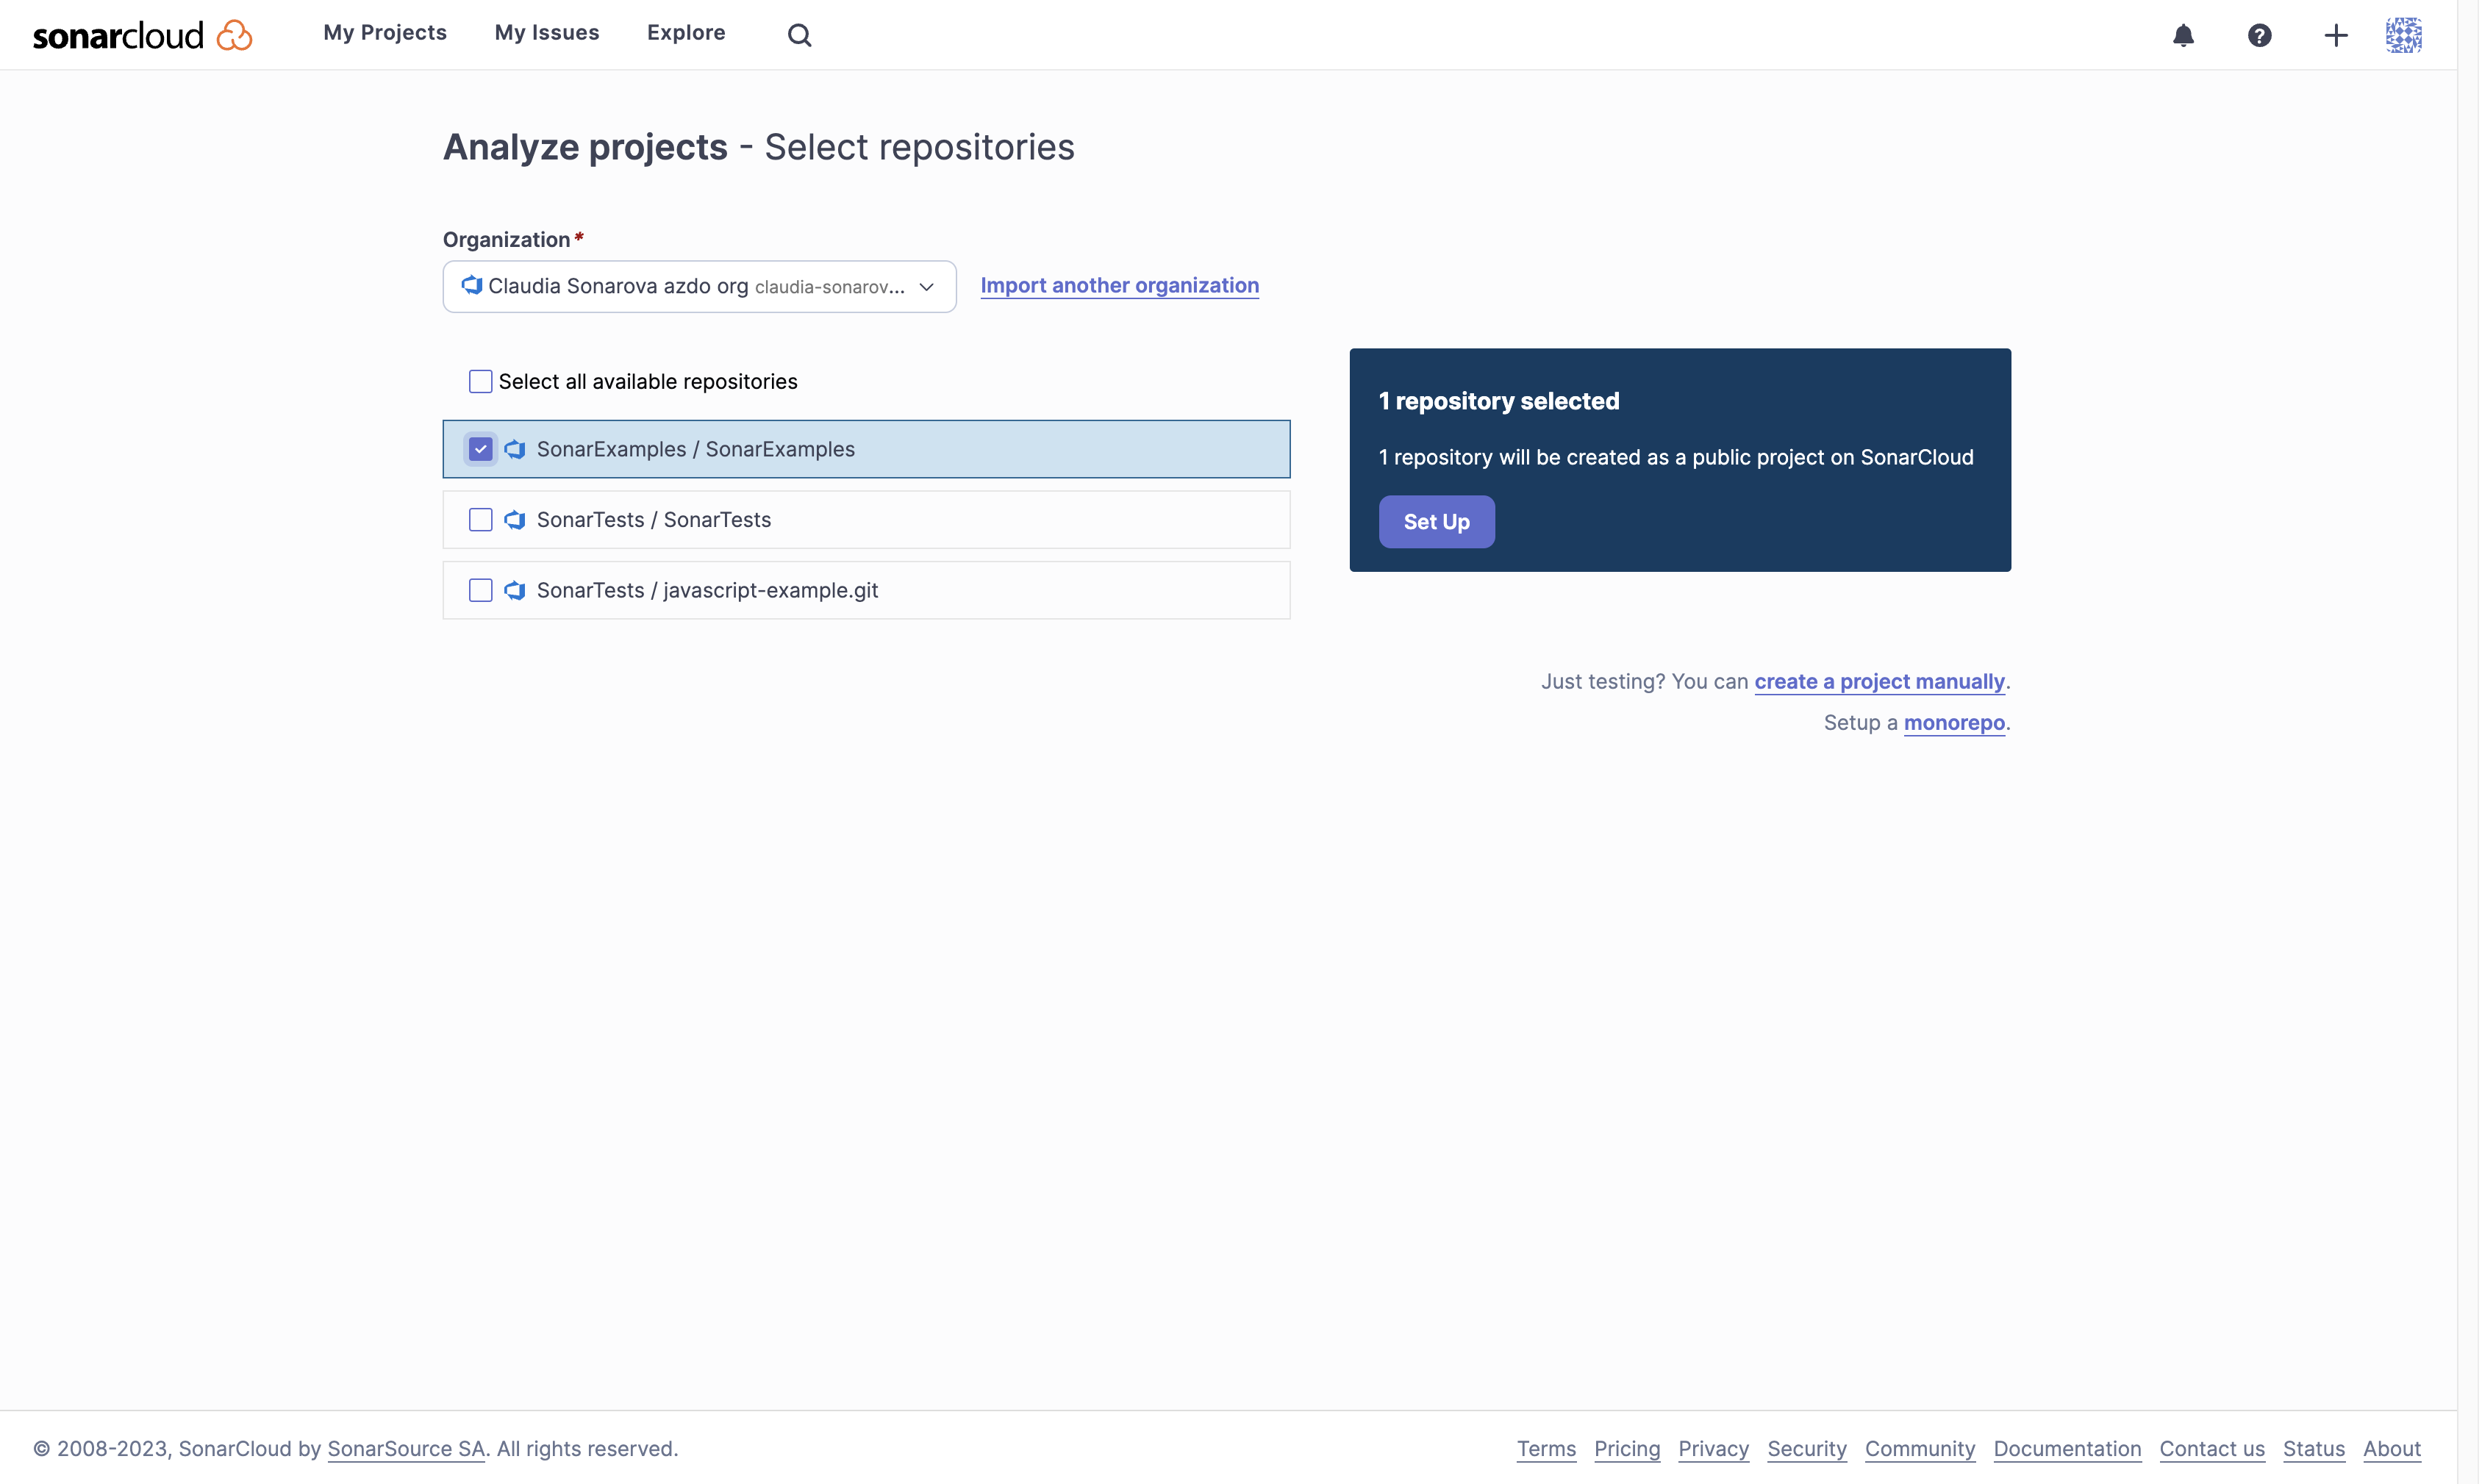
Now, from within your new organization, create a SonarCloud project that will mirror the Azure DevOps project SonarExamples we imported earlier. Select Analyze a new project to continue.
Choose your Azure DevOps project(s) to add and select Set Up to create a project on SonarCloud.
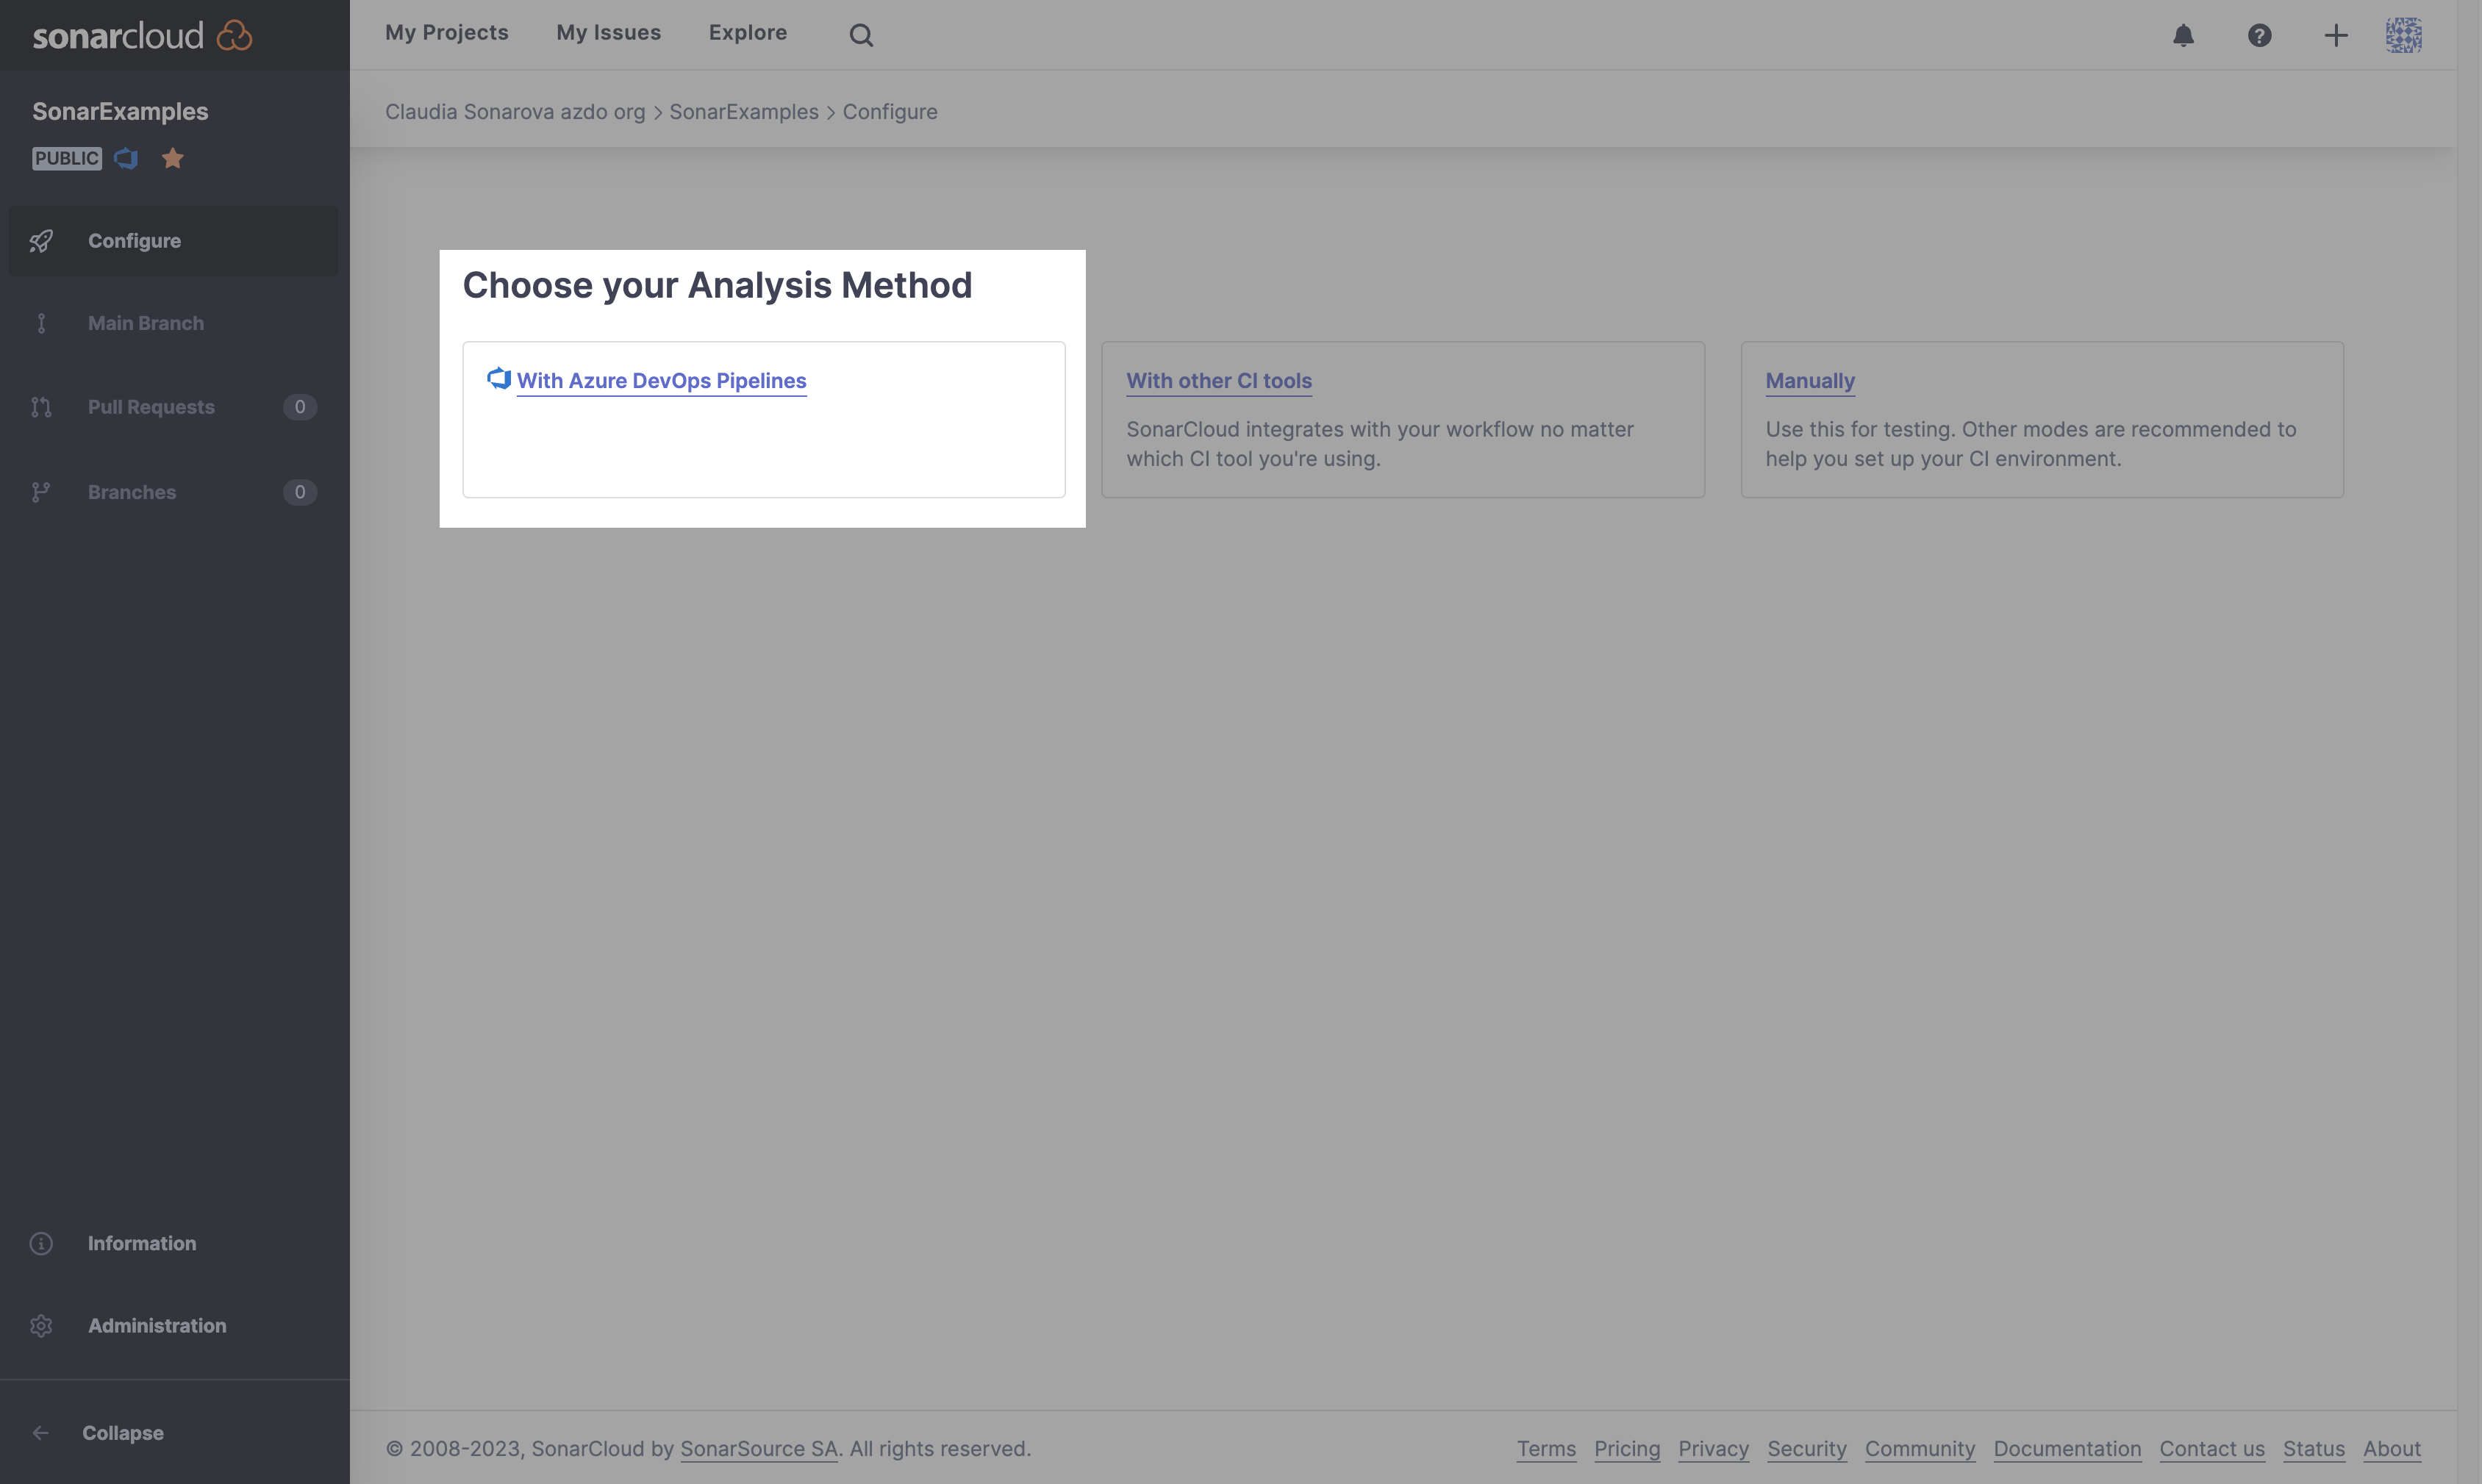
Let’s follow the SonarCloud in-product tutorial to set up the scanning in Azure Pipelines. Select With Azure DevOps Pipelines to get started:
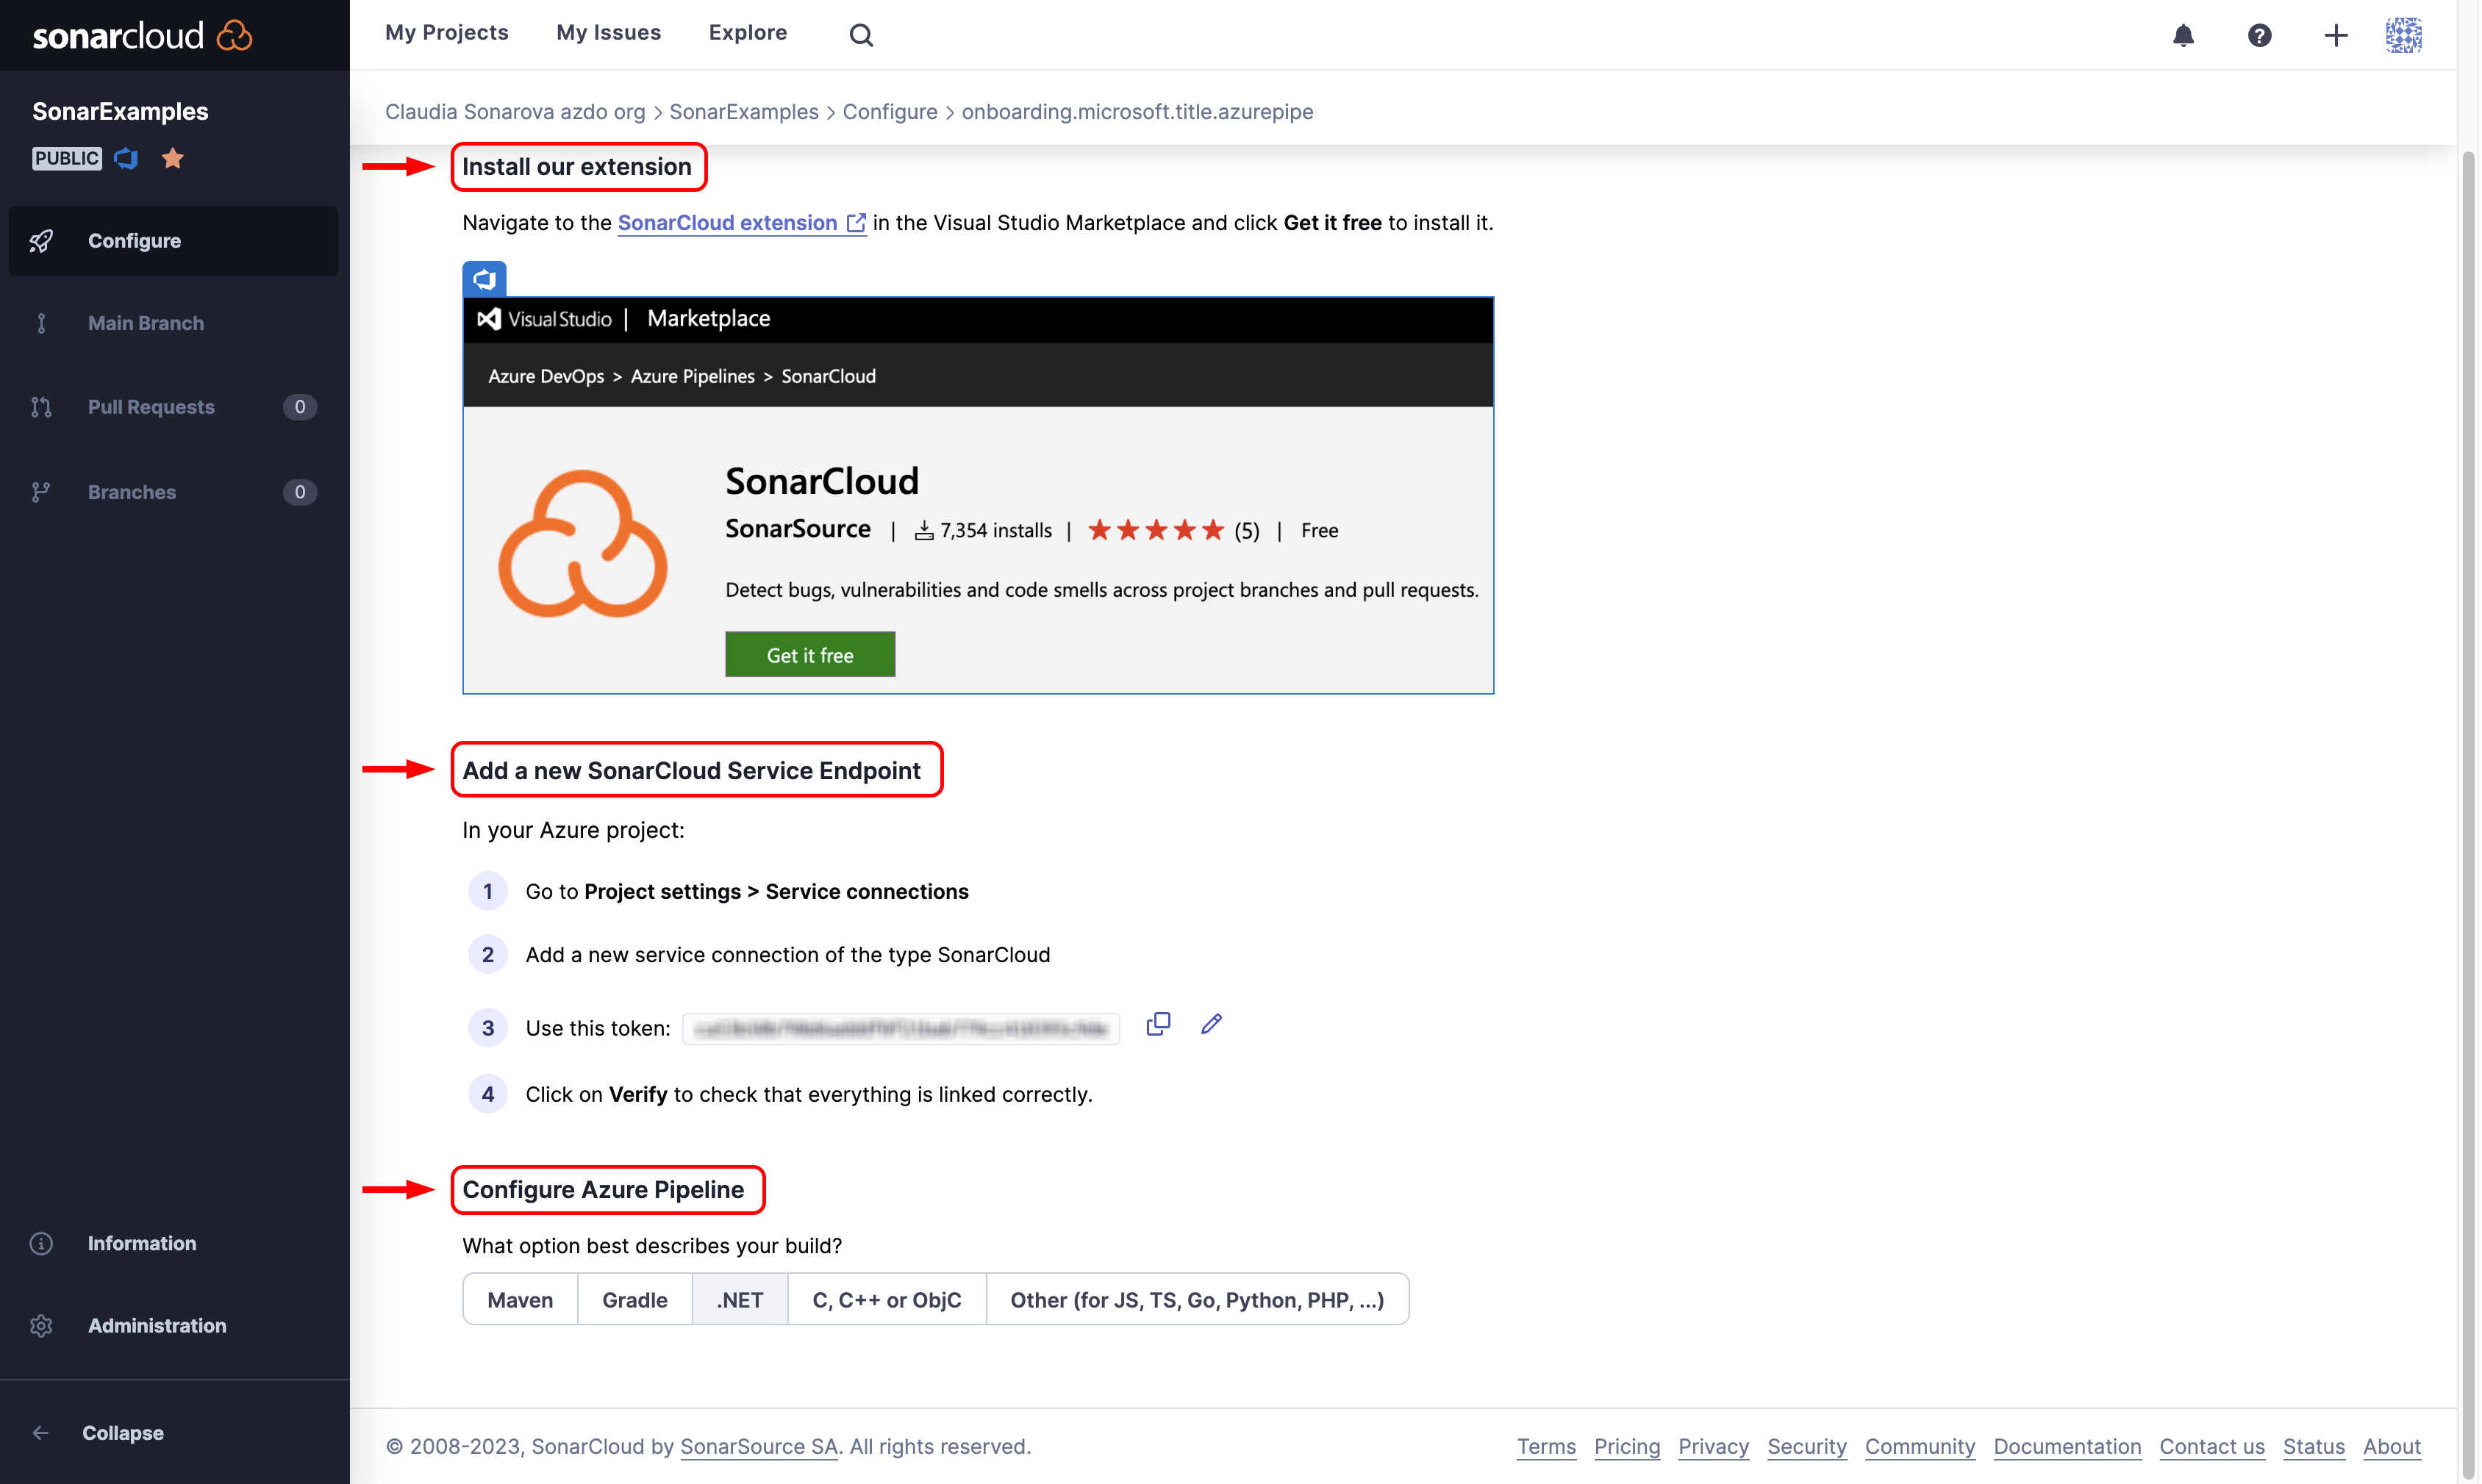
- You can skip Install our extension if done previously.
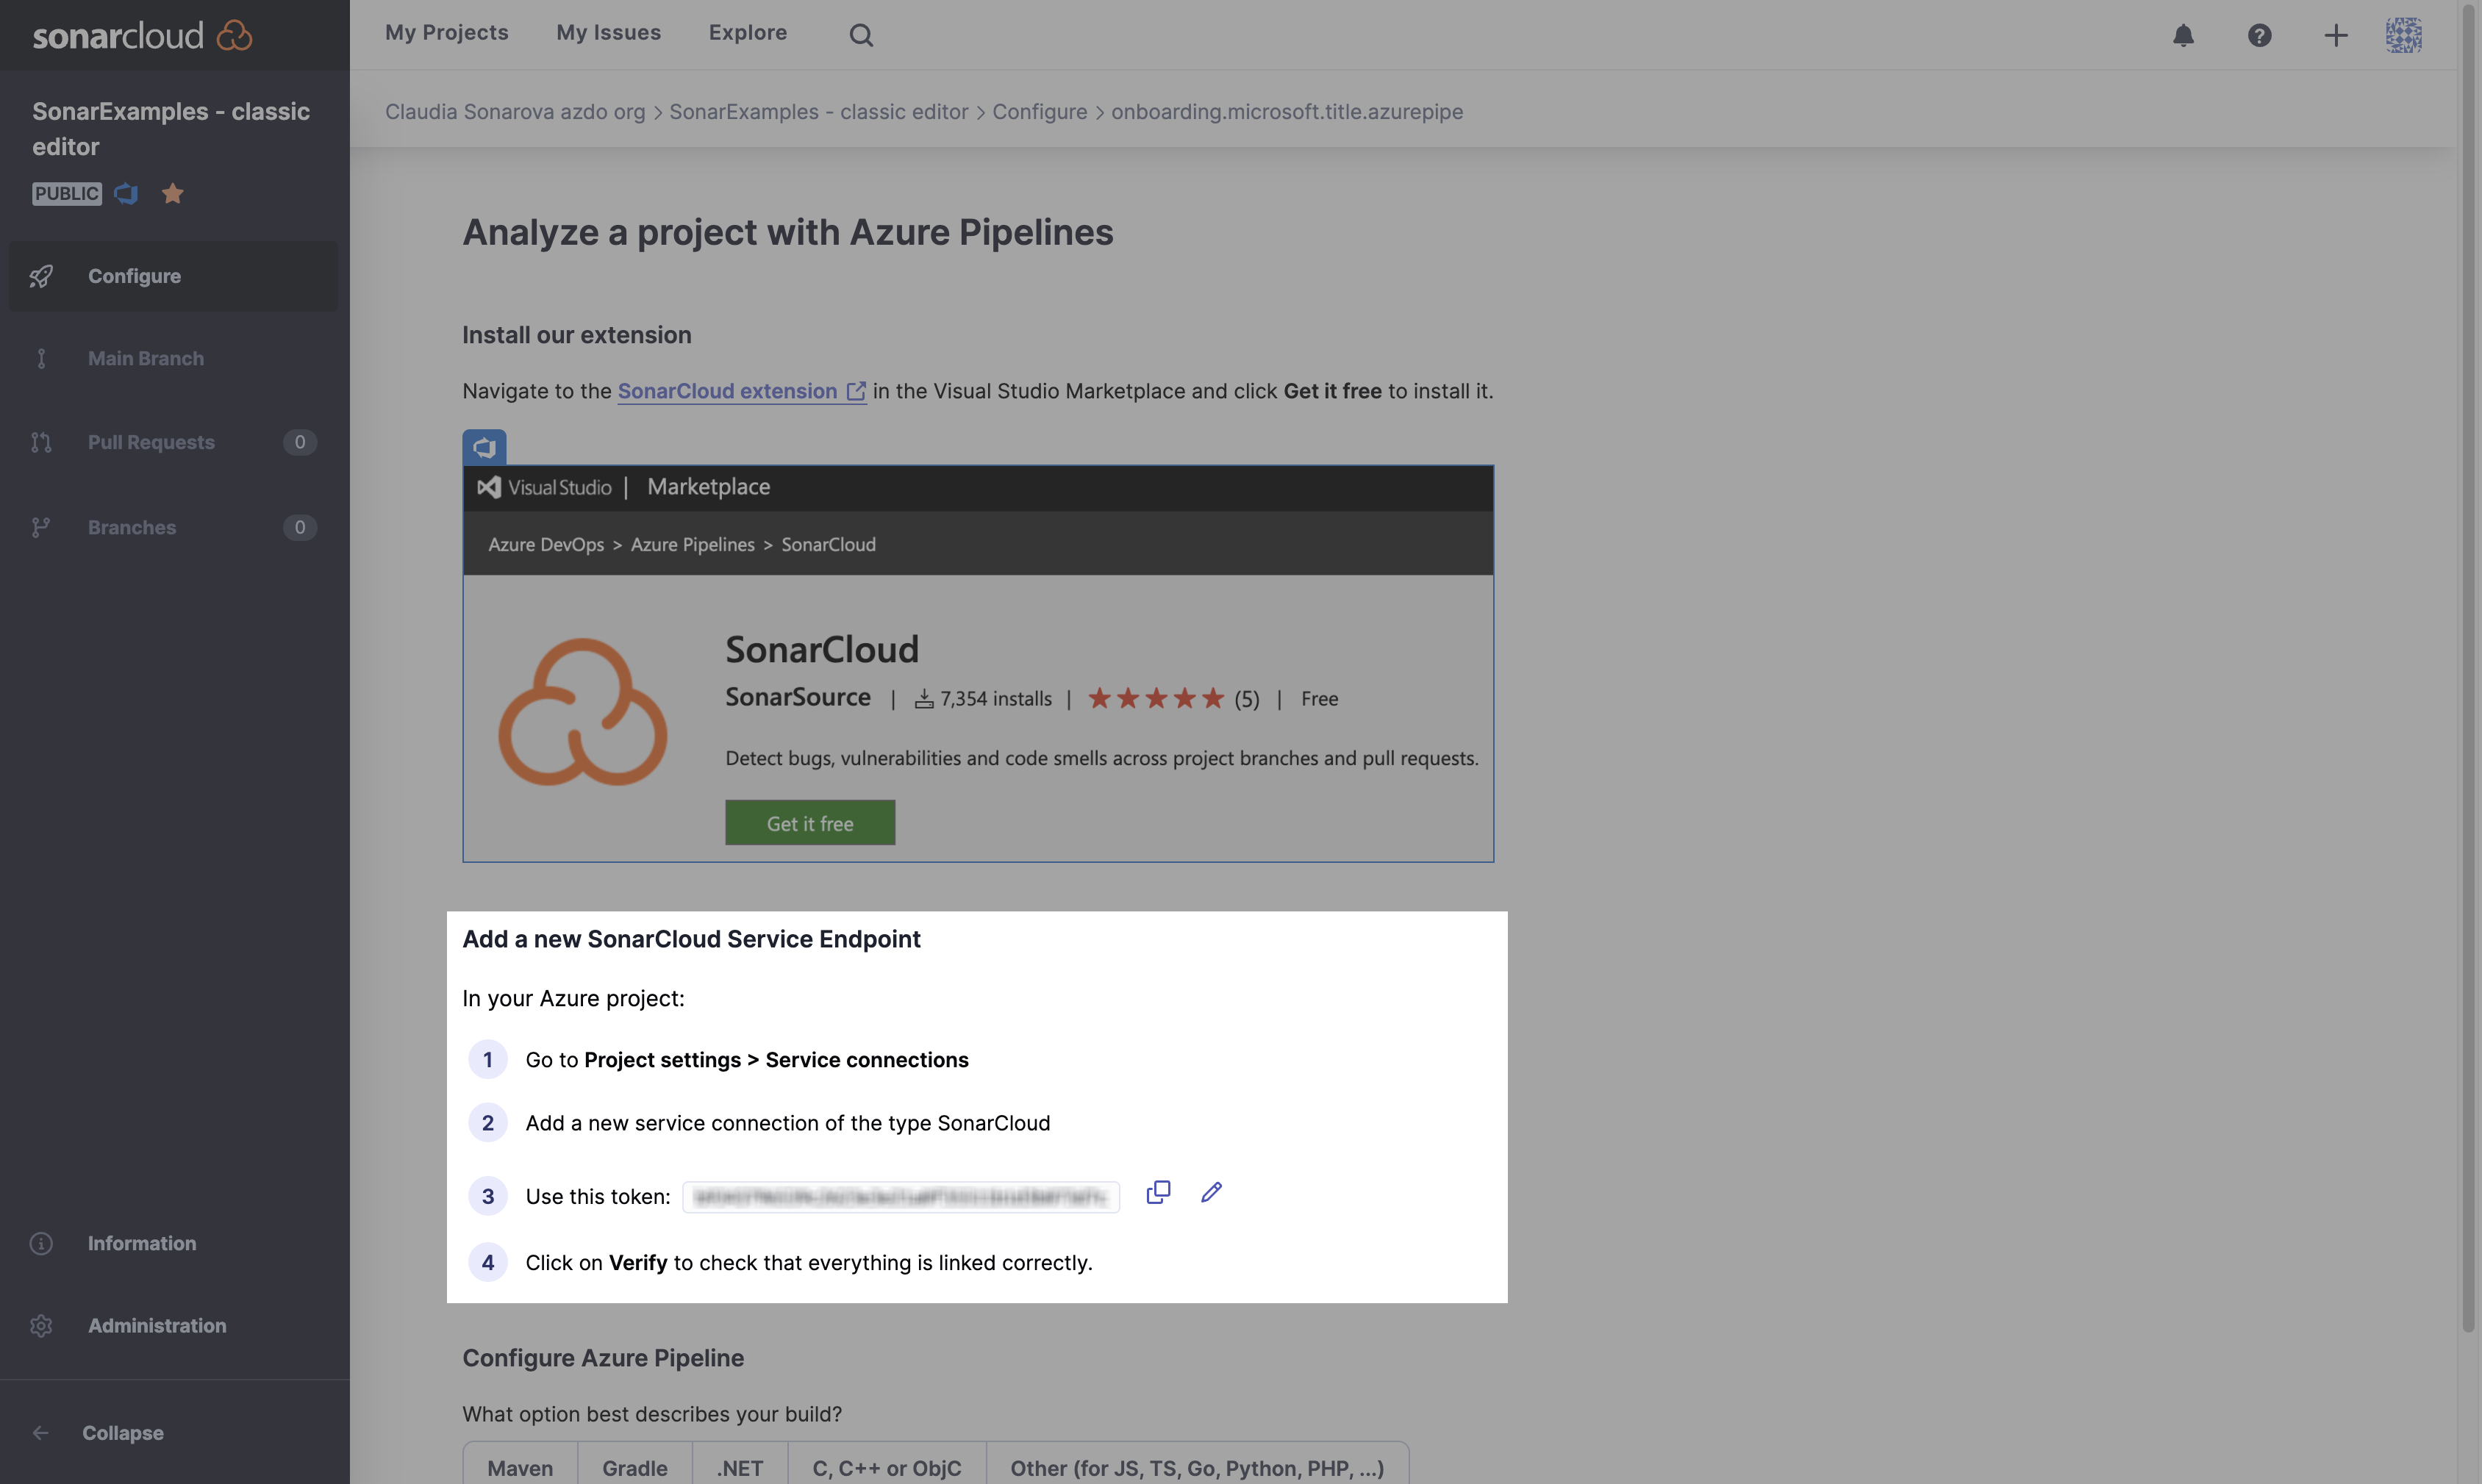
- Next, Add a new SonarCloud Service Endpoint to your Azure project. Go to Project settings > Service connections and use the token provided by the in-product tutorial.
-
With your Service Endpoint verified, move on to Configure Azure Pipeline and select the option that best describes your build:
We will use a .NET project for Exercise 1 to configure the Azure DevOps Pipeline.
Exercise 1: Set up a pipeline that integrates with SonarCloud
We will set up a new build pipeline that integrates with SonarCloud to analyze the SonarExamples project.
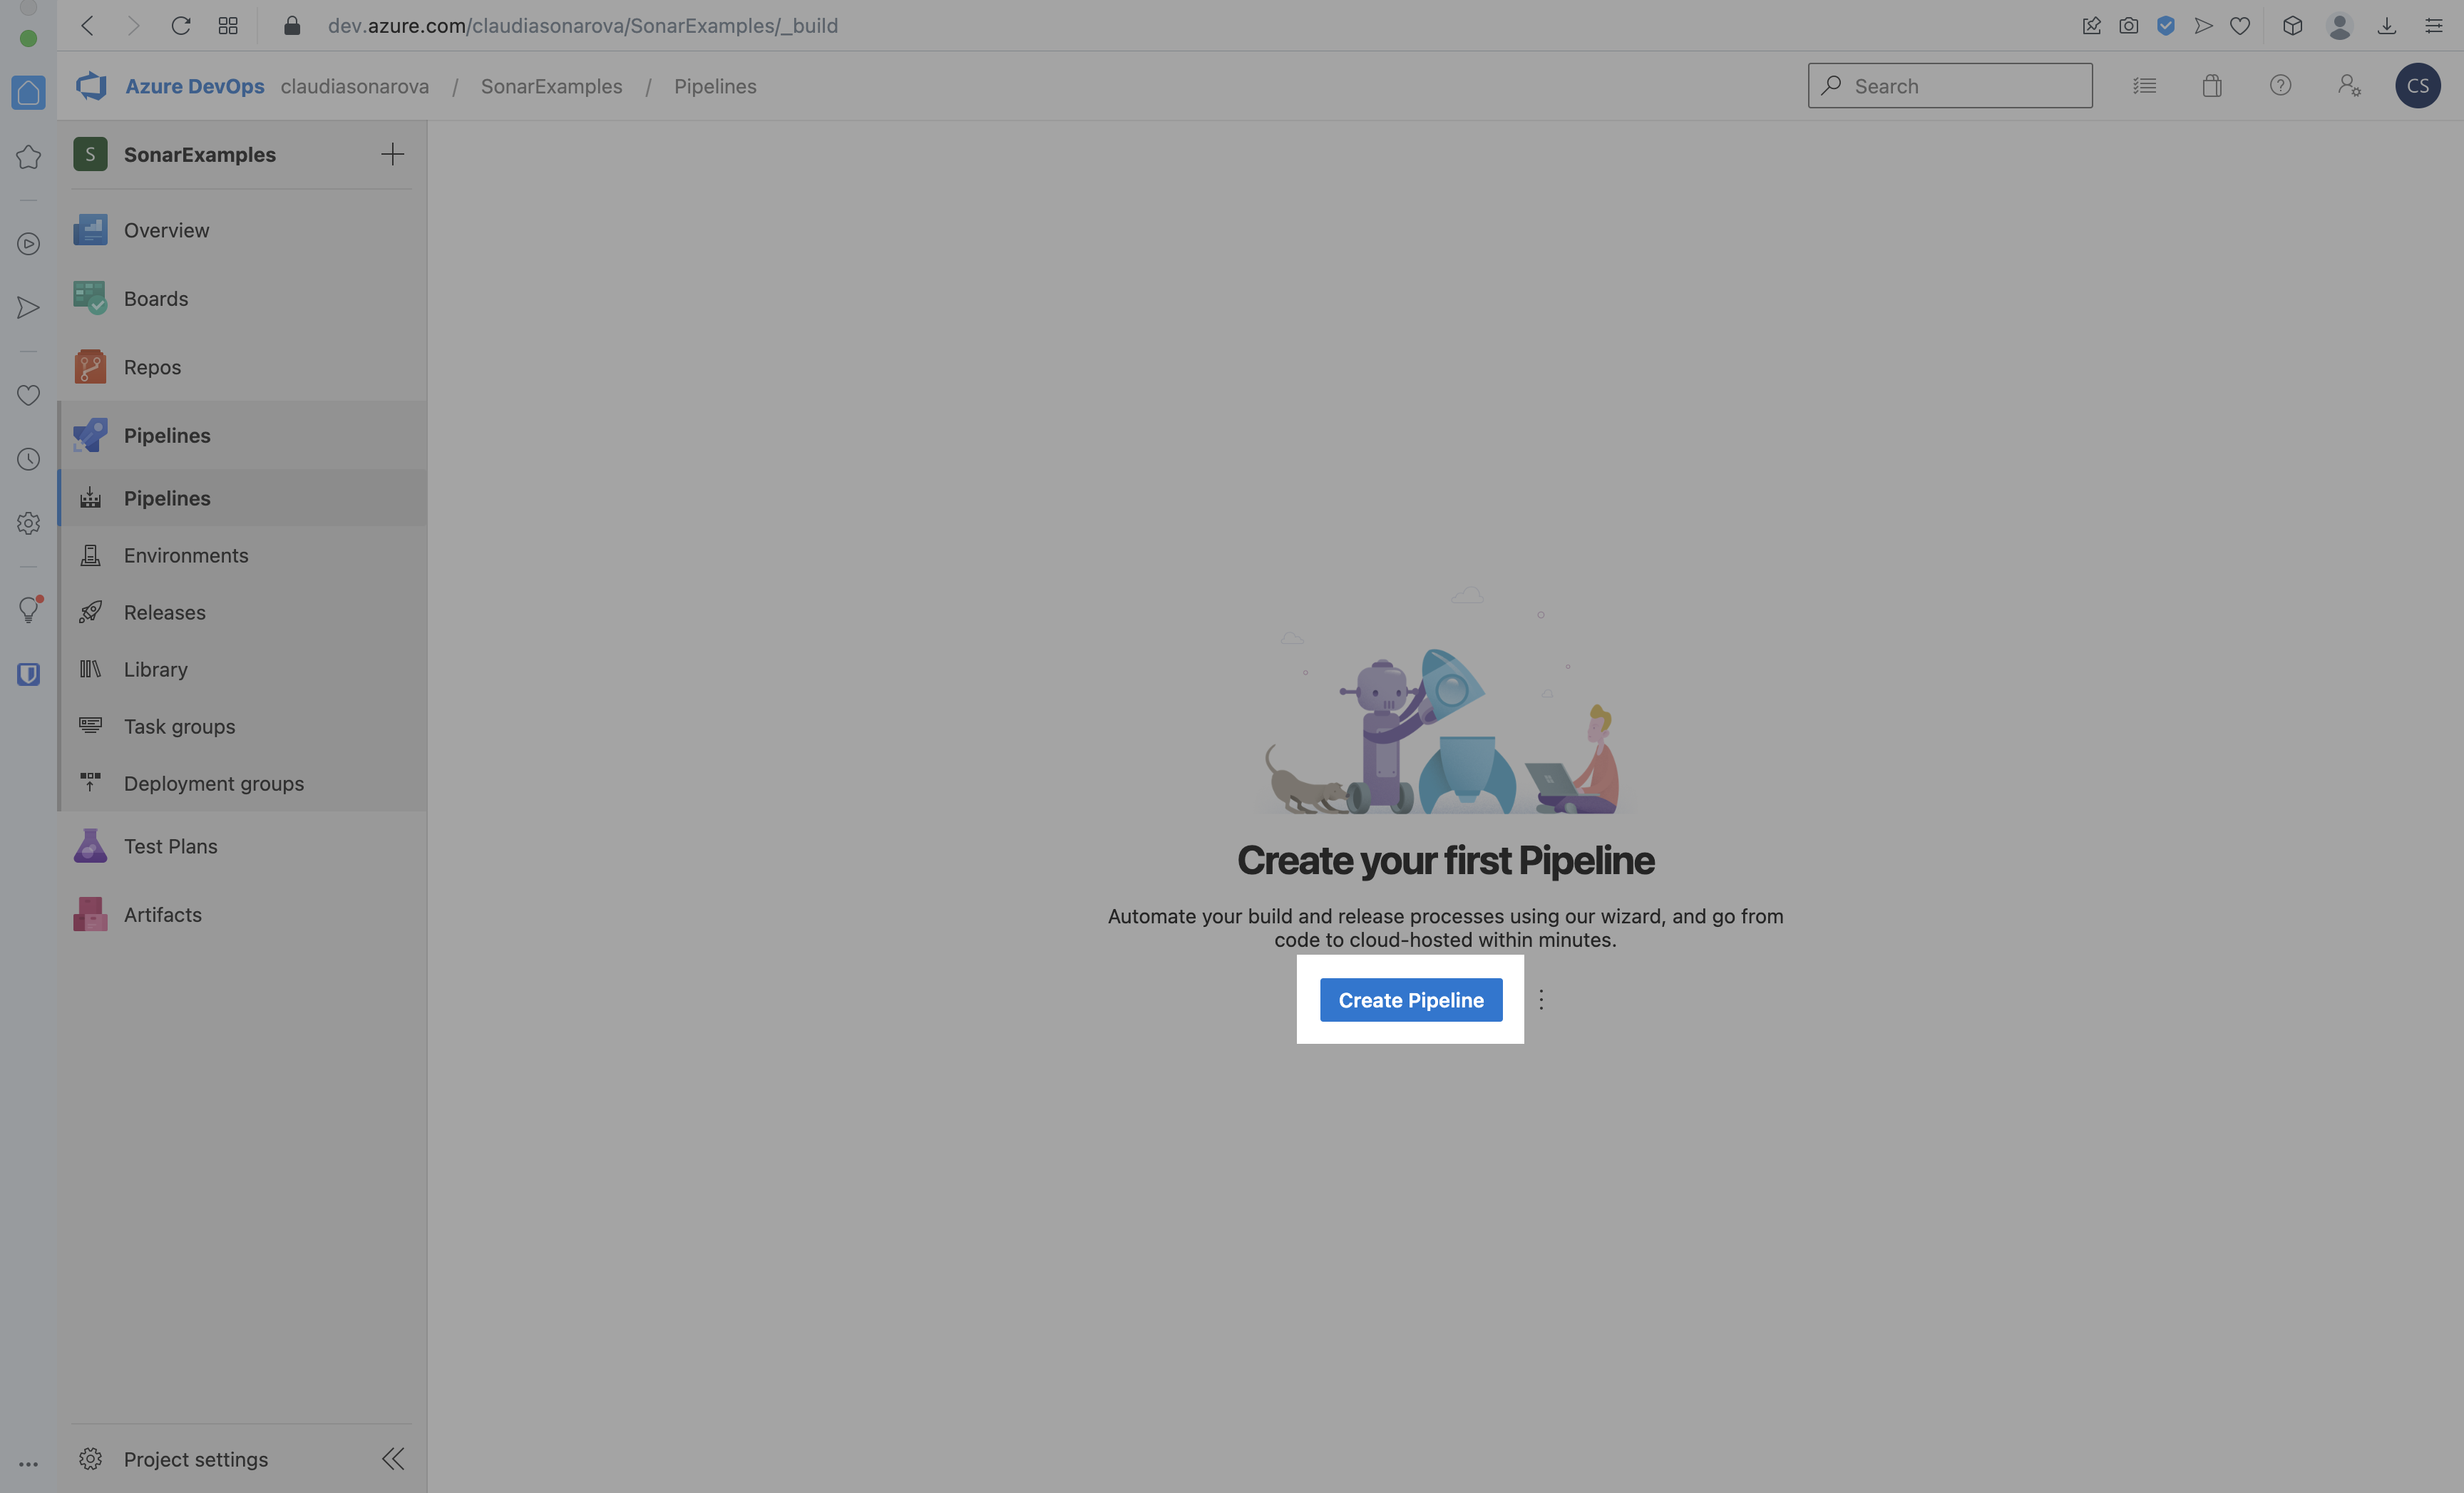
Azure DevOps offers two ways to create pipeline: using a .YAML file or with the classic editor. Both methods begin the same way, by creating a new pipeline.
In your new Azure DevOps project, go to the Pipelines > Pipelines tab and select Create Pipeline:
Here you have two options: you can configure the pipeline with either the YAML editor or choose to use the Classic editor to create a pipeline without YAML.
With the classic editor, you can take advantage of the pre-defined templates that were installed as part of the SonarCloud Extension above. With the YAML editor, you can use a separately provided YAML template file. We will cover both methods in this exercise, starting with the YAML editor.
YAML Editor
-
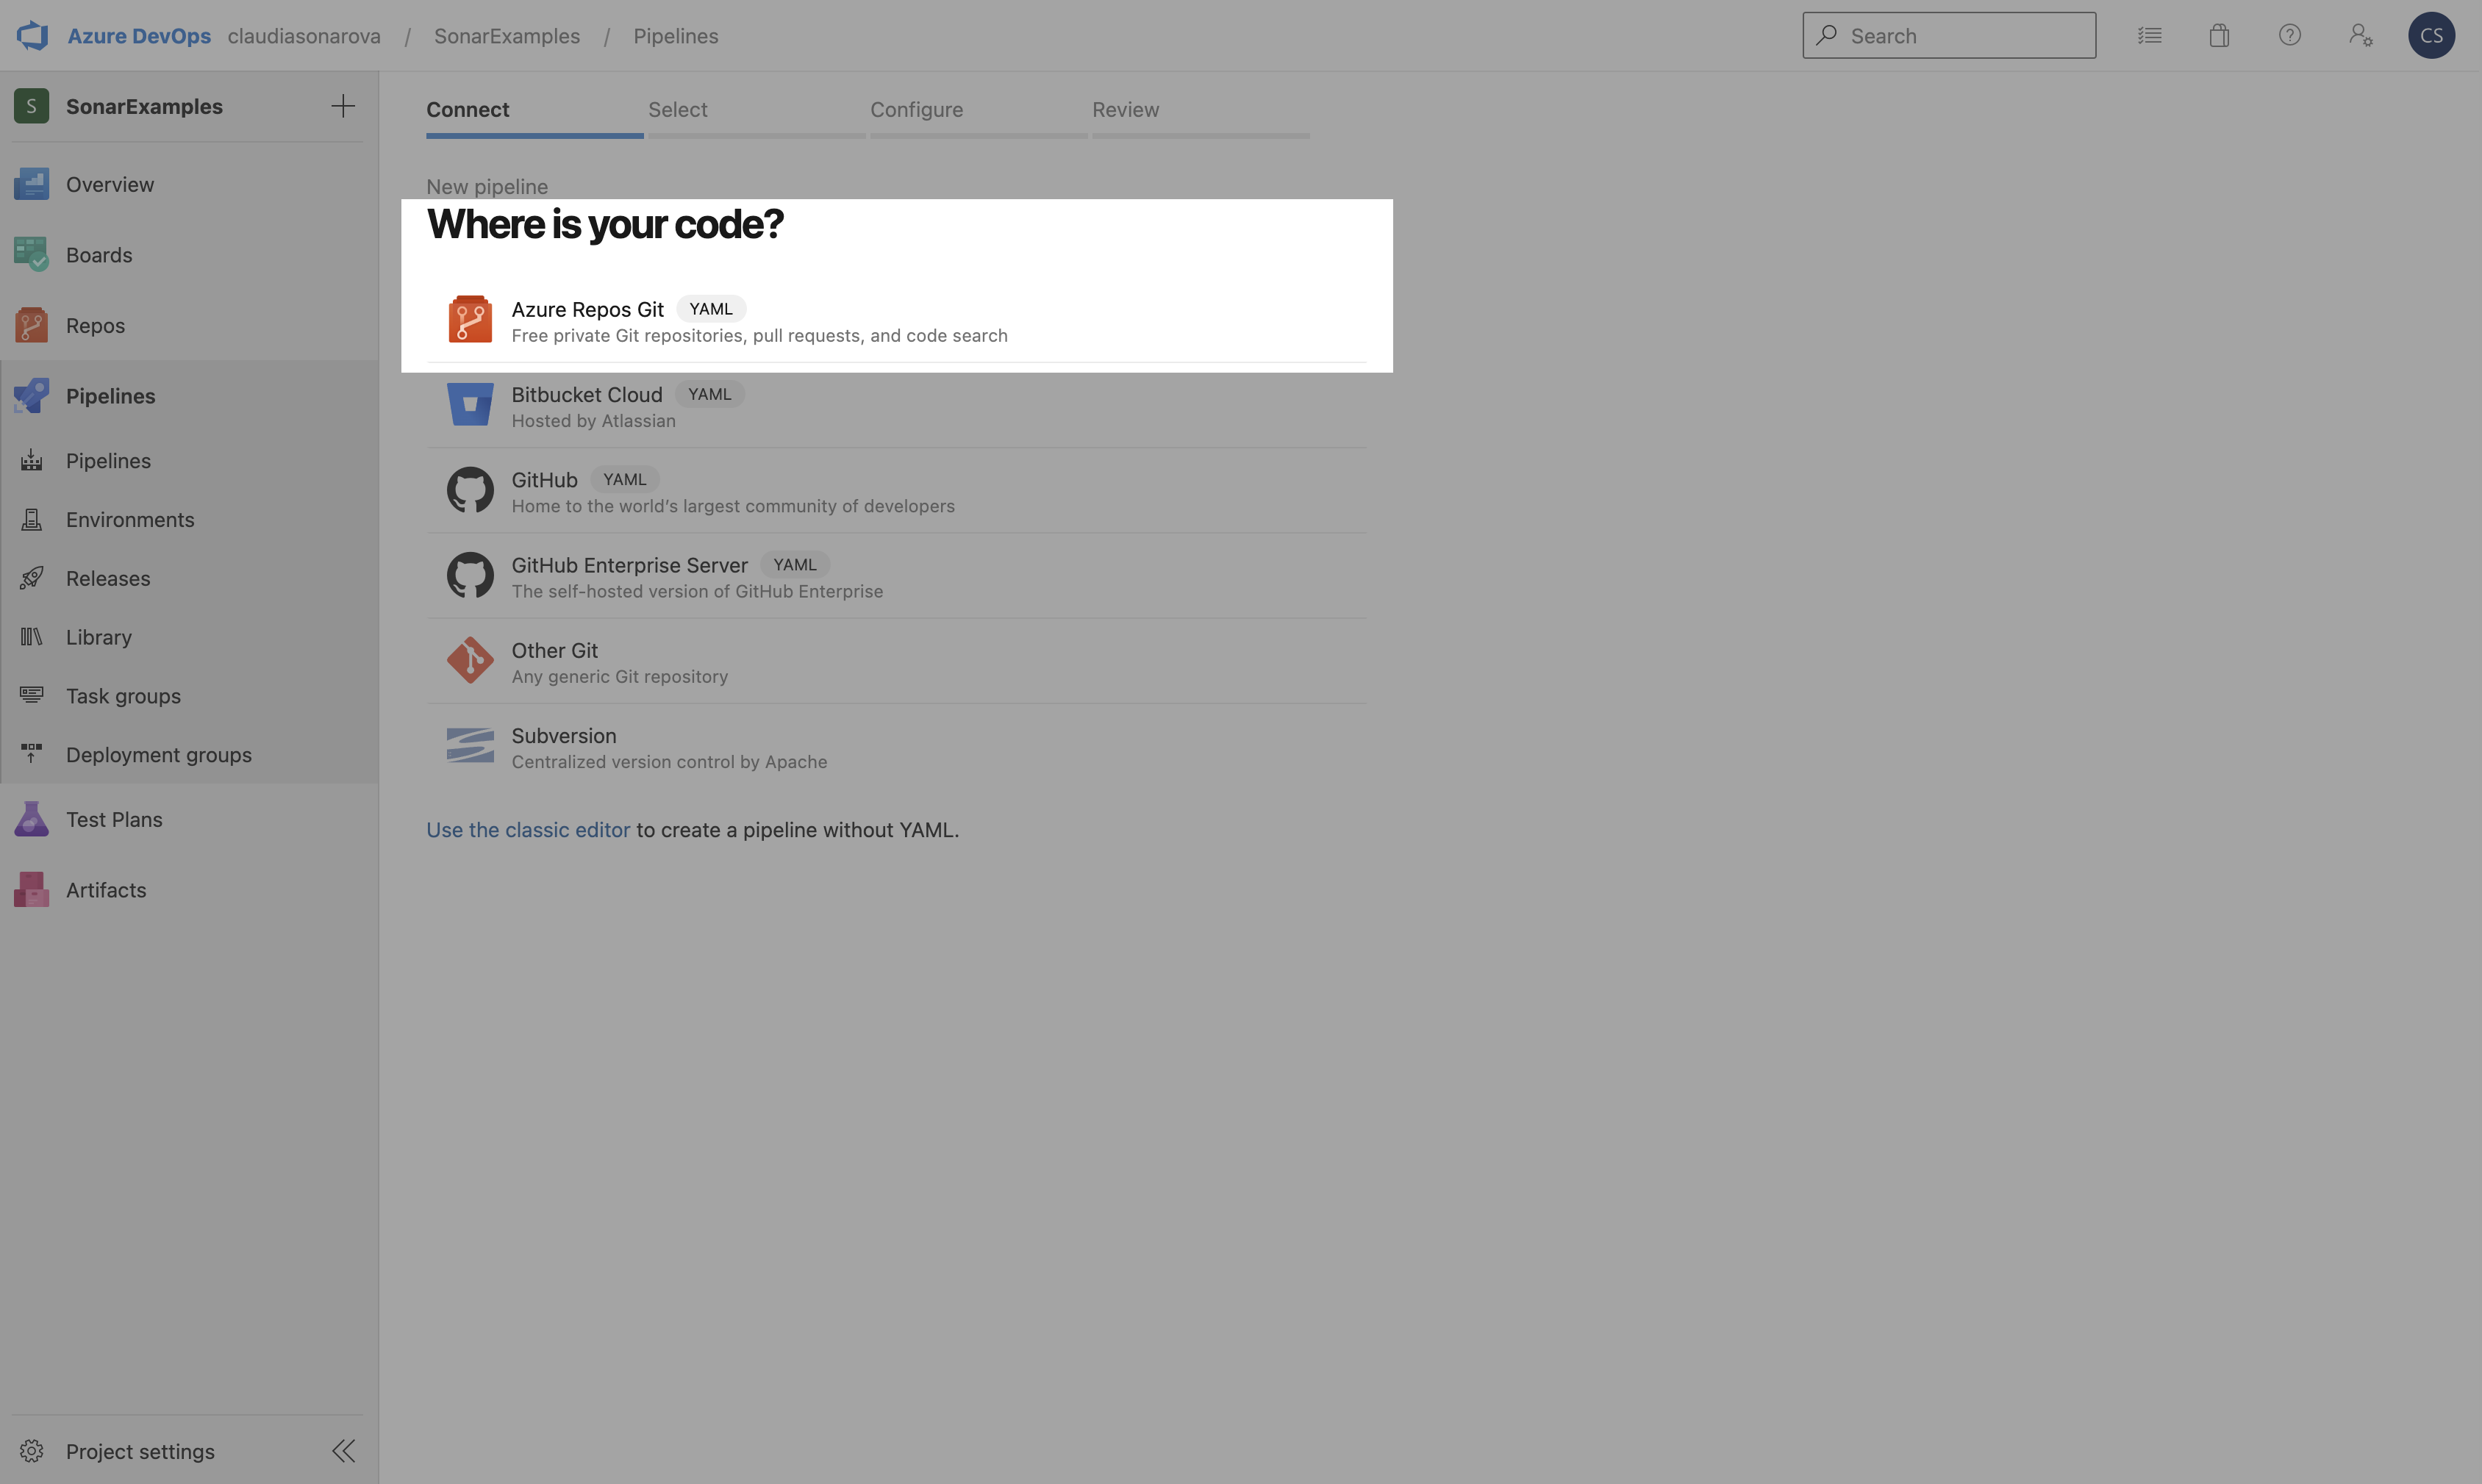
On the Where is your code? page:: Because we have already cloned our repo to the SonarExamples project in Azure, we will select Azure Repos Git. You may have a different configuration in your project.
-
On the next screen select the git repository that you imported earlier, our repo is called SonarExamples:

-
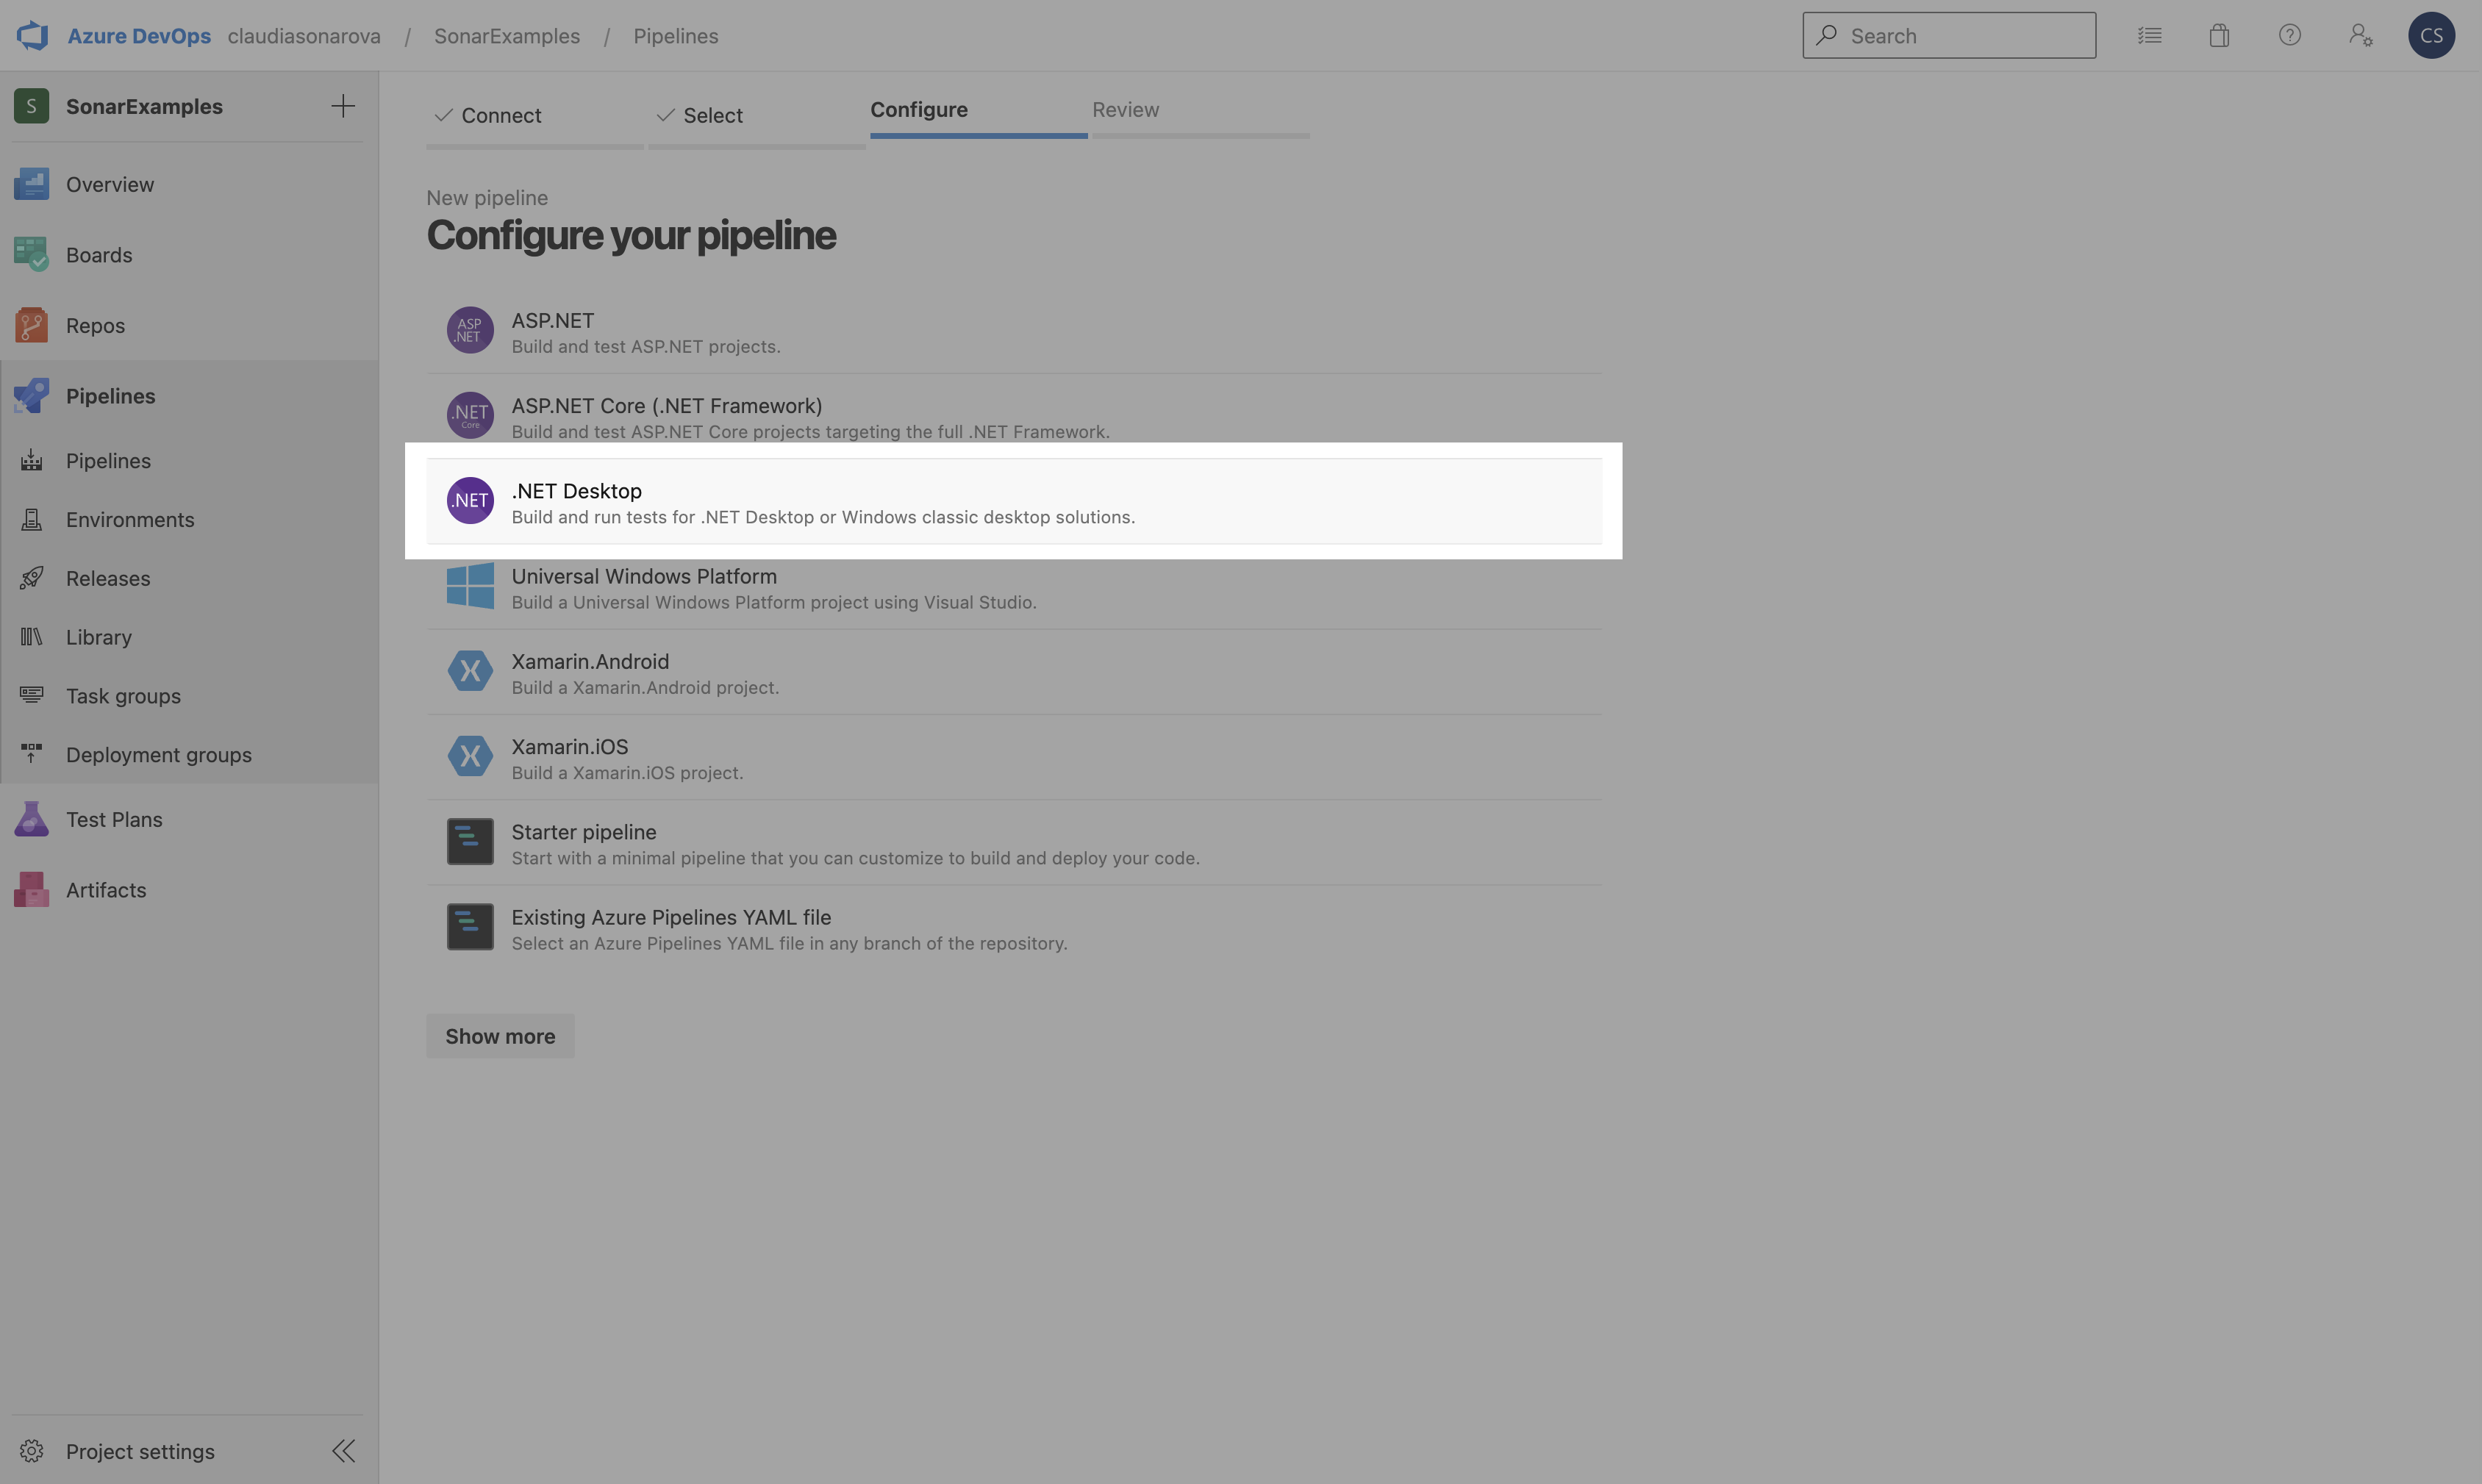
Now select a YAML file template. We will be building and analyzing the .NET code in our example imported repository, so we will start by choosing the .NET Desktop YAML template:
-
The YAML editor will open with the template YAML file. In order to configure it correctly, you will need to adjust it (or replace it) so that it looks like the following example file: net-desktop-sonarcloud.yml
We must customize it to fit our needs:
- Modify the Build task: change the pointer to the solution. Note that we:
- added a
solutionvariable in this example to improve the template, - we updated the
NuGetToolInstaller, and - we used wildcards because our
.slnfile is not located in the root of the repo:
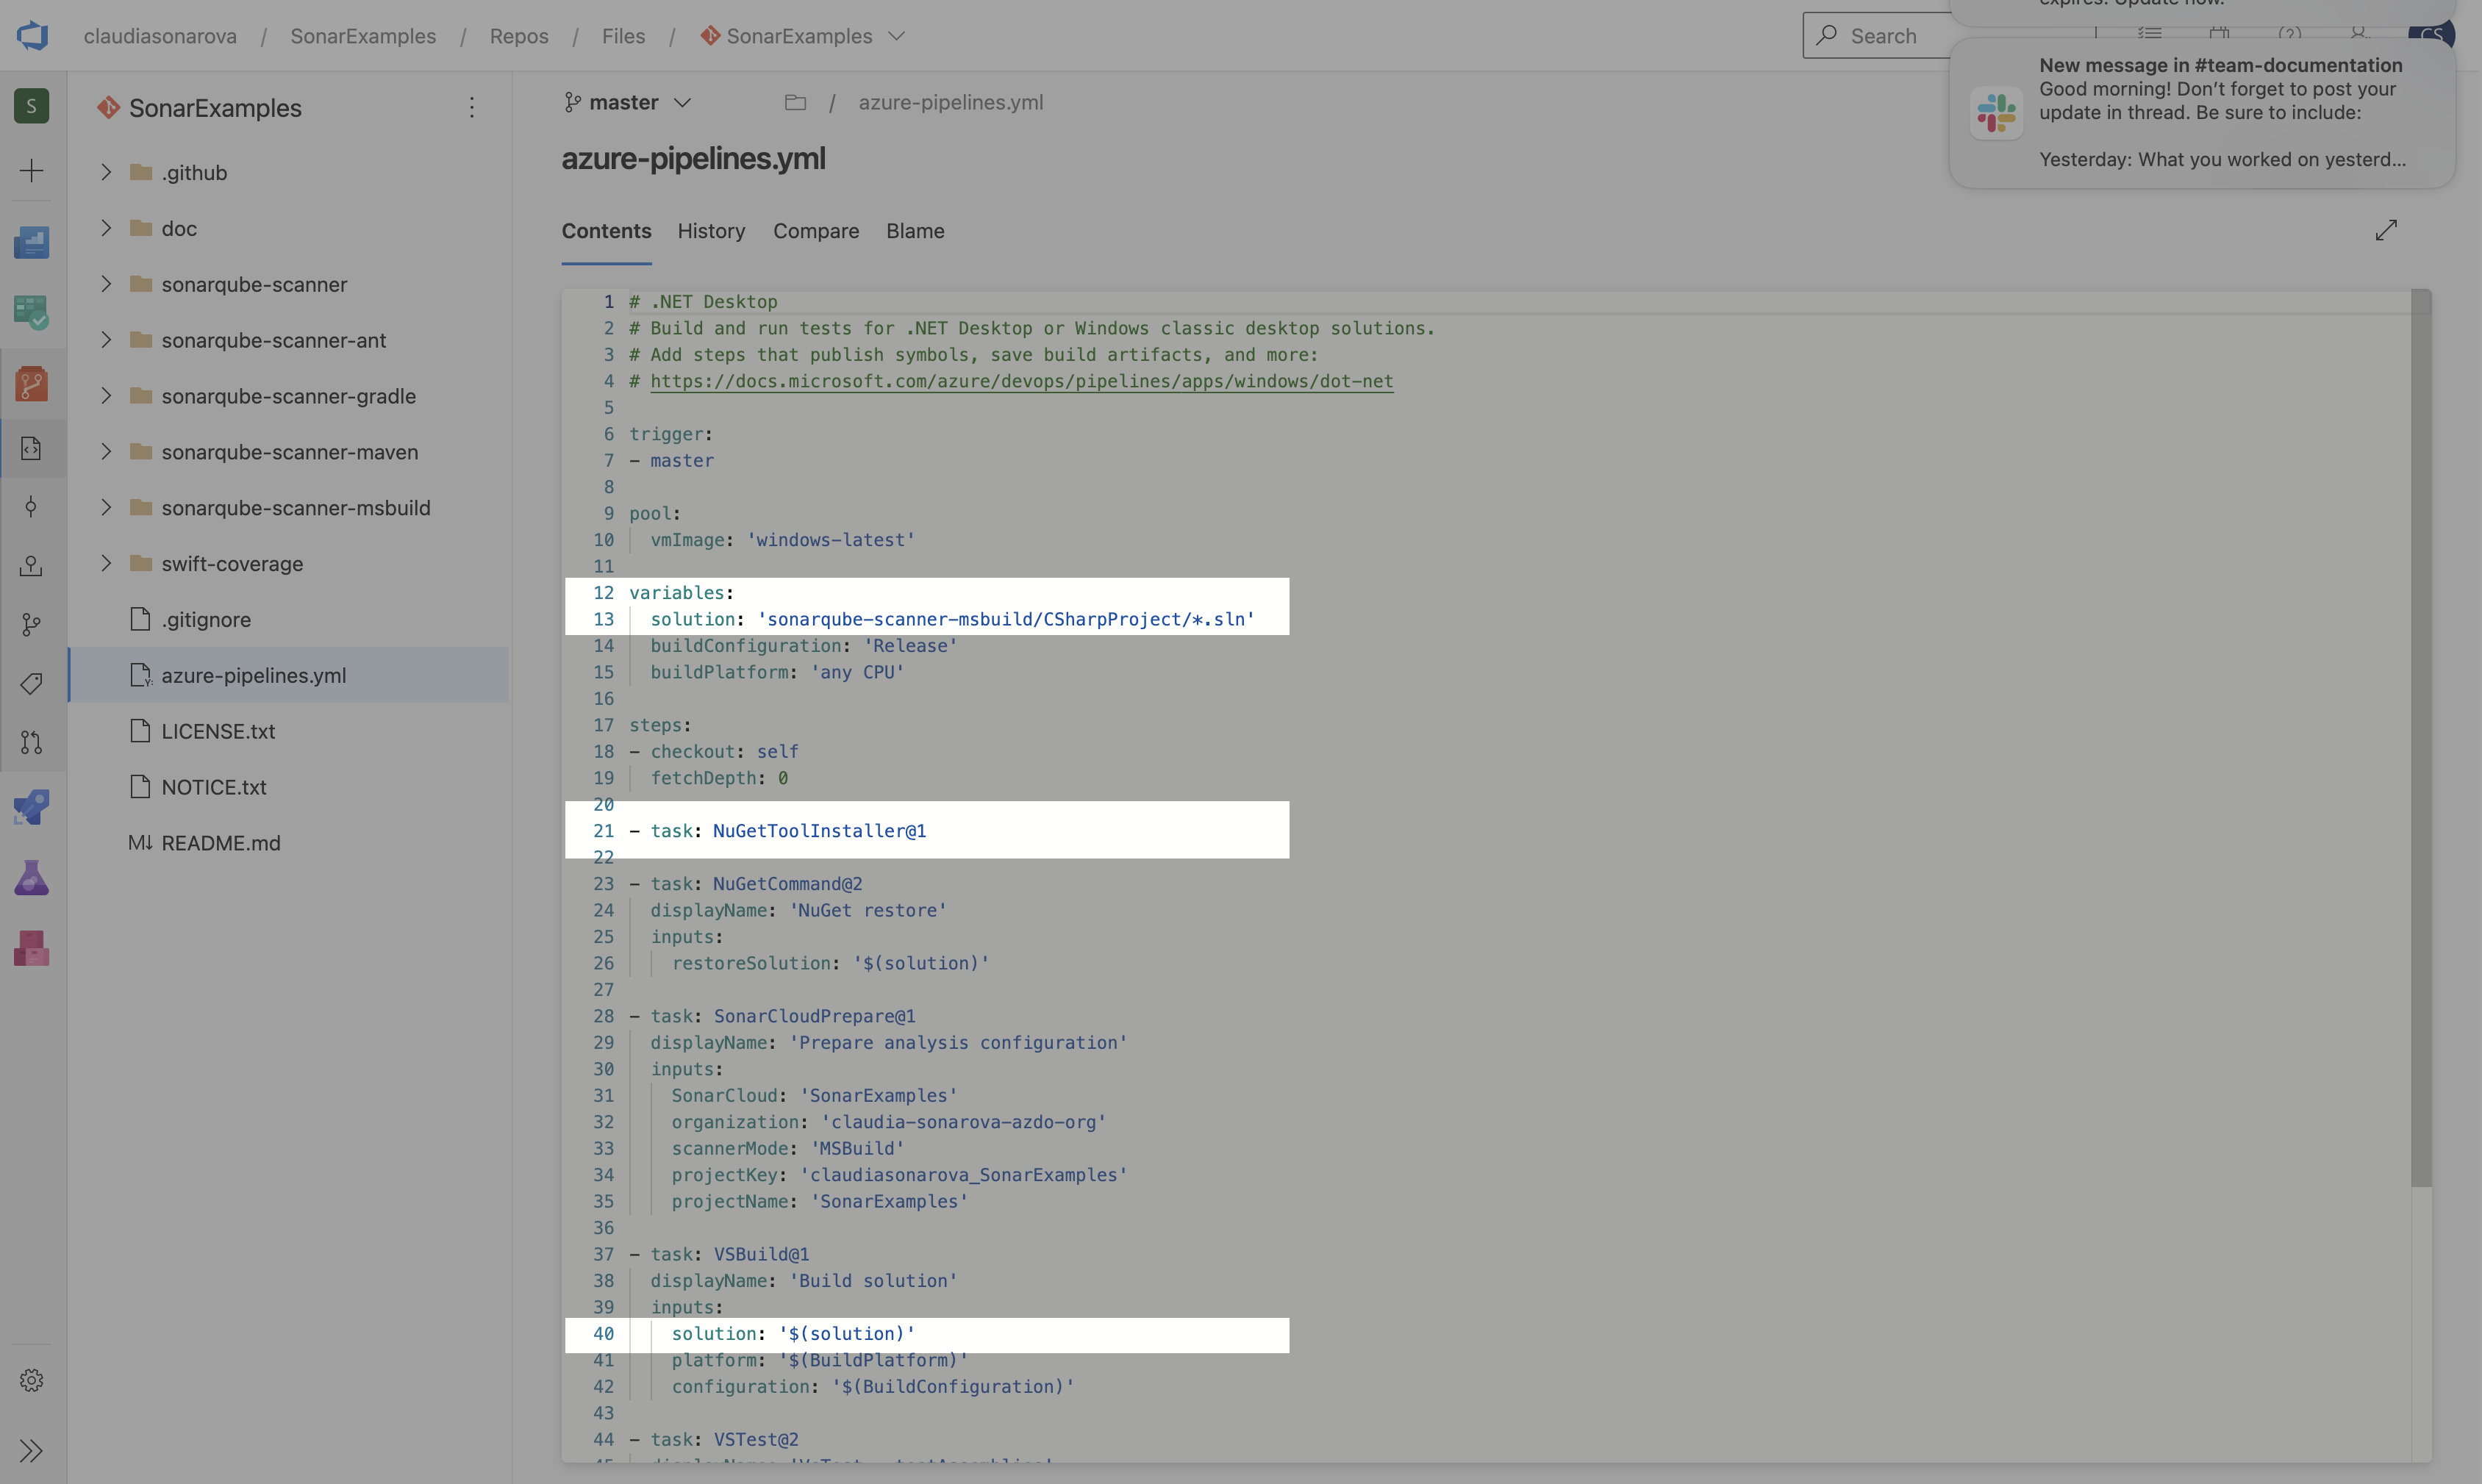
- added a
-
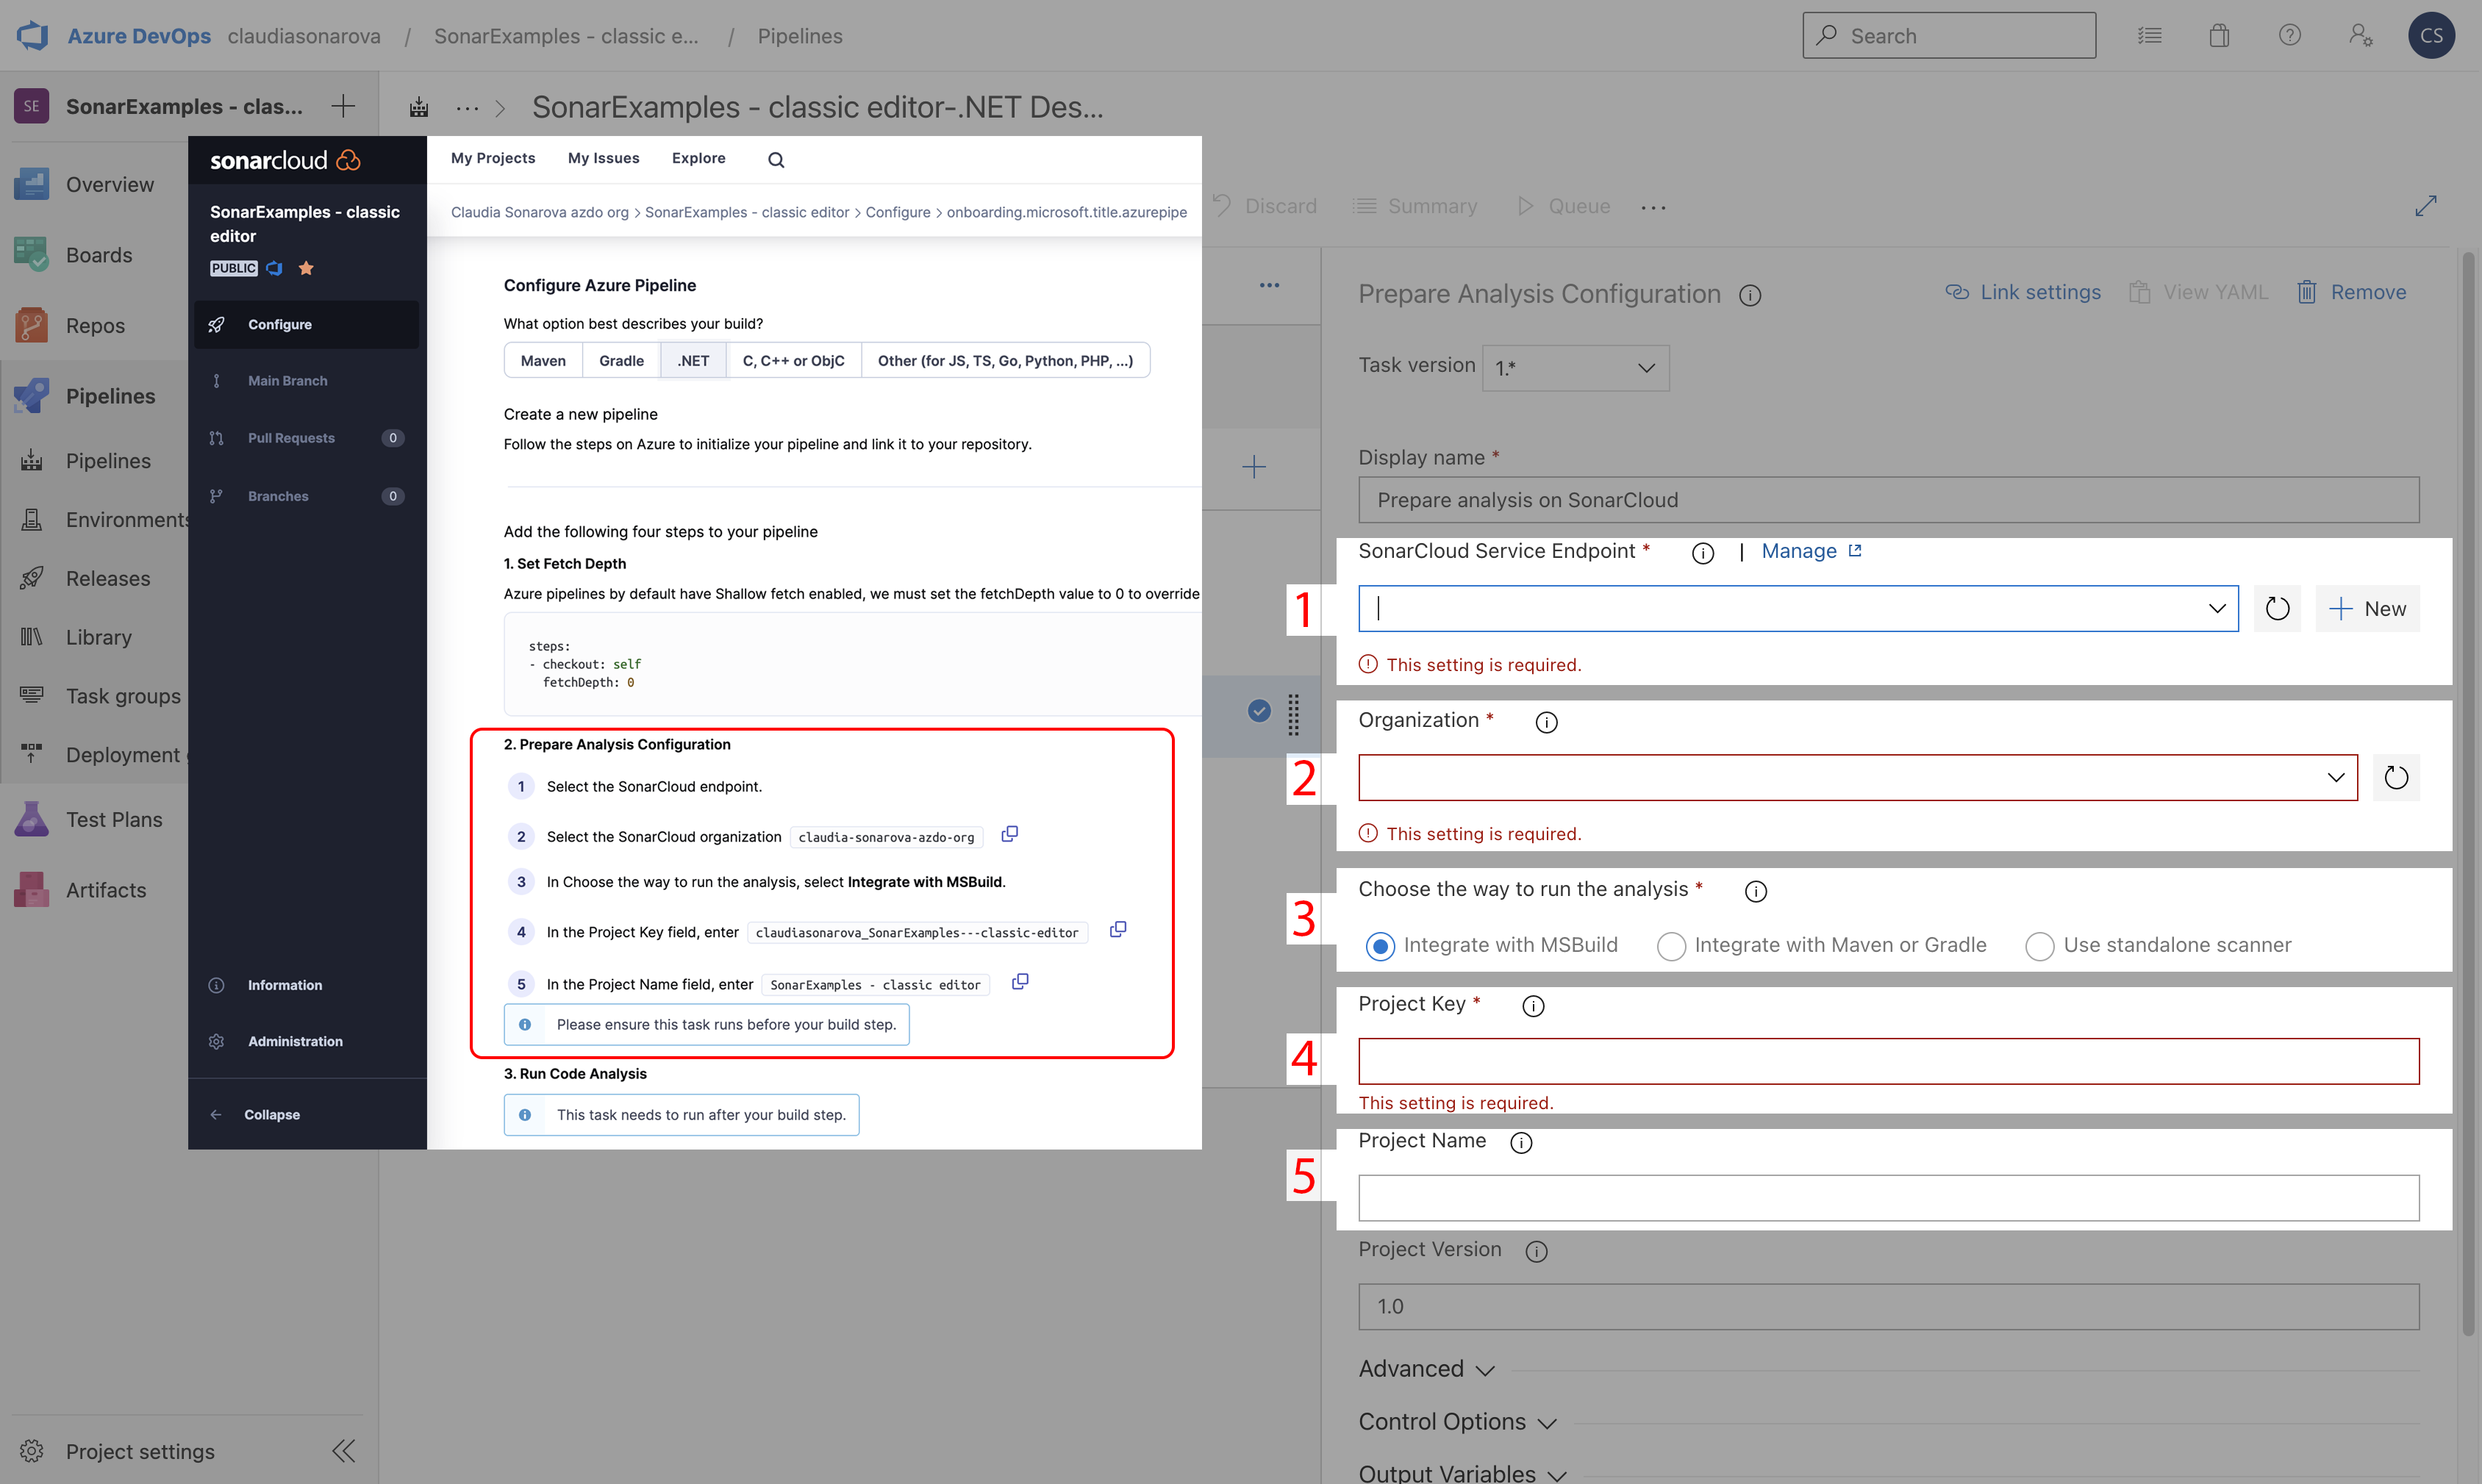
Modify the
SonarcloudPreparetask with your information: Follow in-product tutorial from Sonarcloud to add the required steps in your pipeline. The steps will be different depending on your build option and because we are using .NET for this tutorial, we have these items to configure: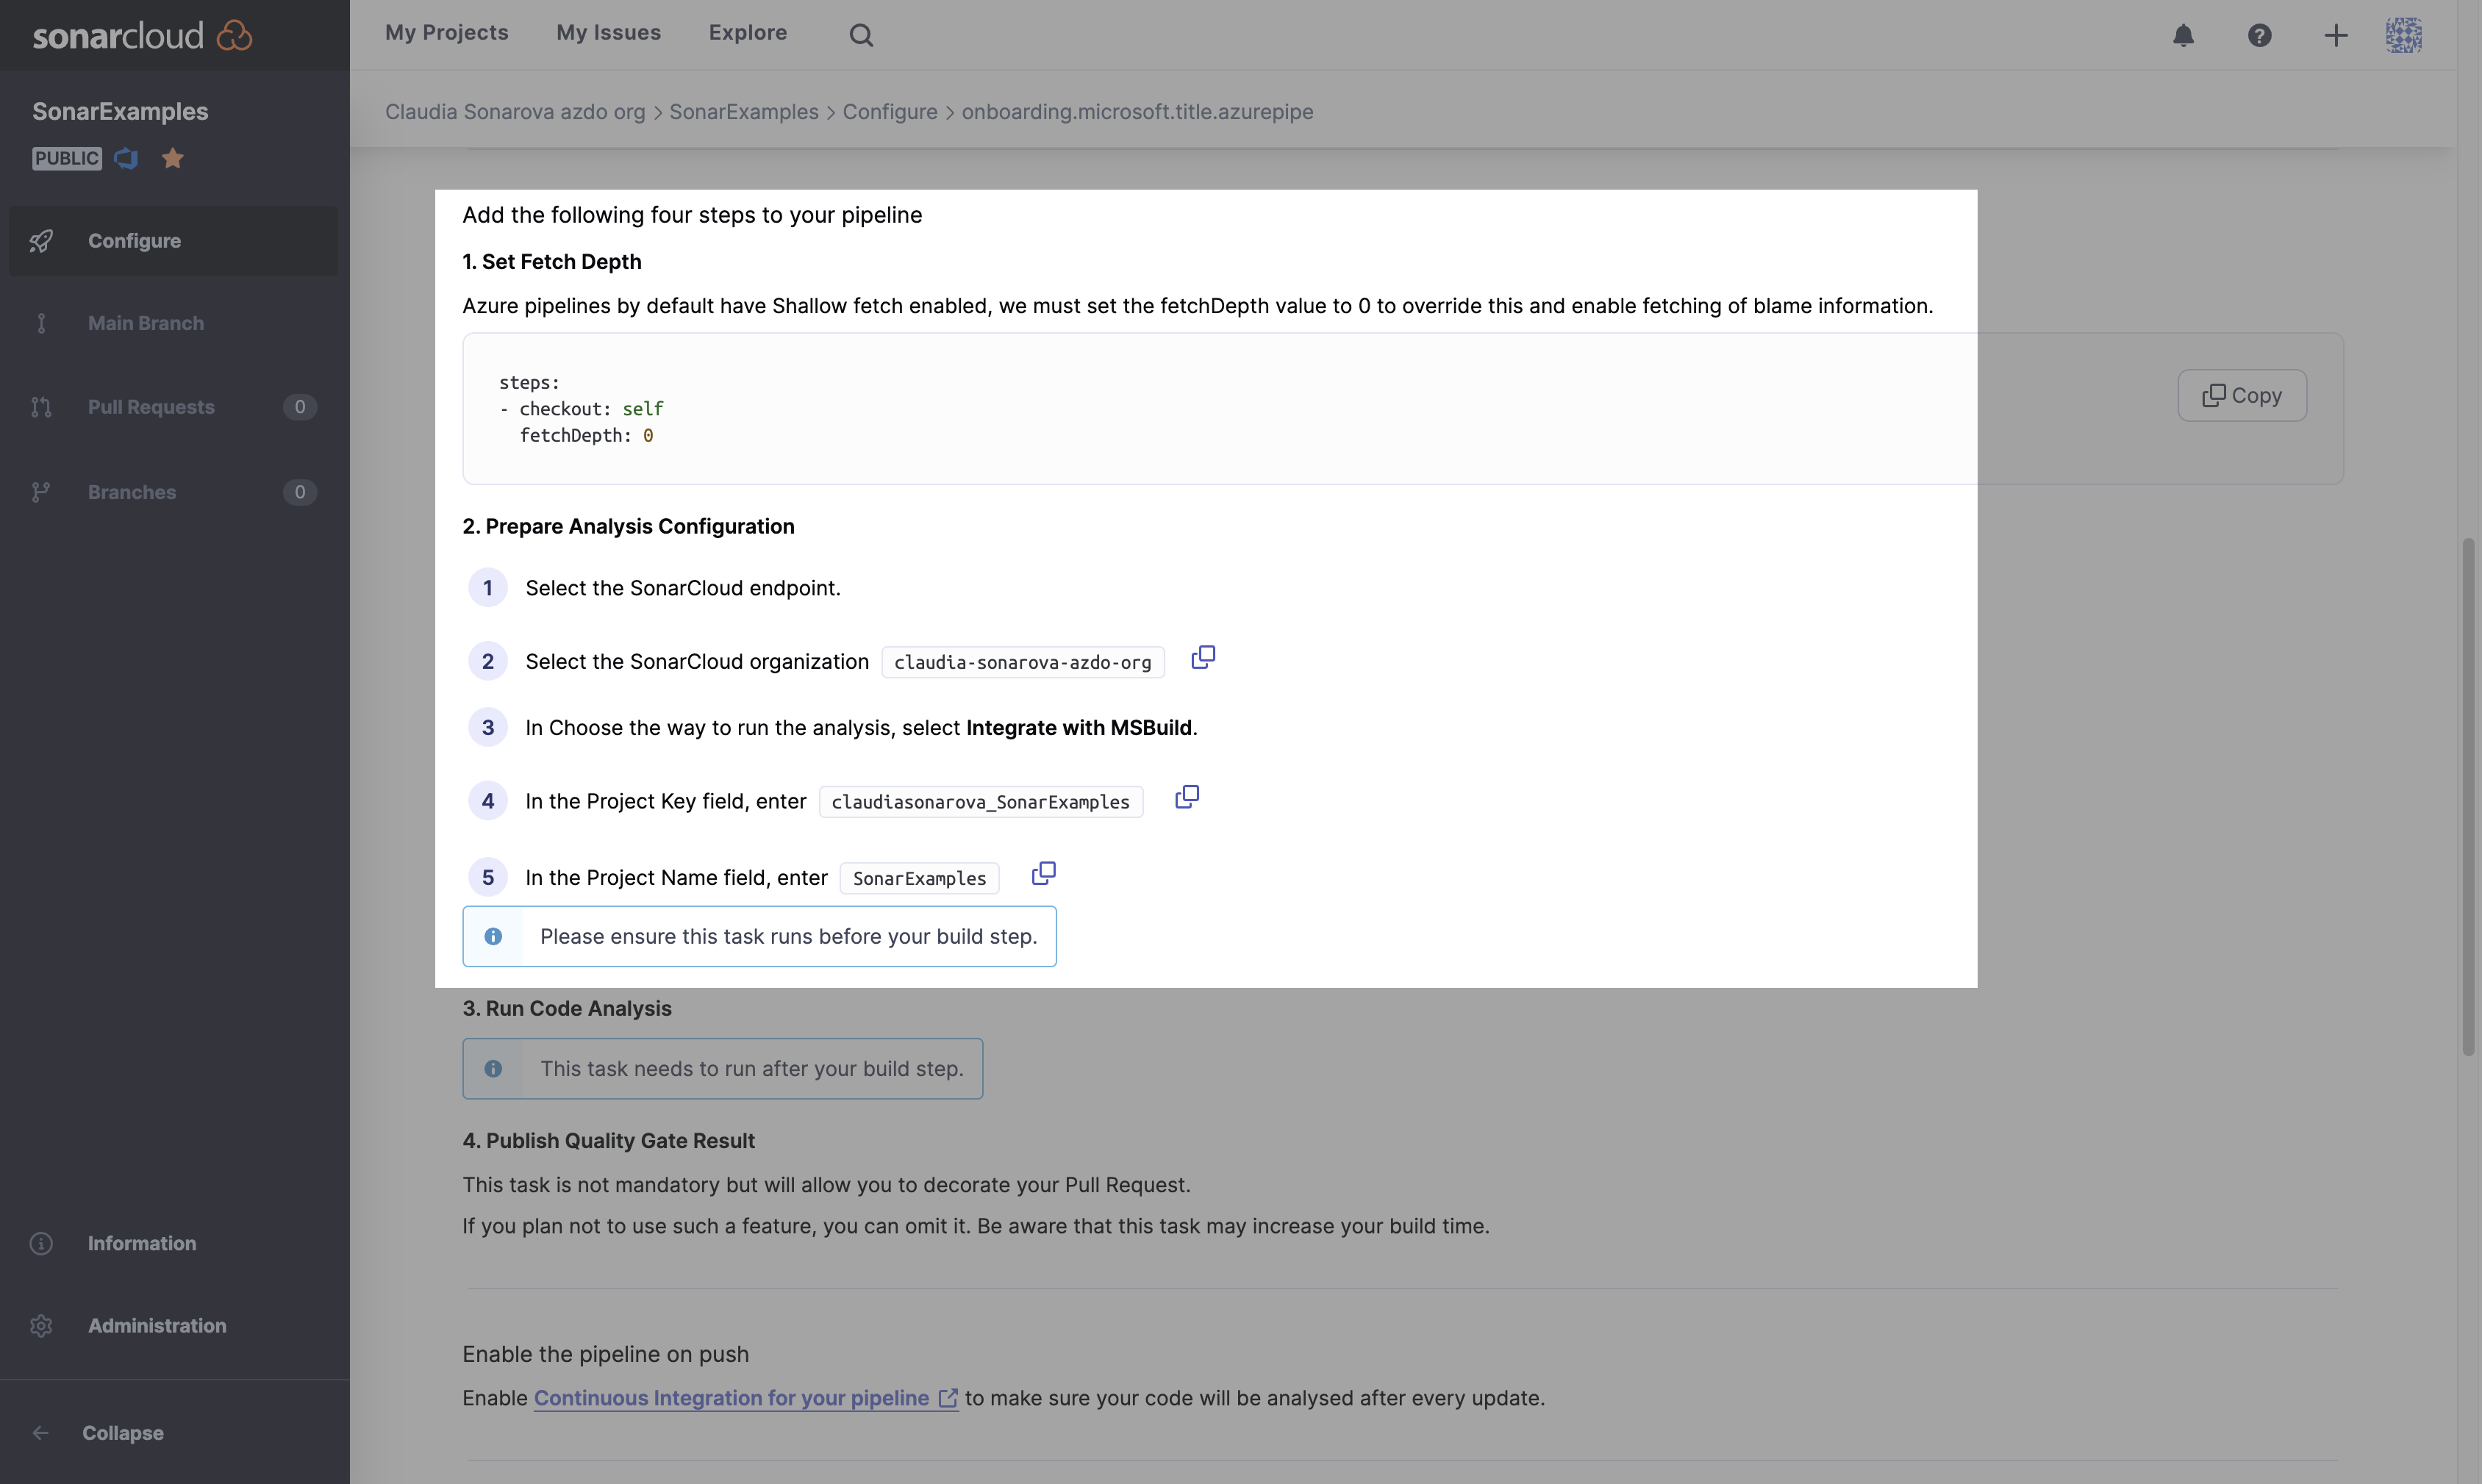
-
Set your Fetch Depth: See SonarCloud for the code sample to copy/paste.
-
Prepare Analysis Configuration: To continue, type
sonarcloudin the Azure task search bar and select Prepare Analysis Configuration. Then, using the values provided by the SonarCloud in-product tutorial, complete the following steps:- Select the SonarCloud endpoint you created a few minutes ago.
- Copy/paste your Organization.
- Depending on your choosen build option, SonarCloud will recommend the correct way to run the analysis.
- Copy/paste the Project Key.
- Copy/paste the Project Name.
Note in the following image how Azure DevOps will format the task parameters for you.

-
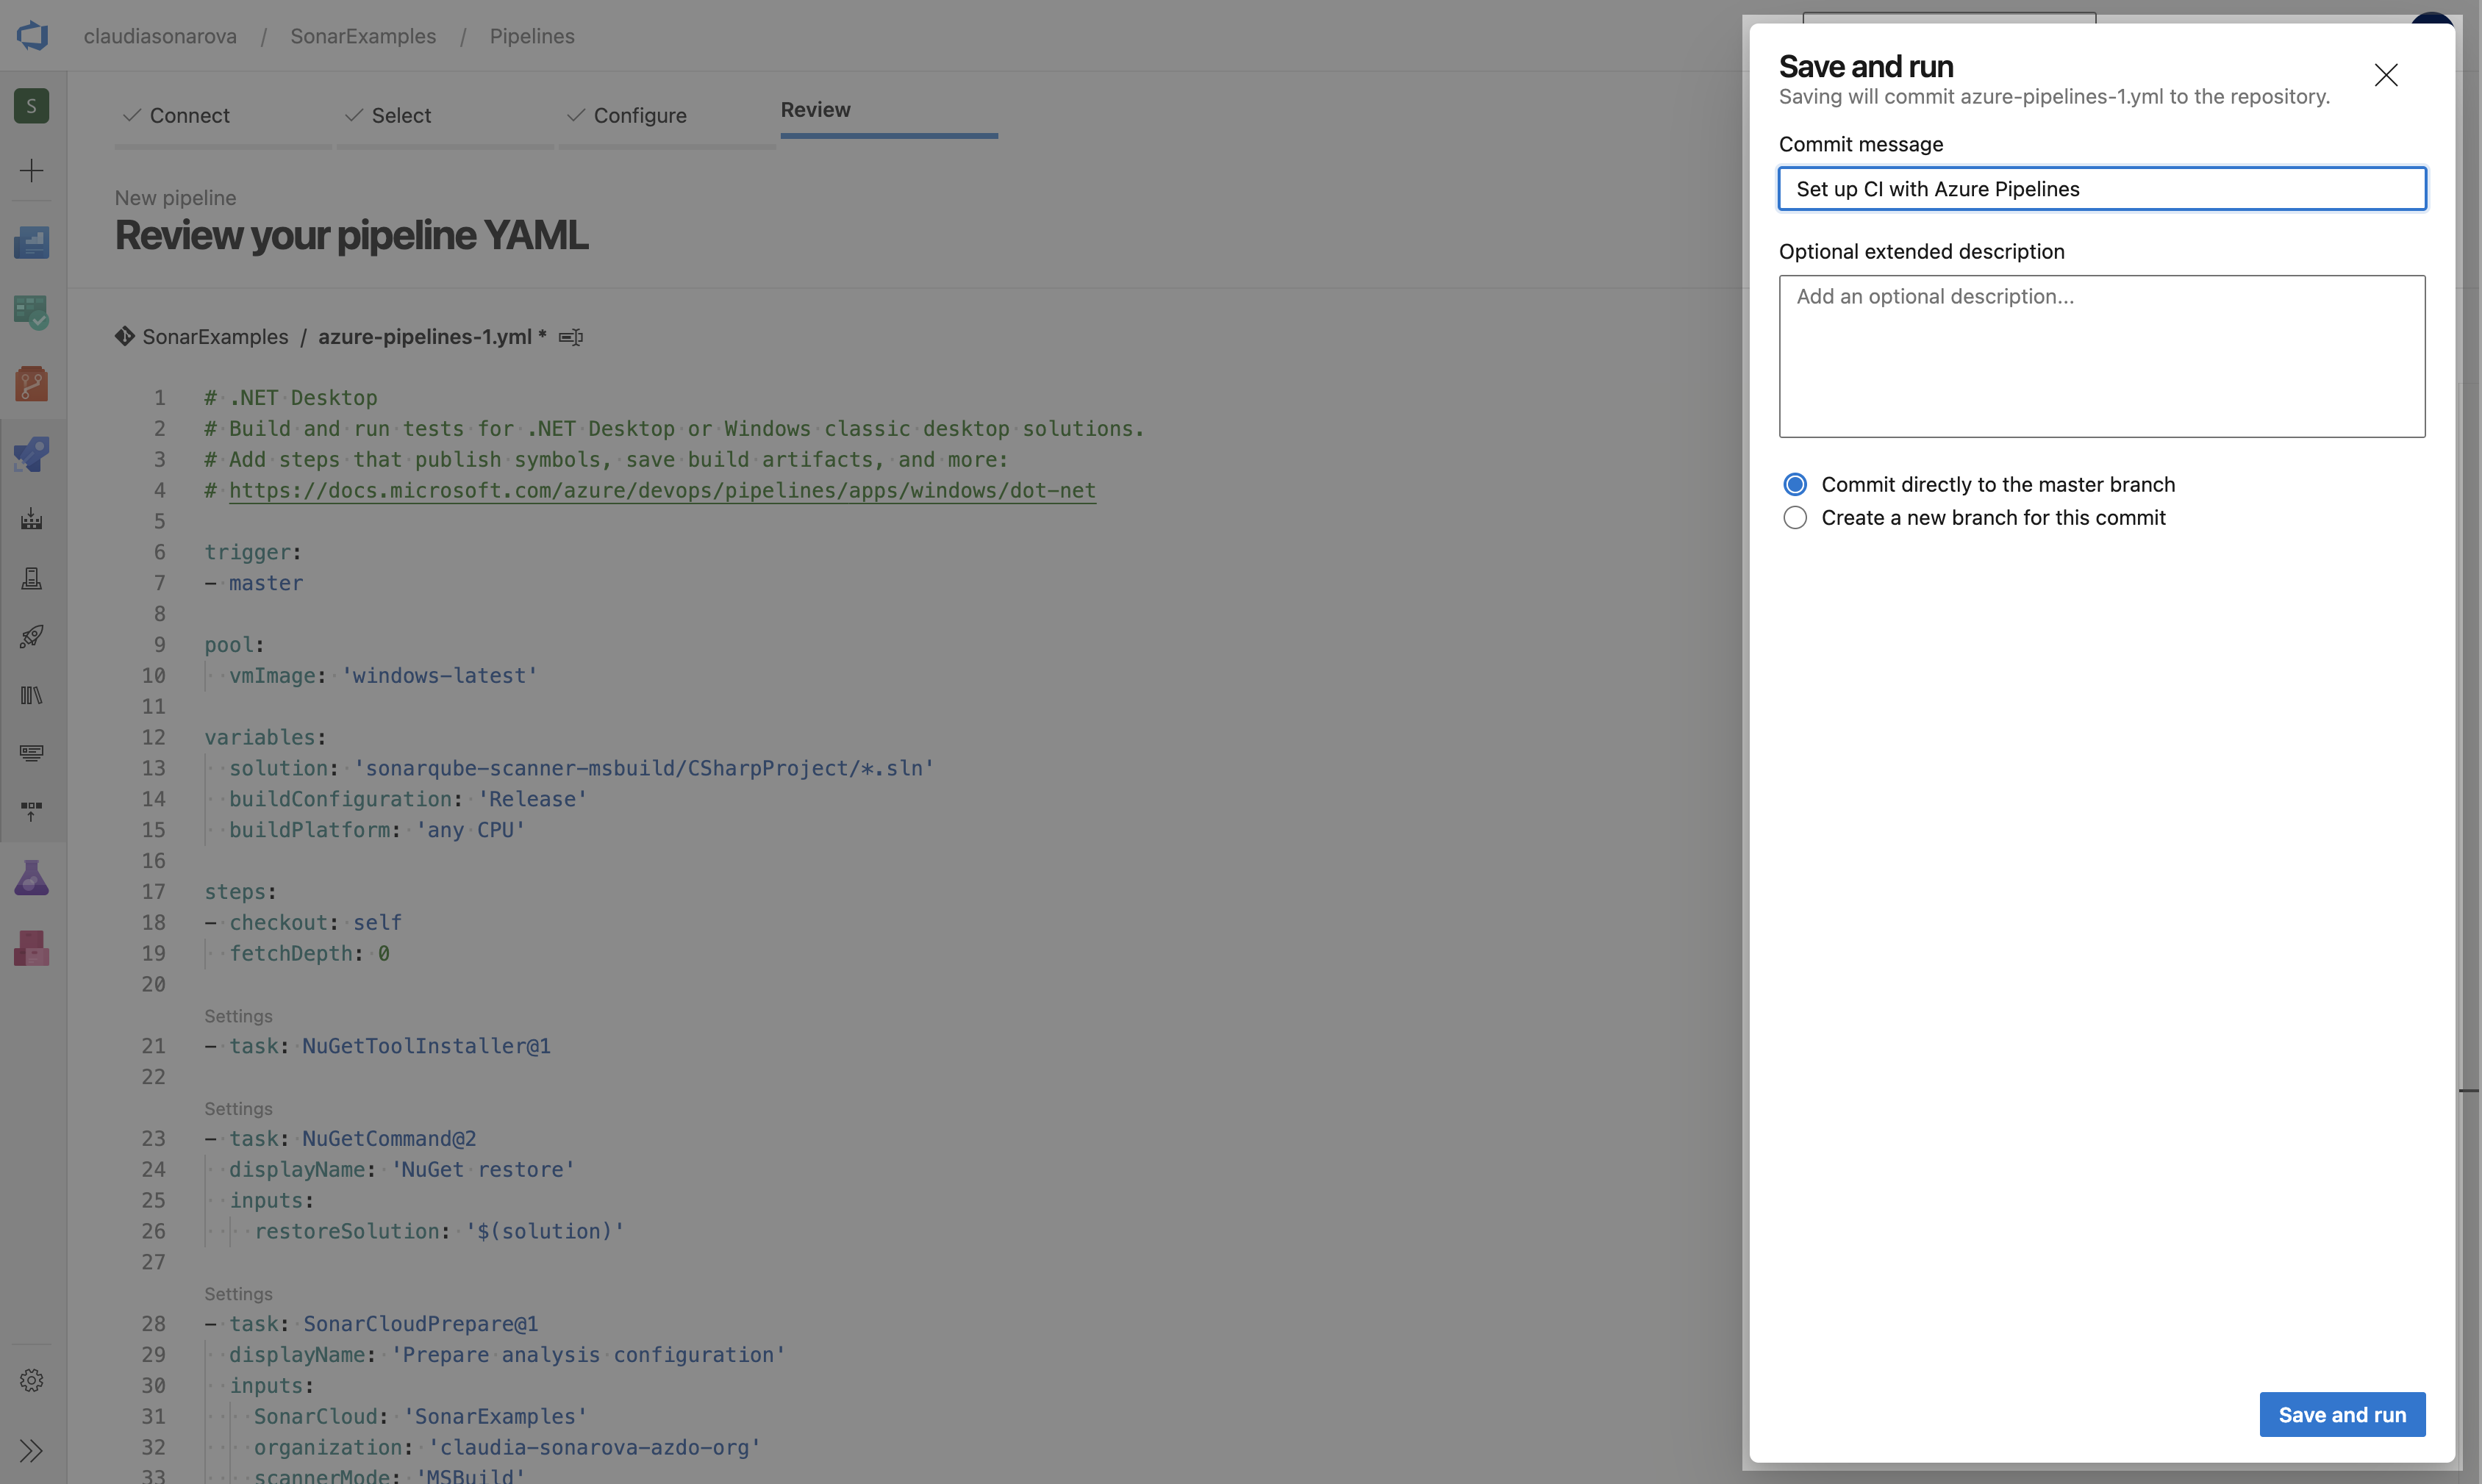
When you are done making the changes to the YAML file, edit the commit message and select Save and run:
- Modify the Build task: change the pointer to the solution. Note that we:
Classic Editor (skip this method if you chose the YAML option)
Use of the classic editor is still supported by Azure DevOps and therefore still supported by SonarCloud.
To continue with this alternate part of Exercise 1, you should have already started the setup process in SonarCloud so that your service endpoint is created, and installed the SonarCloud extension in Azure DevOps.
-
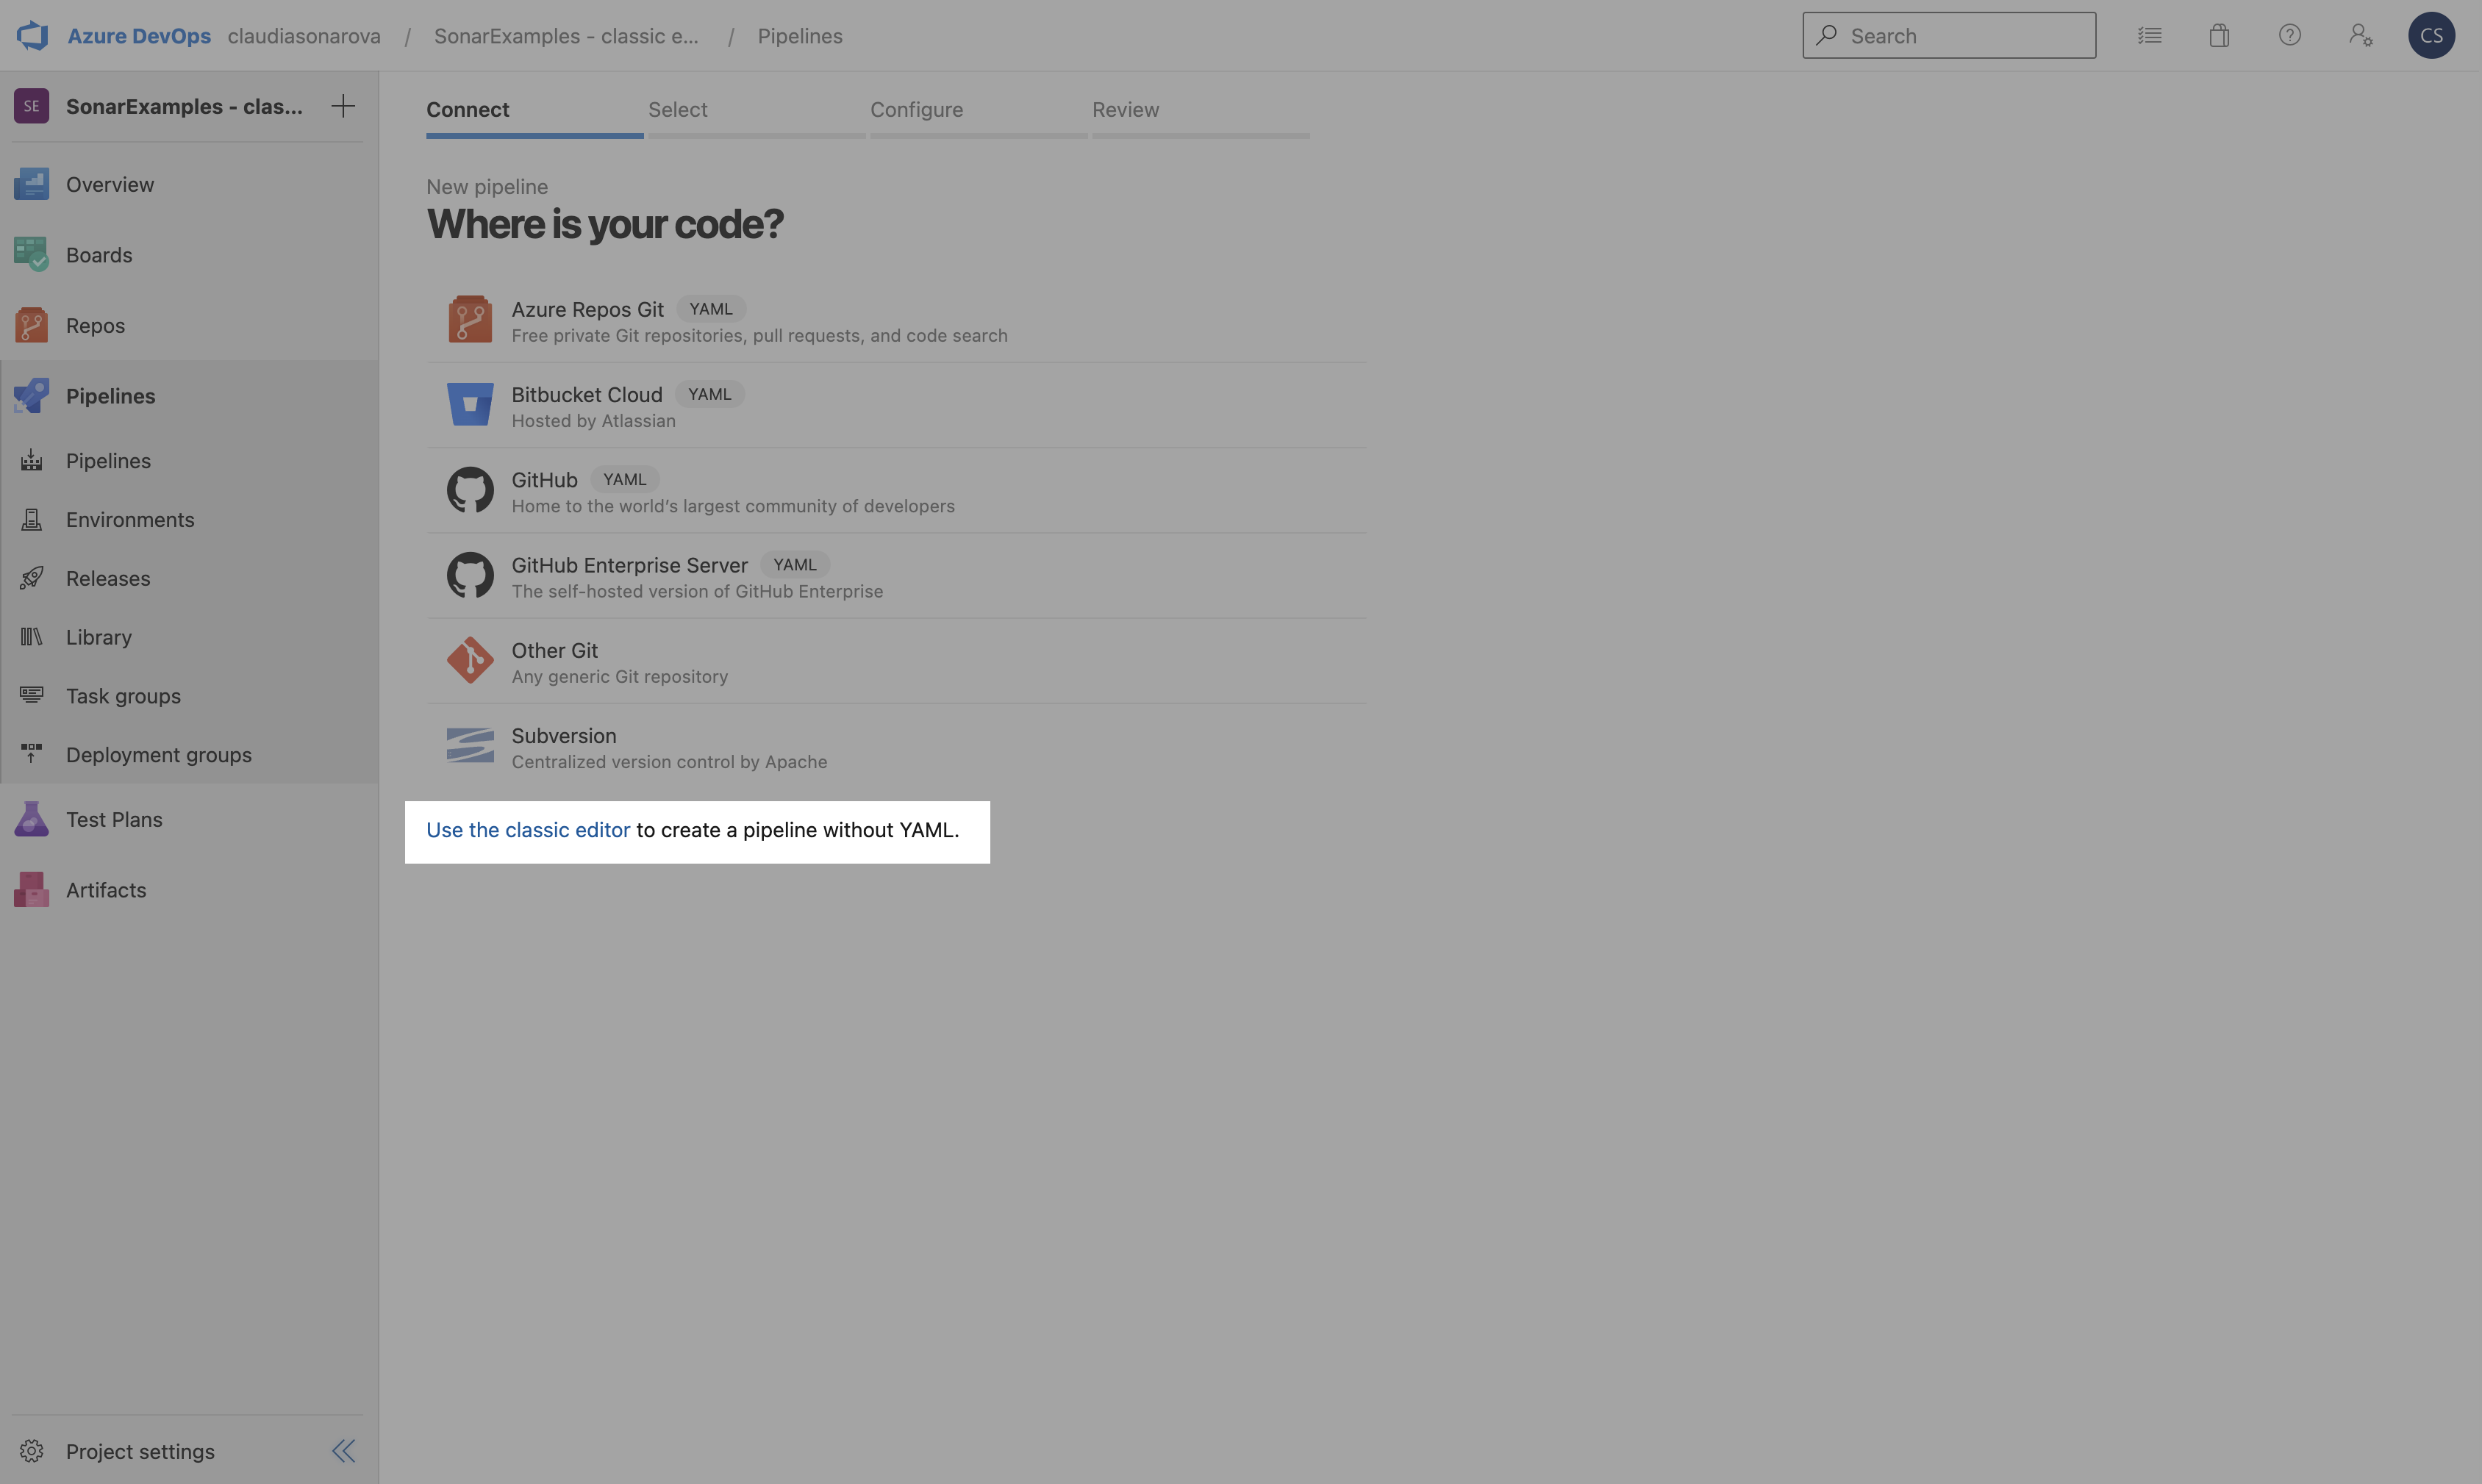
To configure the pipeline using the classic editor, select Use the classic editor on the Where is your code? page:
-
Select your source, Repository and Default branch for builds. The selection needed for the steps followed in this tutorial are highlighted. Then click Continue.

The SonarCloud extension installed earlier provides SonarCloud-enabled custom build templates for Maven, Gradle, .NET Core and .NET Desktop applications. The templates are based on the standard Azure DevOps templates and have additional analysis-specific tasks as well as some pre-configured settings to make the process easierto configure.
-
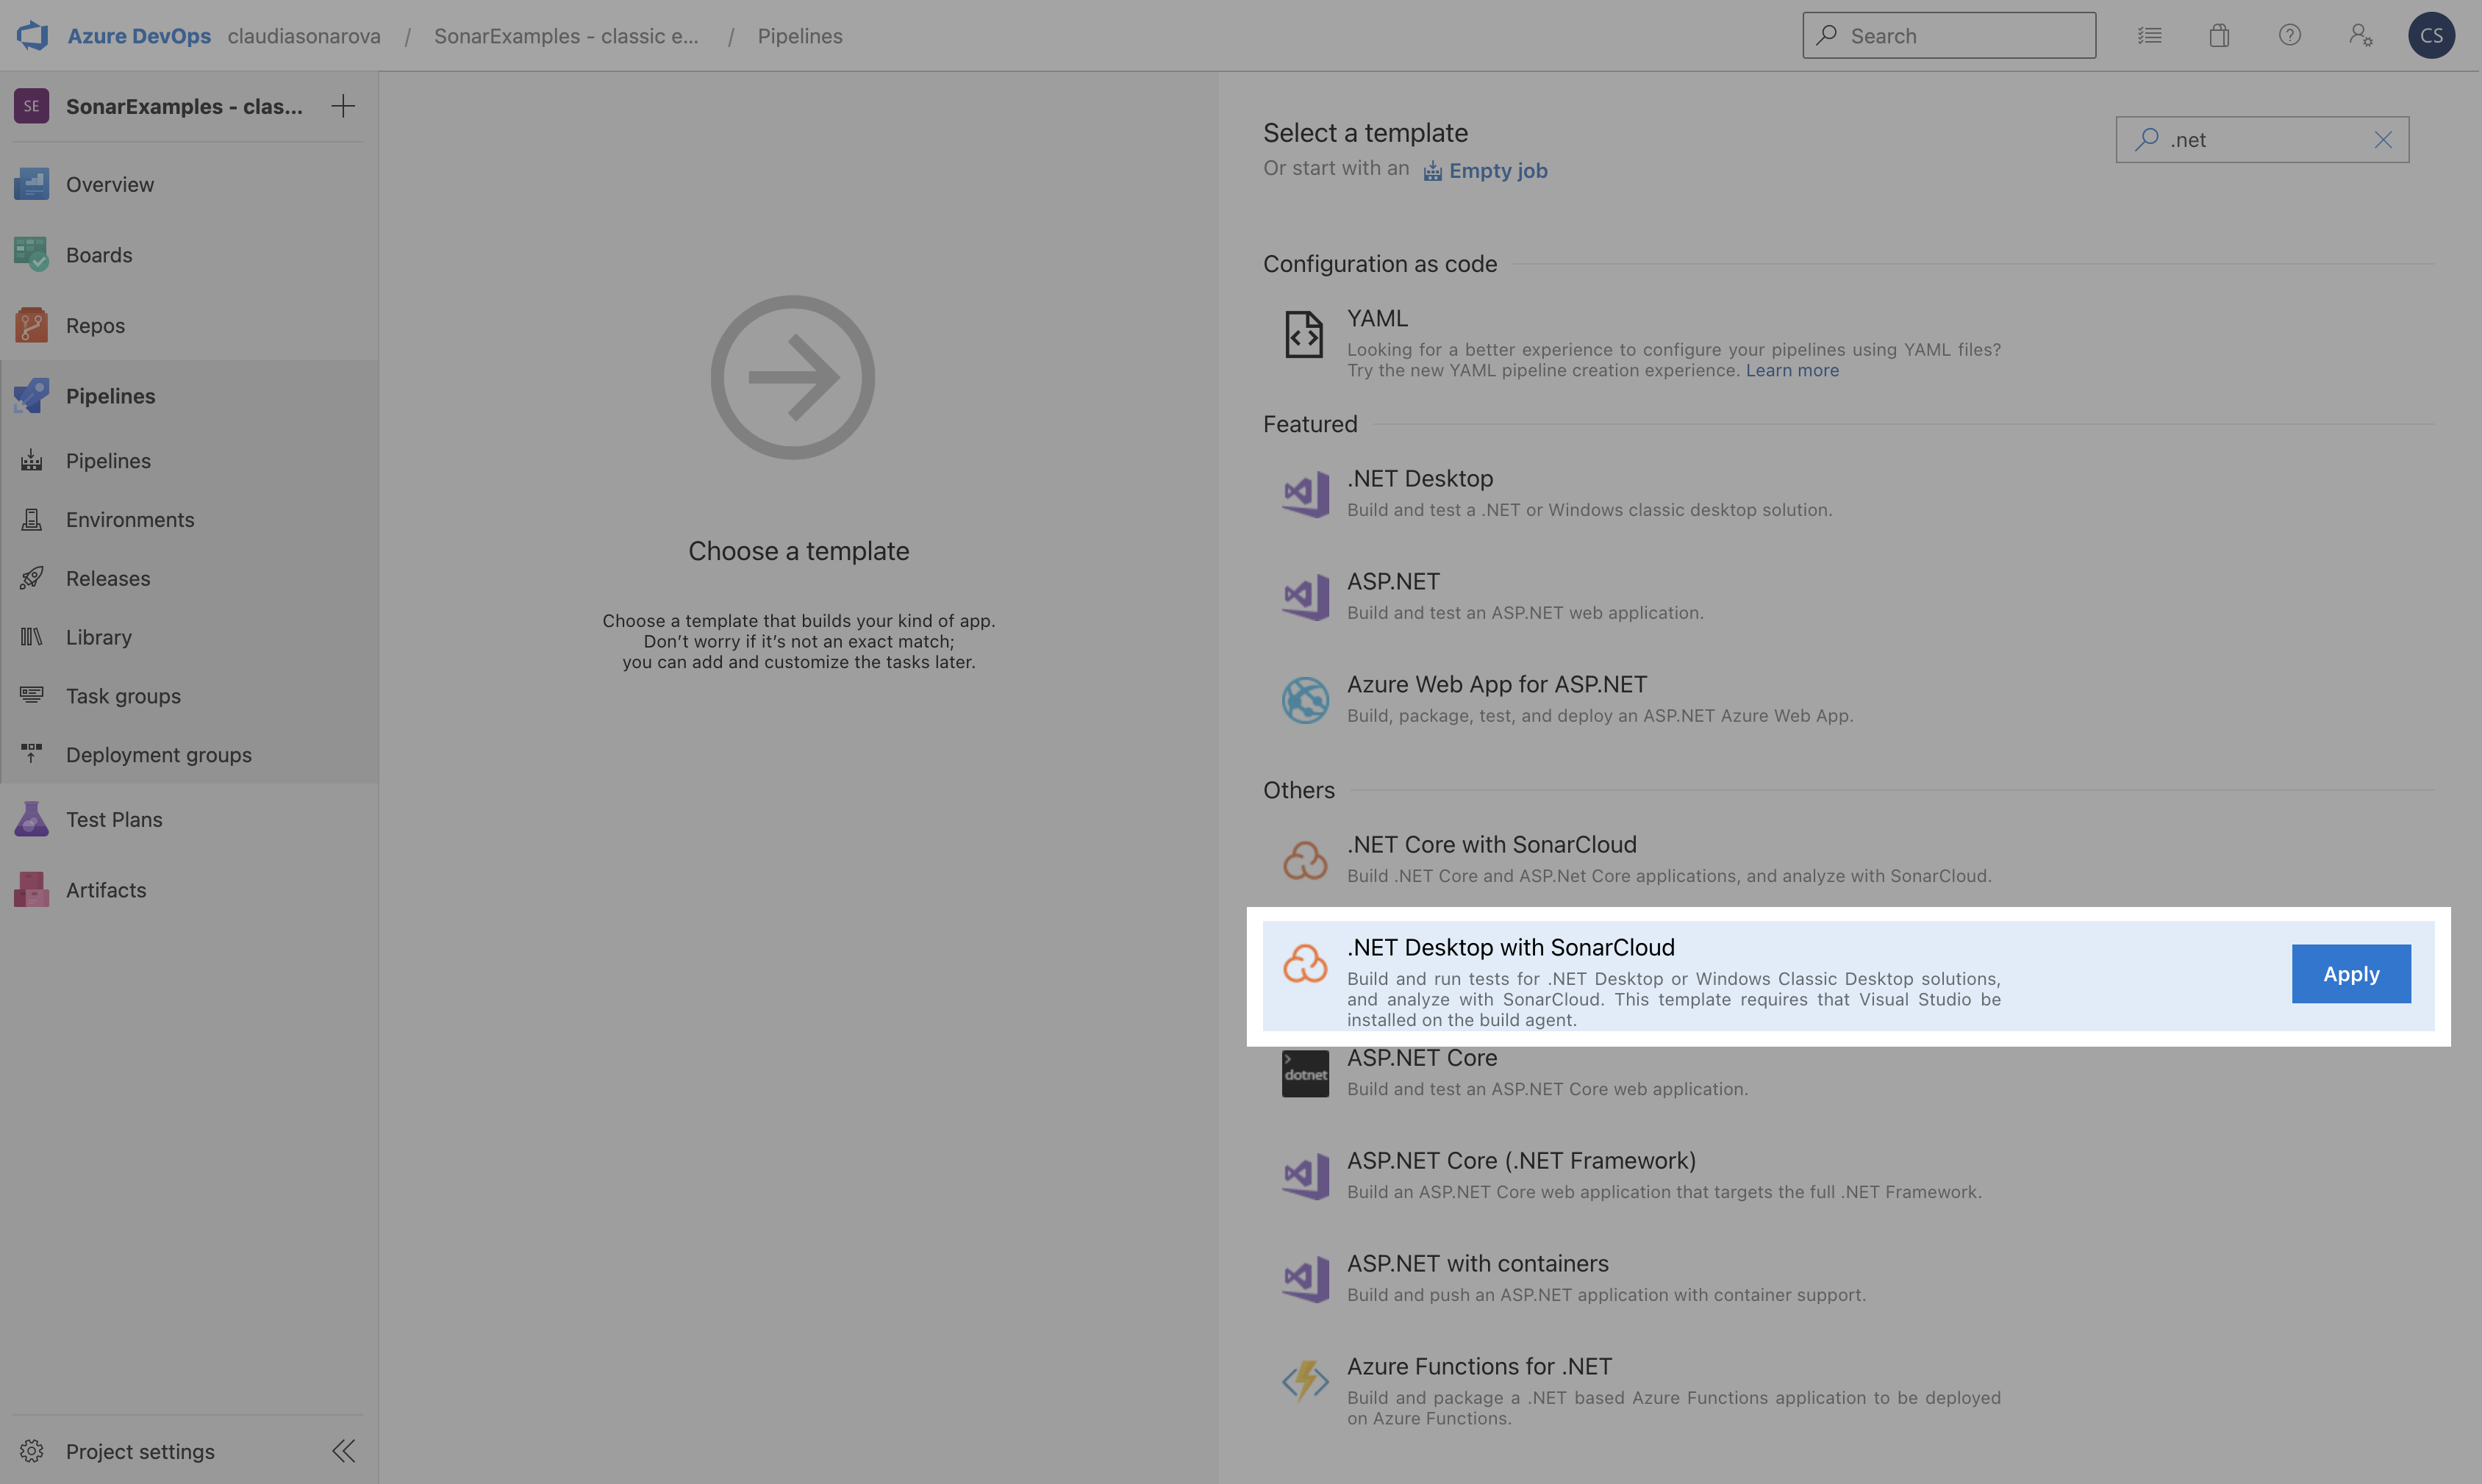
Select the .NET Desktop with SonarCloud template and click Apply.
The template contains all of the necessary tasks and most of the required settings. However, You will need to provide a few additional settings.
-
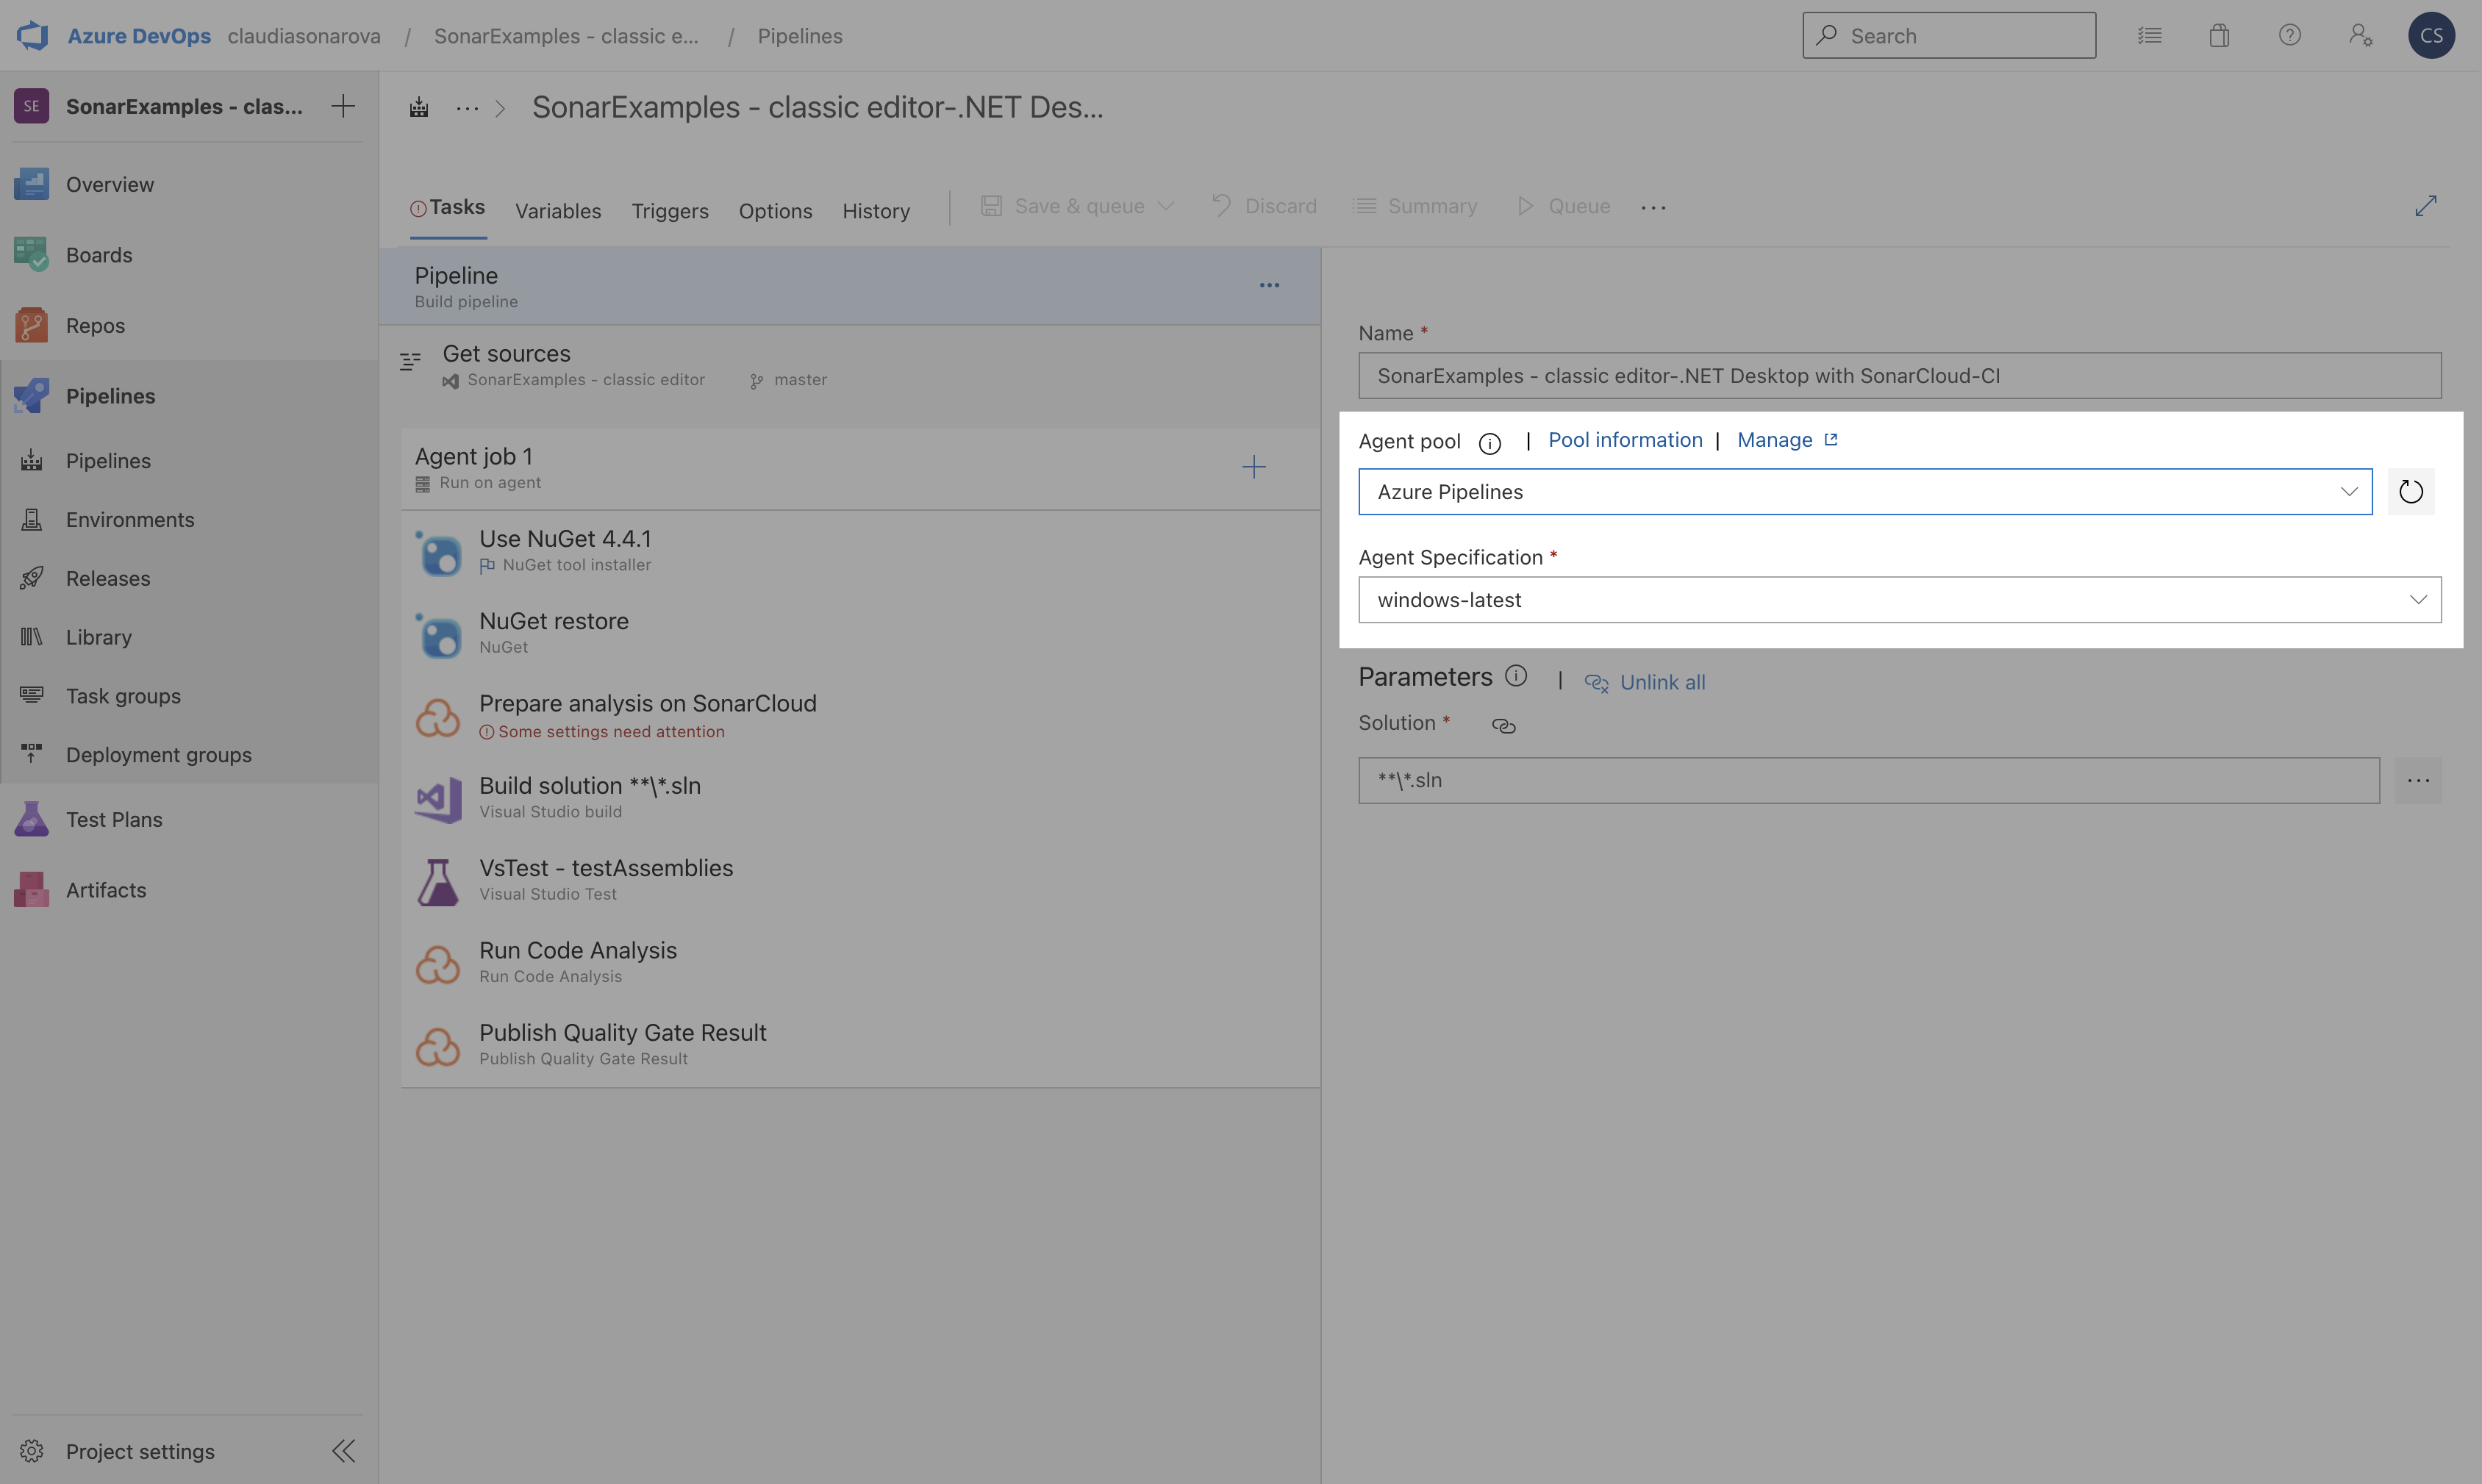
The pipeline editor will open and you must now define your tasks. First, select your Agent pool and Agent Specification; we used Azure Pipelines for the Agent pool and, for our project, windows-latest as the Agent Specification.
-
Go to Get sources in Azure and disable your Fetch Depth. The SonarCloud tutorial recommends to set the Fetch depth to
0, but this is not an option when using the Classic editor. When the fetch depth is ≠ 0, some features, such as automatic assignment of issues, may be missing or broken. Disabling shallow clone is recommended for improving the relevancy of reports, but it is not required to run an analysis.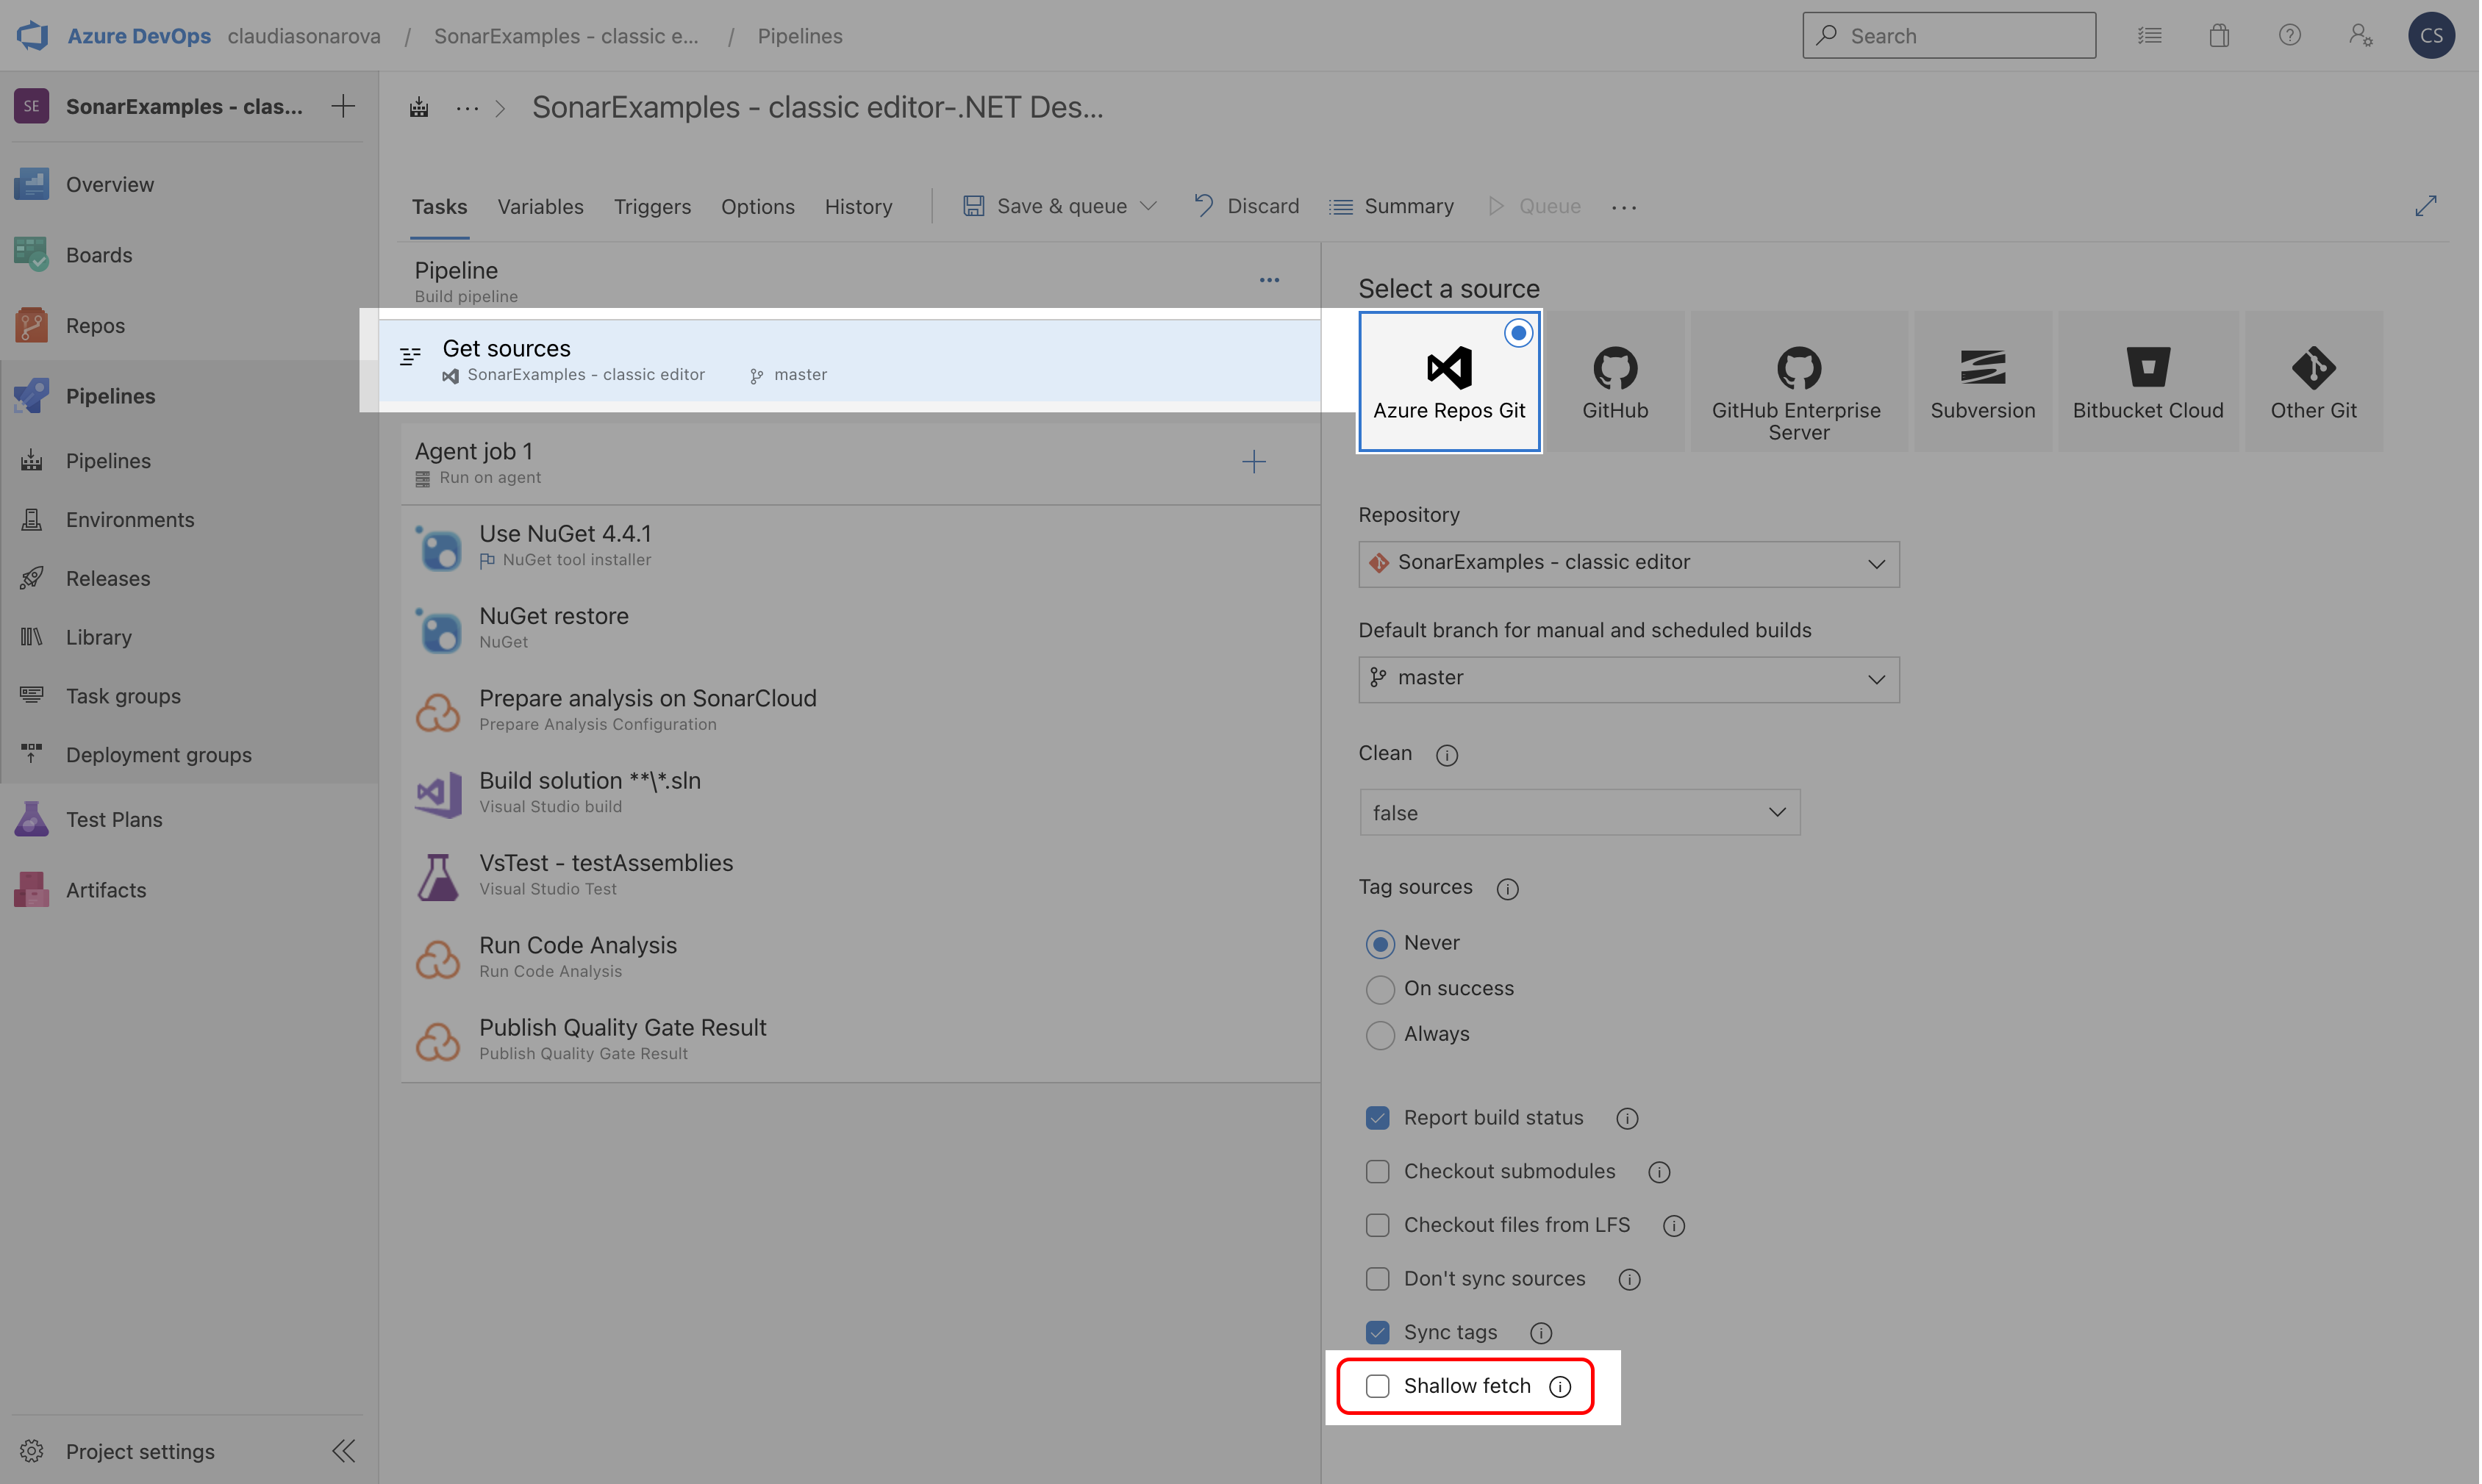
-
Next, we must add the analysis configuration values given by the SonarCloud in-product tutorial to the Prepare analysis on SonarCloud step in the pipeline.
-
If you haven’t already defined your SonarCloud Service Endpoint, do it now; it was the last step we took in SonarCloud before starting Exercise 1. To create a new service endpoint, click the New button then add your SonarCloud Token and Verify the connection. If verification works, give your token a name then select Verify and save to define it in the task.
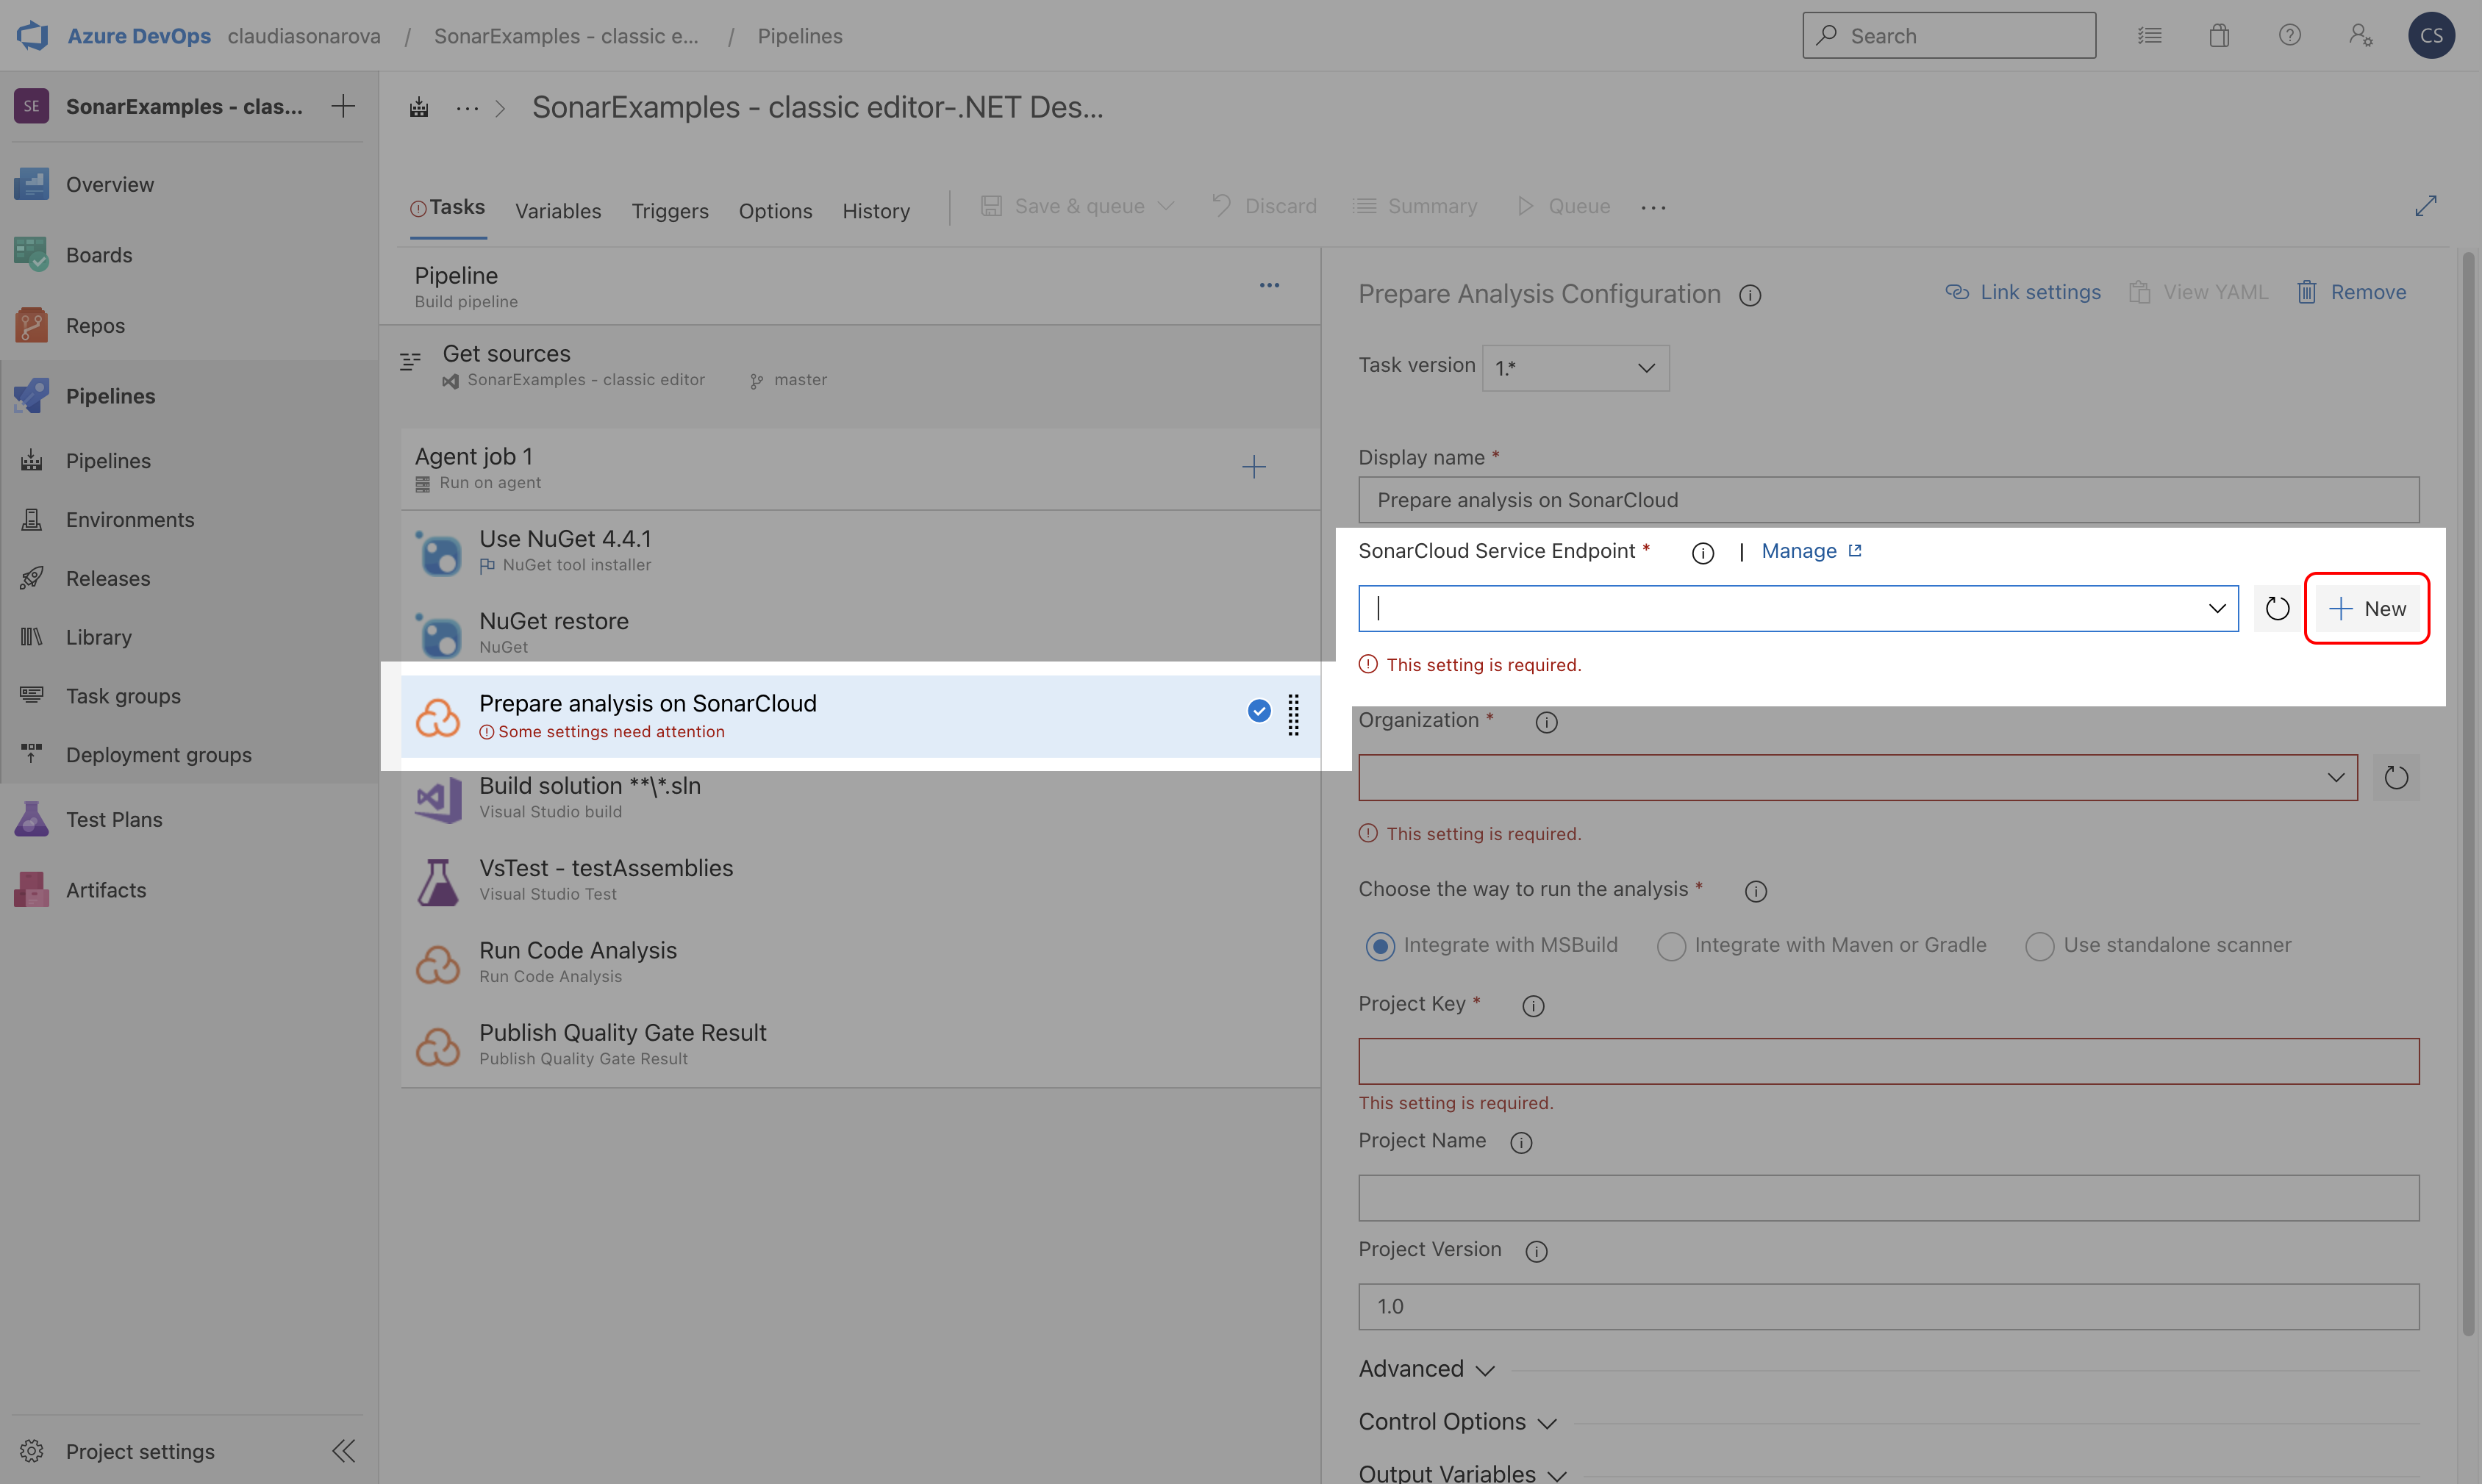
The SonarCloud in-product tutorial will generate an endpoint token for you during project setup. This token identifies your account on that system and allows other services, in this case, Azure DevOps, to connect to that account. You can create and revoke tokens at any time by going to My Account > Security in SonarCloud. For this tutorial, we used the token provided by the in-product tutorial.
-
If the token was correctly copied, Azure DevOps should connect with your SonarCloud account and you should be able to click on the Organization drop-down to select the organization you created earlier; choose it from the dropdown (in our case
claudiasonarova-azdo-org). -
SonarCloud’s in-product tutorial gives you the next values you must define: Choose the way to run the analysis, copy/paste your Project Key, and copy/paste your Project Name (items 3 & 4 in the image).
-
With all of the project settings defined in Azure, select Save and queue, add a commit message, and select Save and run to test your pipeline.
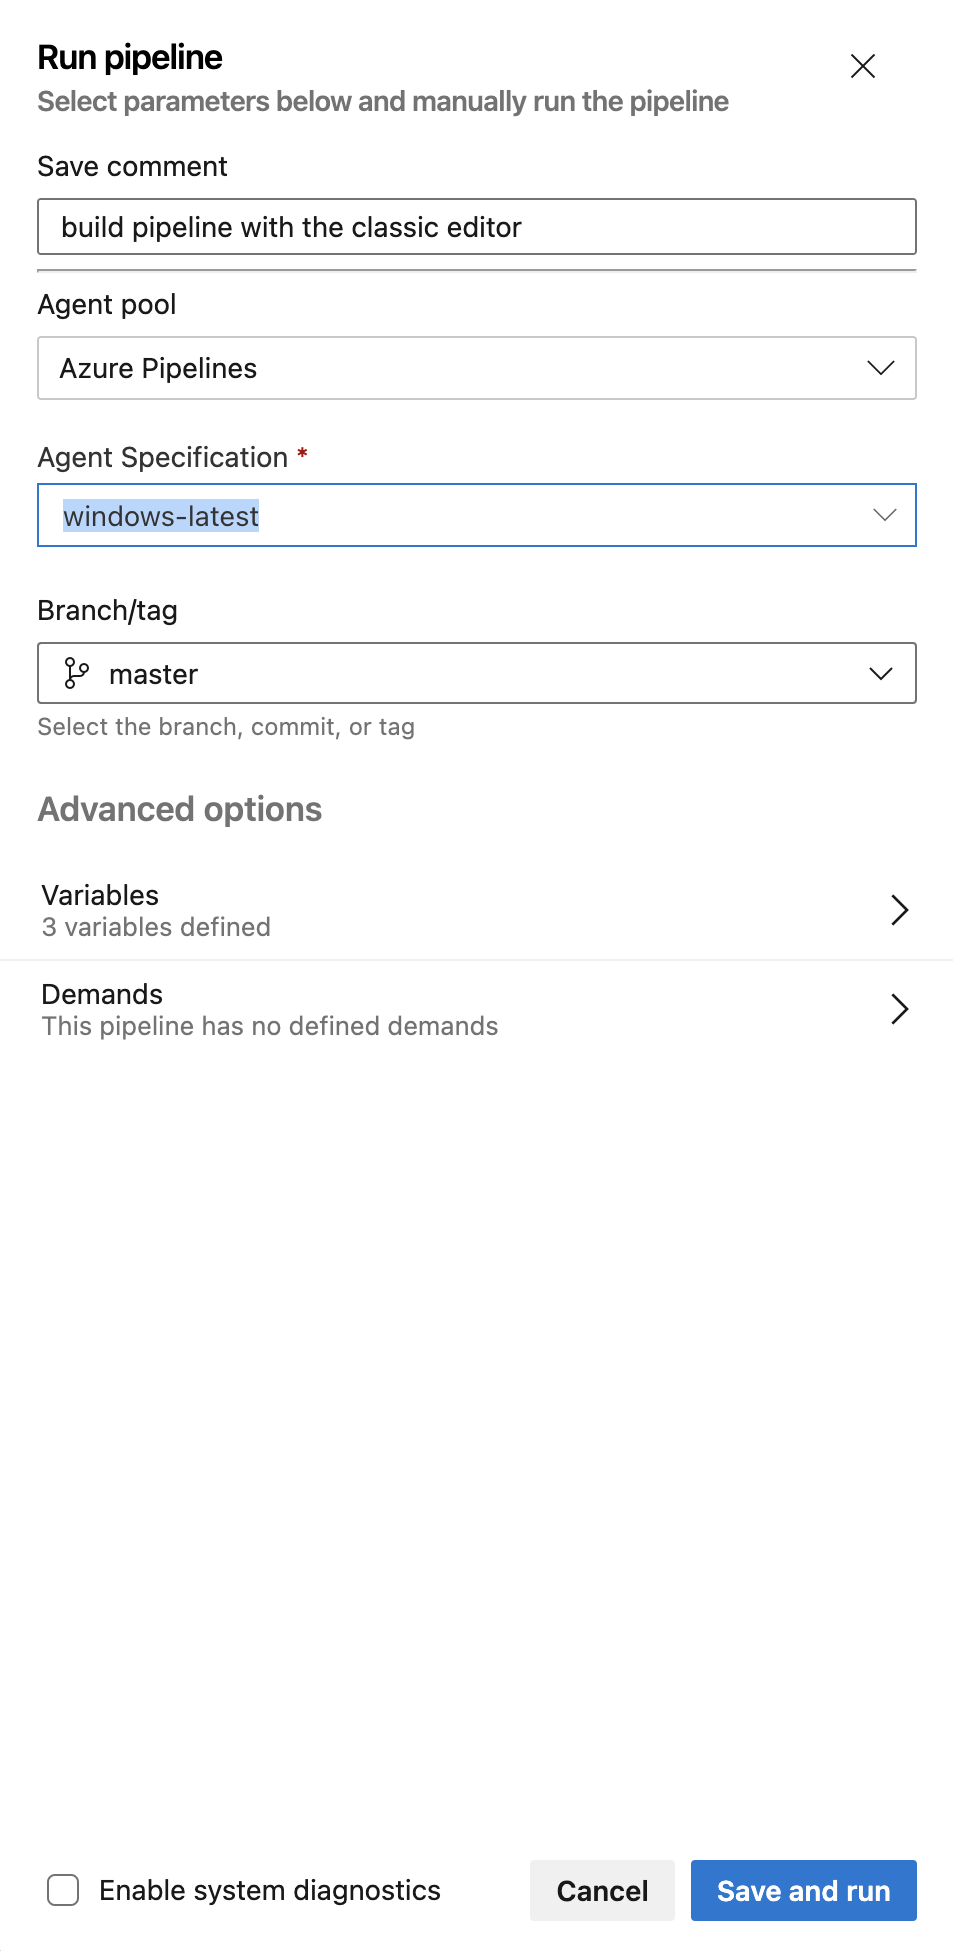
If you set up everything correctly, the pipeline will run and your SonarCloud in-product tutorial page will refresh and present your project’s first analysis results!

-
-
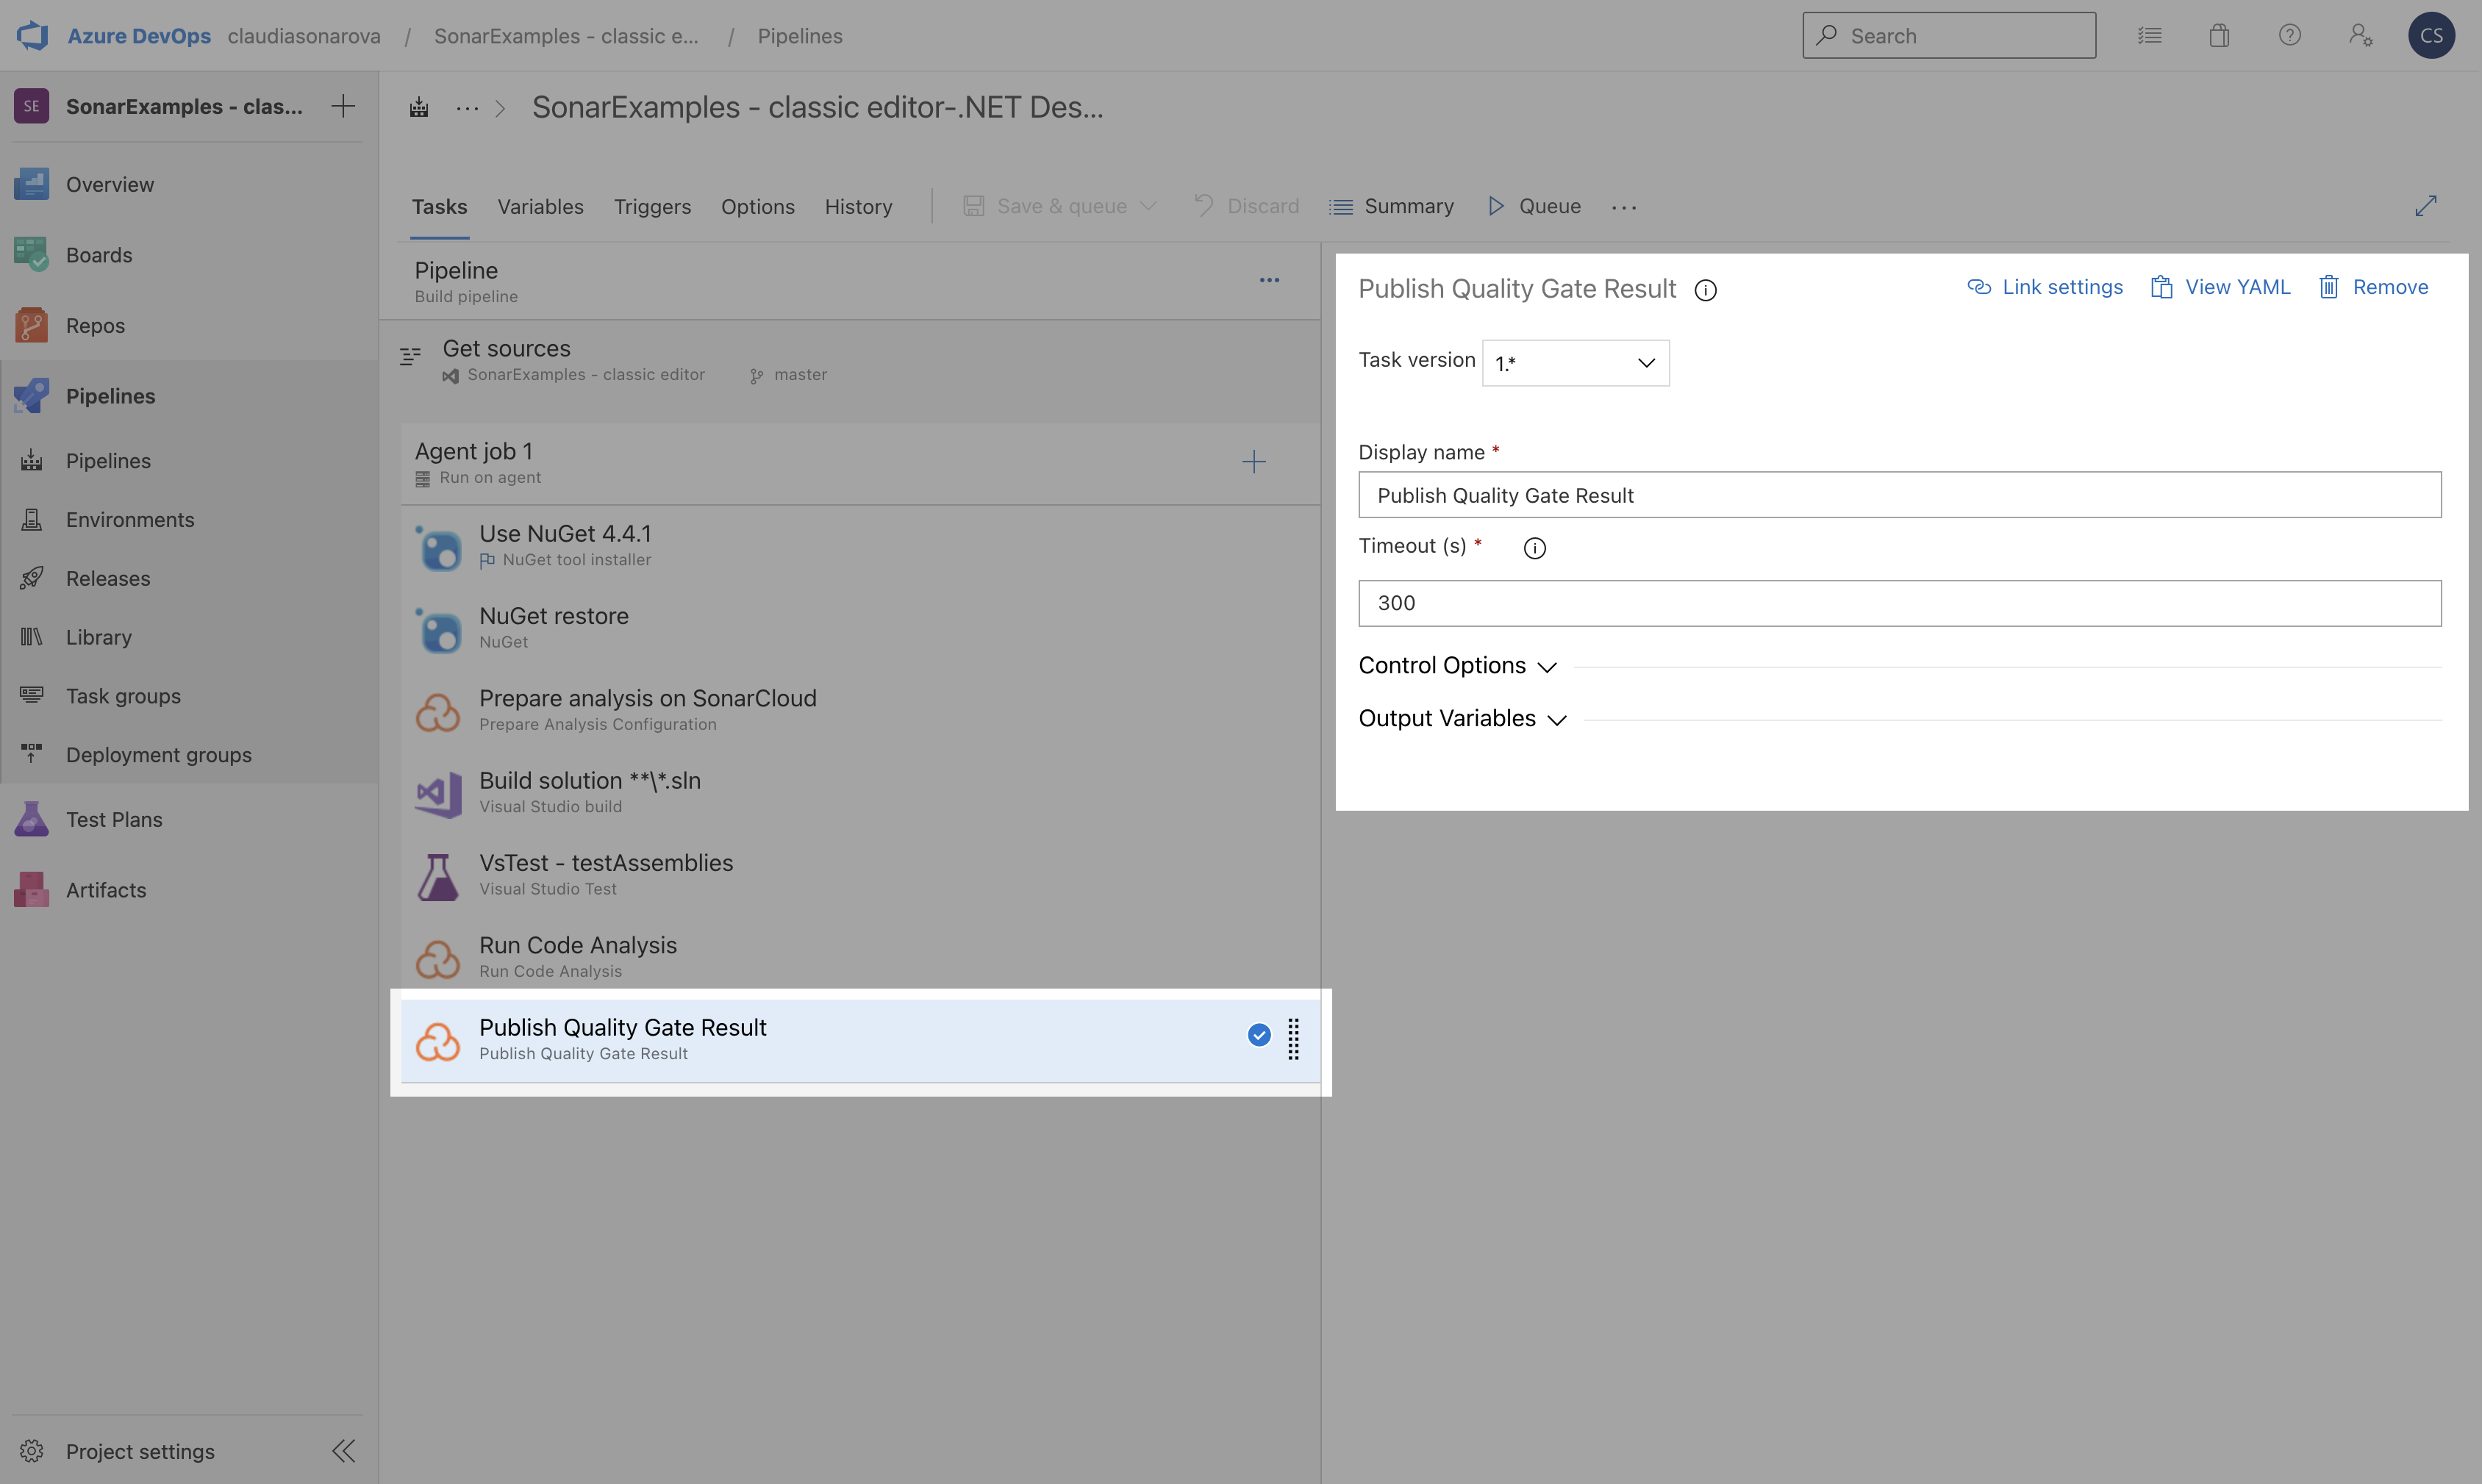
[Optional] Enable the Publish Quality Gate Result step in your pipeline.
This step is added by default via the .NET Desktop with SonarCloud template, and is recommended to use SonarSource’s Clean as You Code best practices. Enabling this feature will delay the completion of the build until the processing on SonarCloud has finished. However, it can be removed if desired.
-
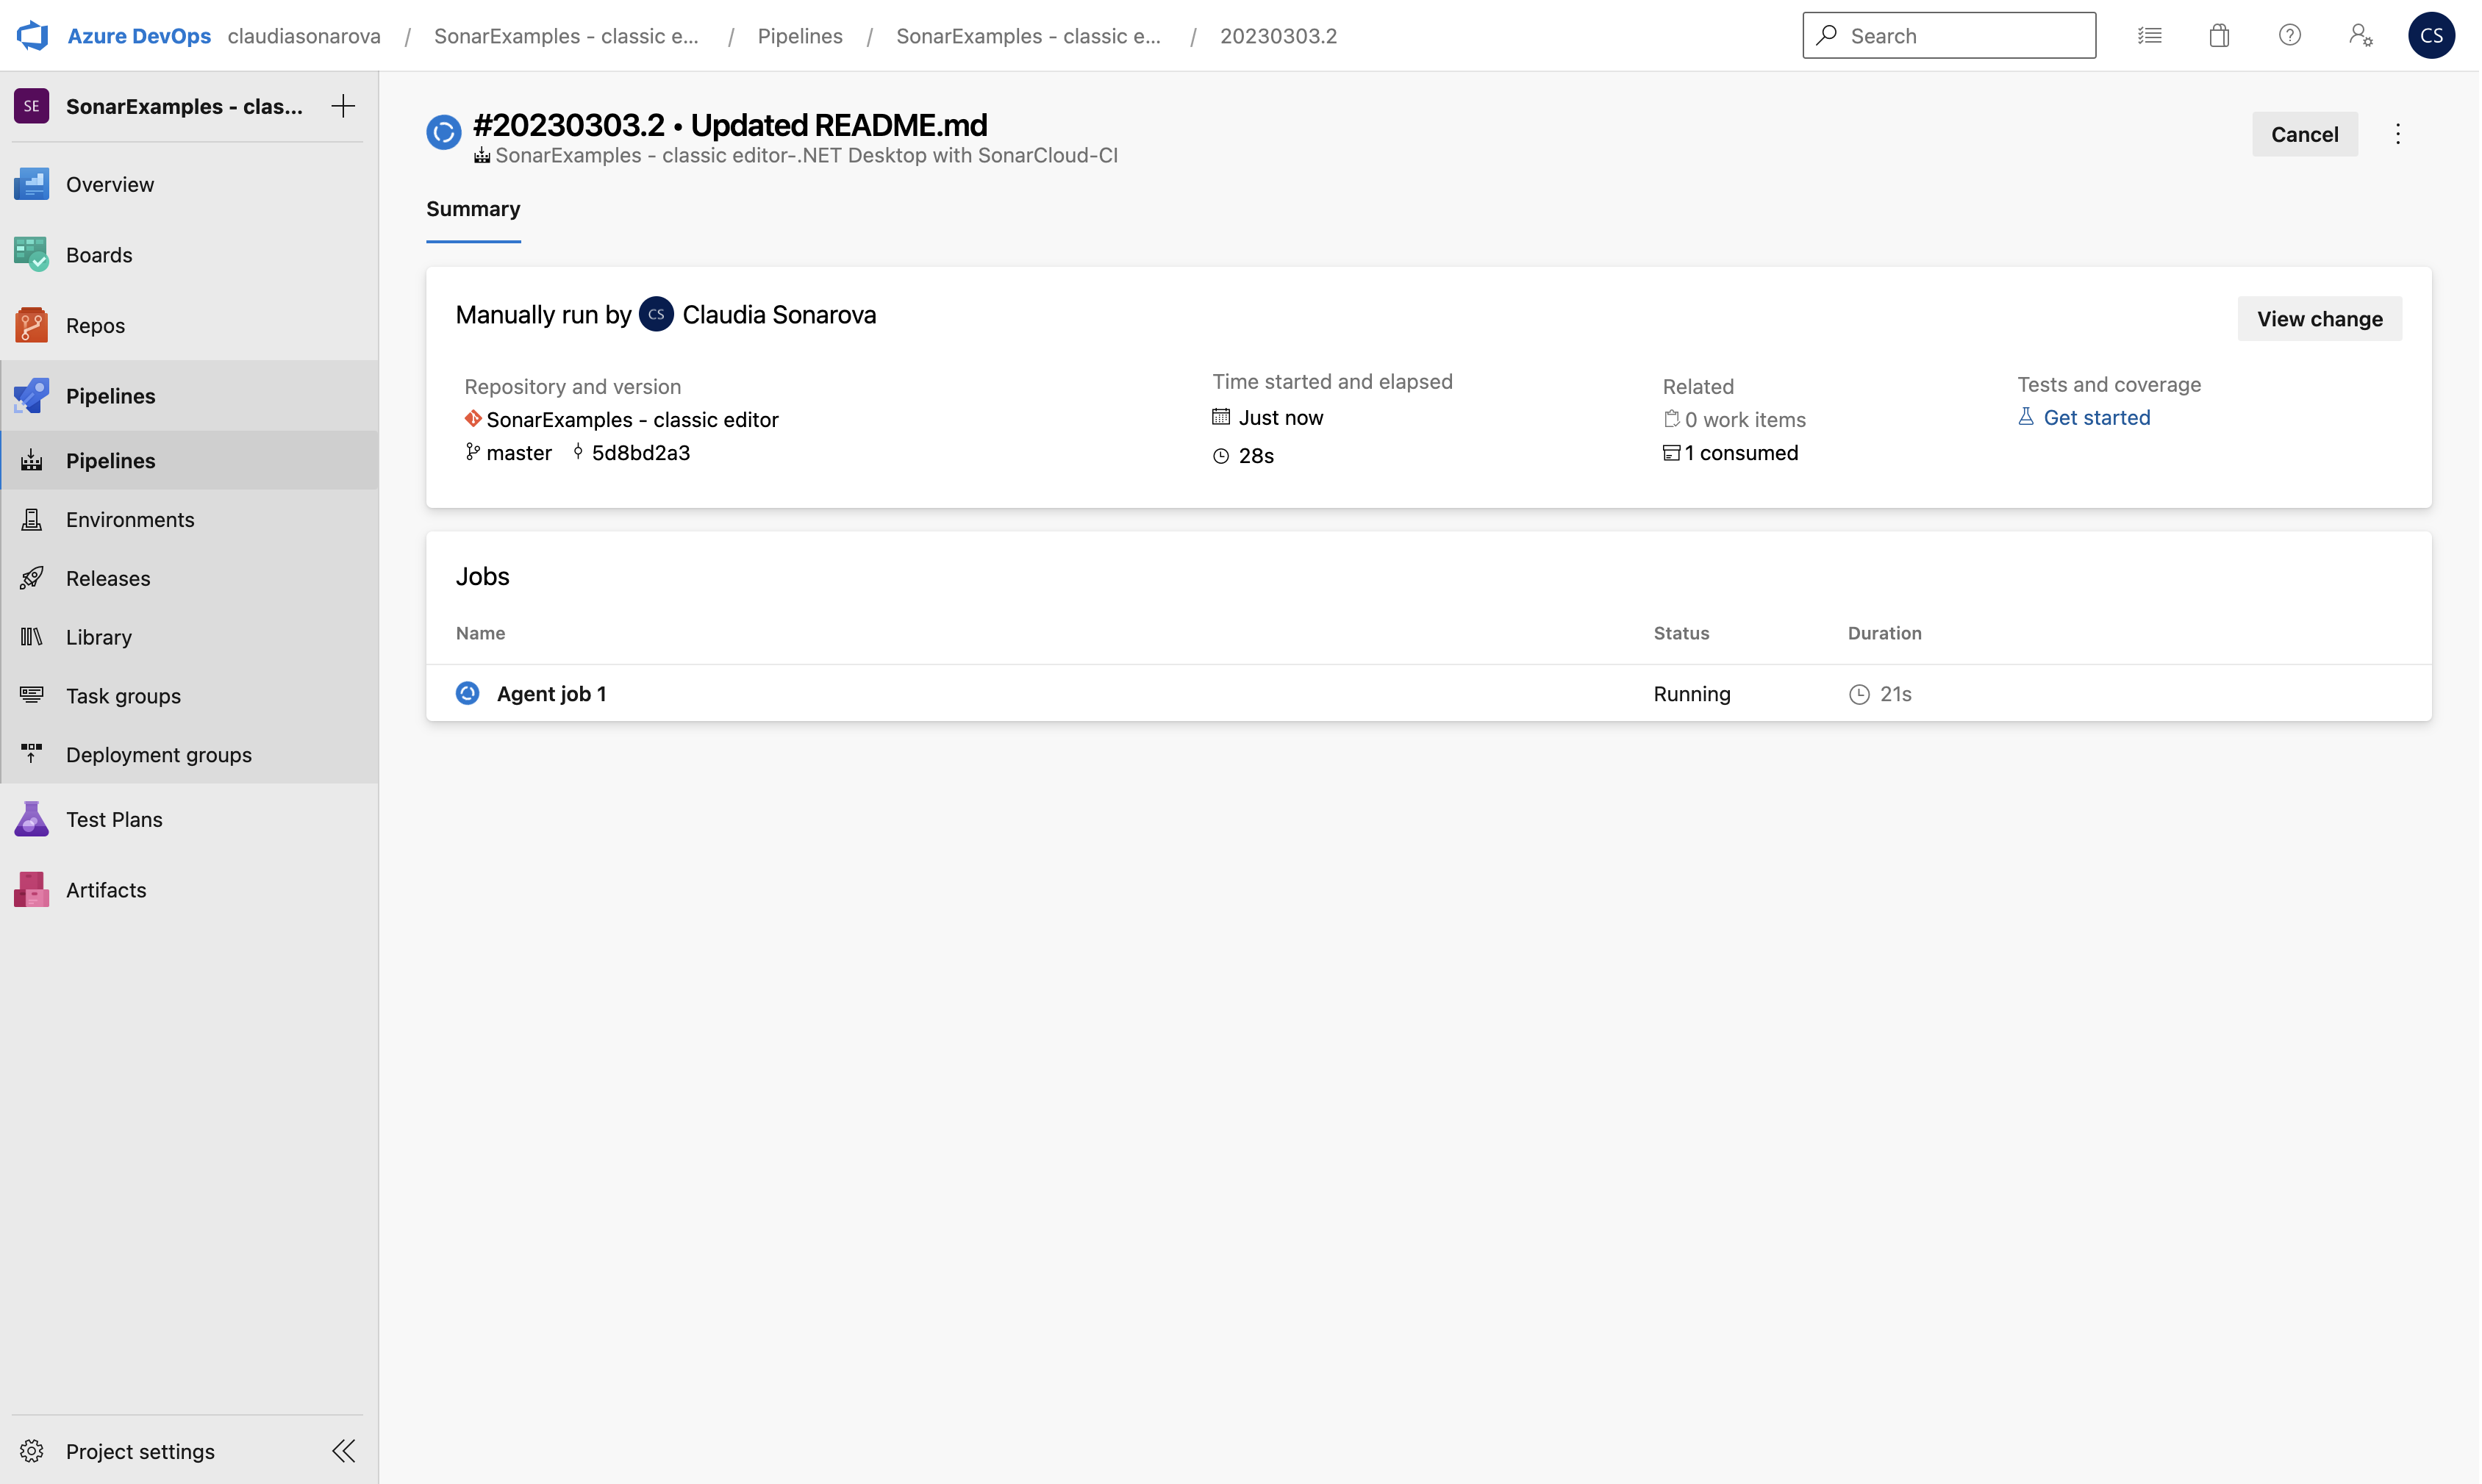
Save and queue the build to update the pipeline after making changes. Once the build has started, you should see something like this:
-
If you did not change the default Enabled value in the Publish Quality Gate Result step of your pipeline, the Build Summary > Extensions tab in Azure will contain a summary of the analysis report. See step 11 about setting up your Sonar Quality Gate.
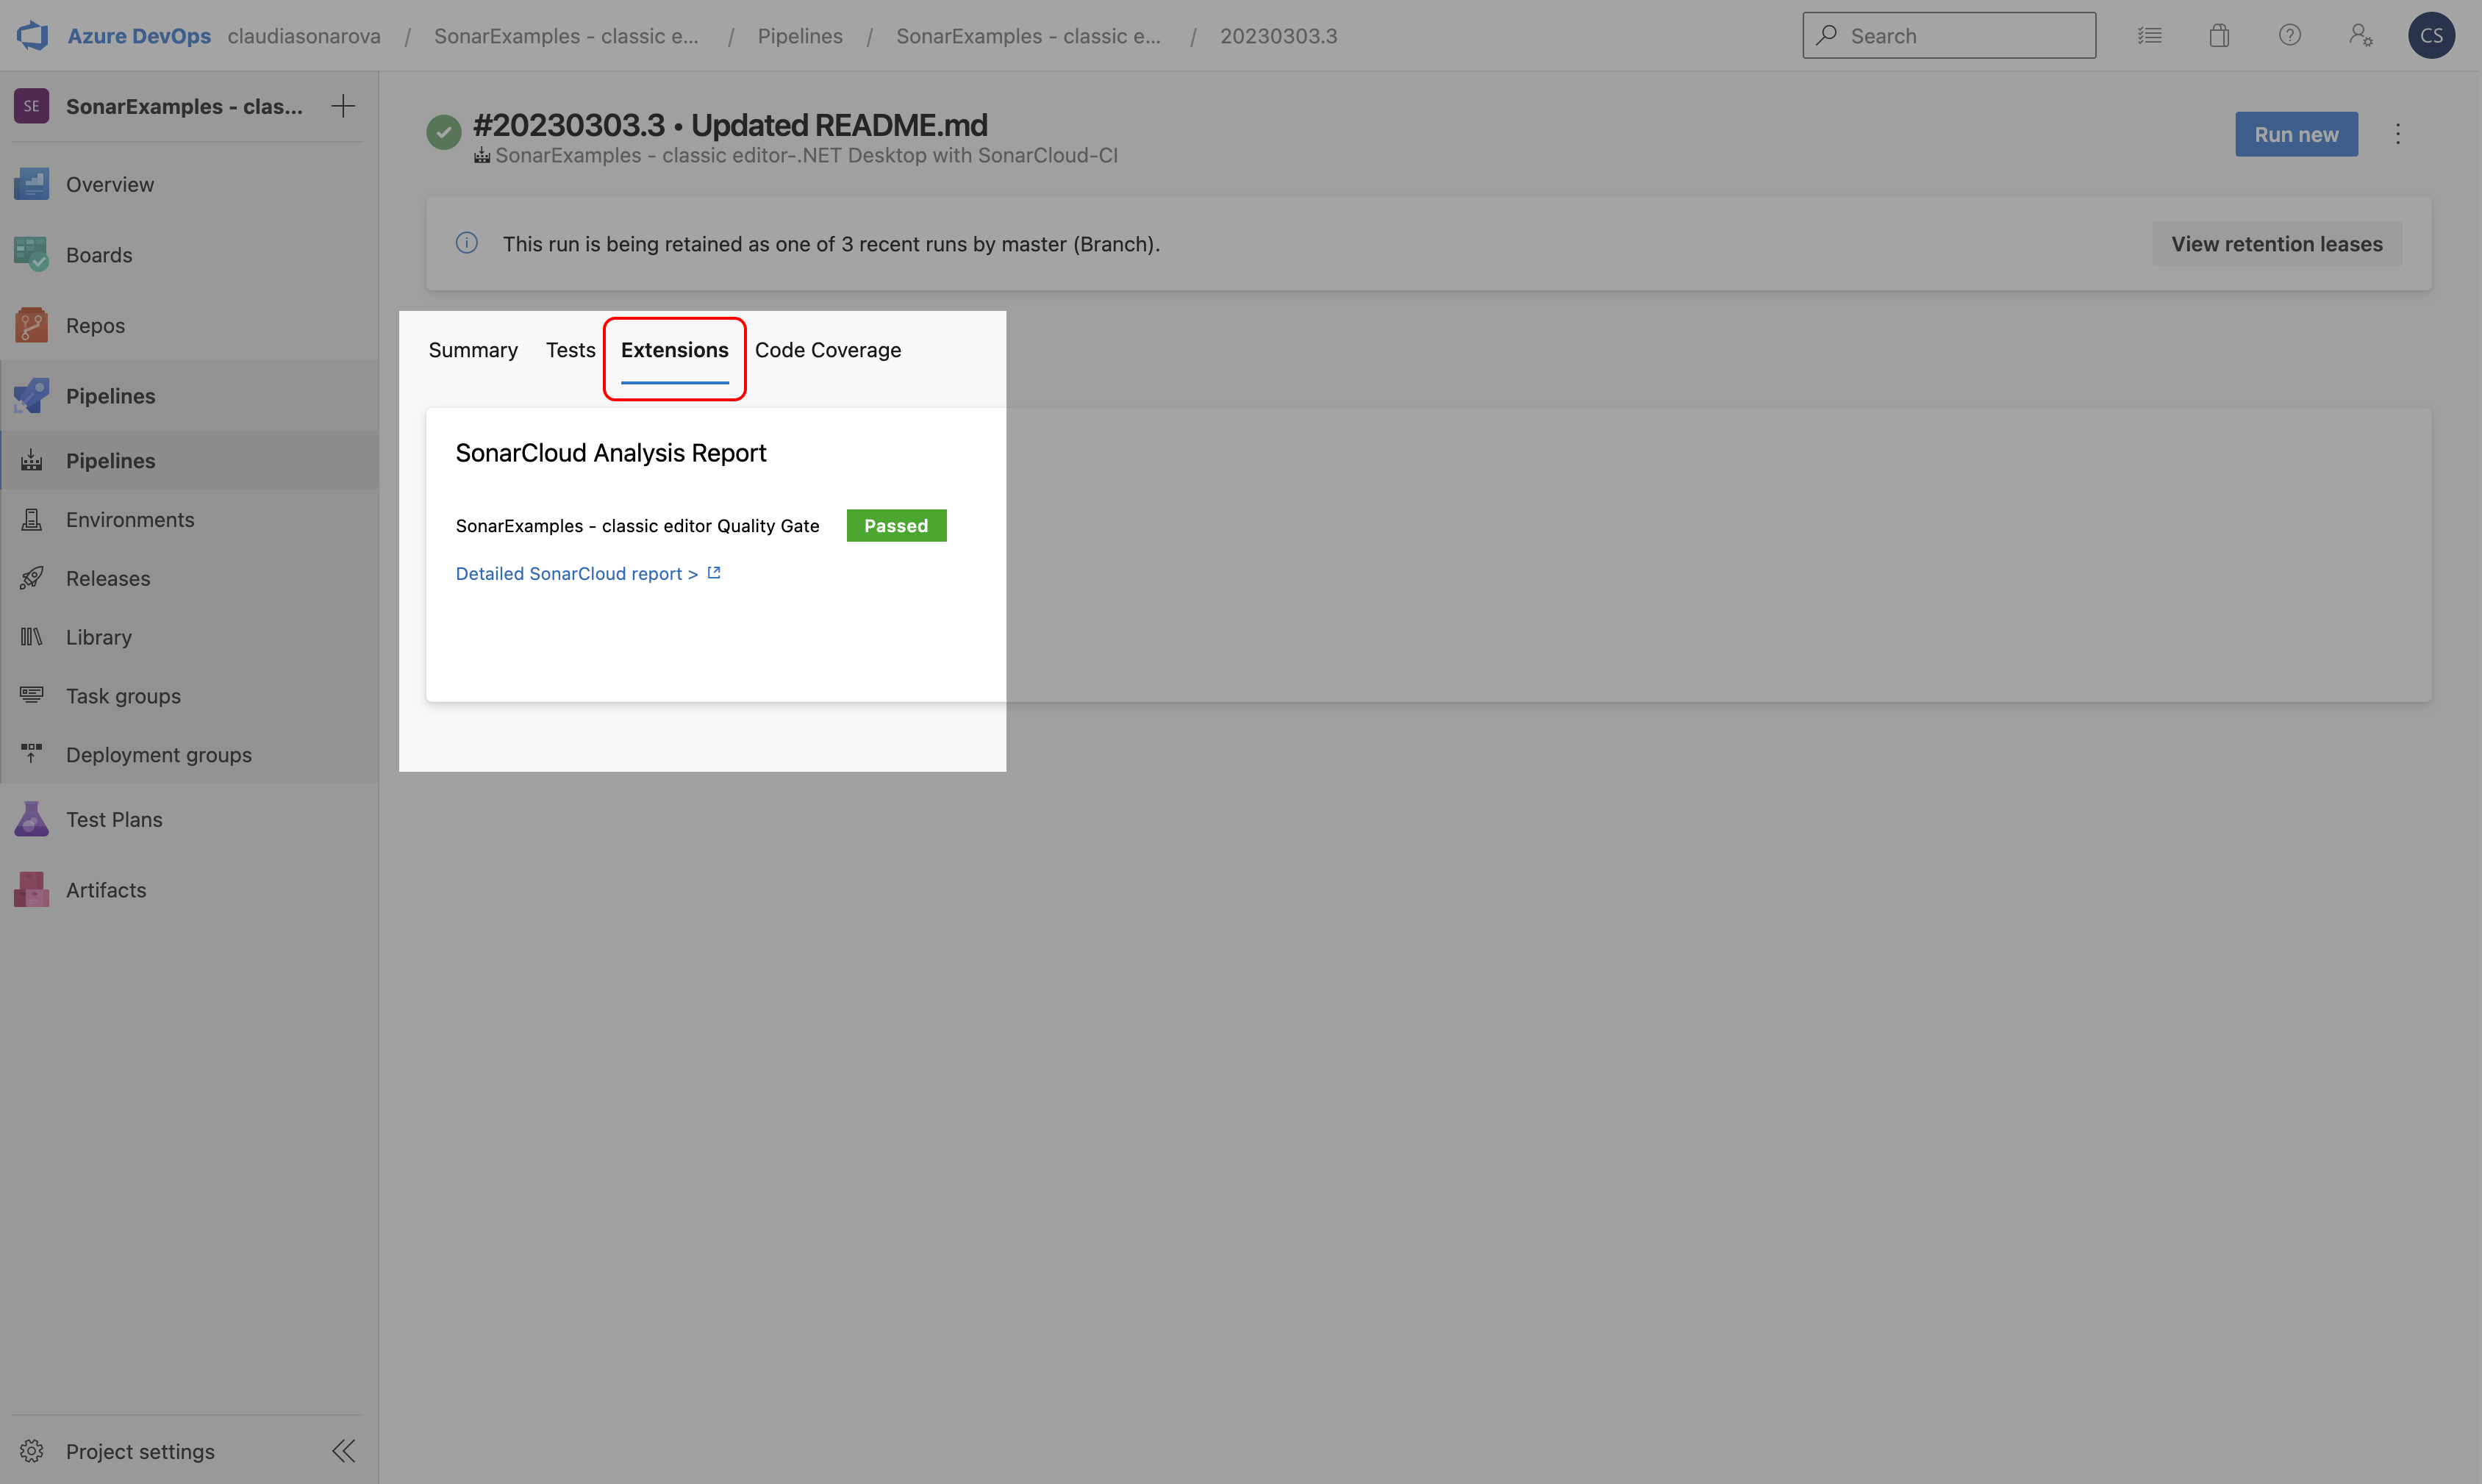
-
Either select the Detailed SonarCloud report > link in the Azure build summary, or browse to SonarCloud and open the project to view the analysis results in SonarCloud.
-
To be able to see the Sonar Quality Gate result in your Azure Build summary, you must:
- Run your first analysis to connect your Azure DevOps pipeline to your SonarCloud project.
- Define your New Code Period, and
- Issue your first PR to check the new code against your Quality Gate.
We have now created a new organization on SonarCloud and configured our Azure DevOps build to perform an analysis and push the results of the build to SonarCloud.
In Exercise 2, we will look at what to do with those reports in SonarCloud.
Exercise 2: Review SonarCloud Reports
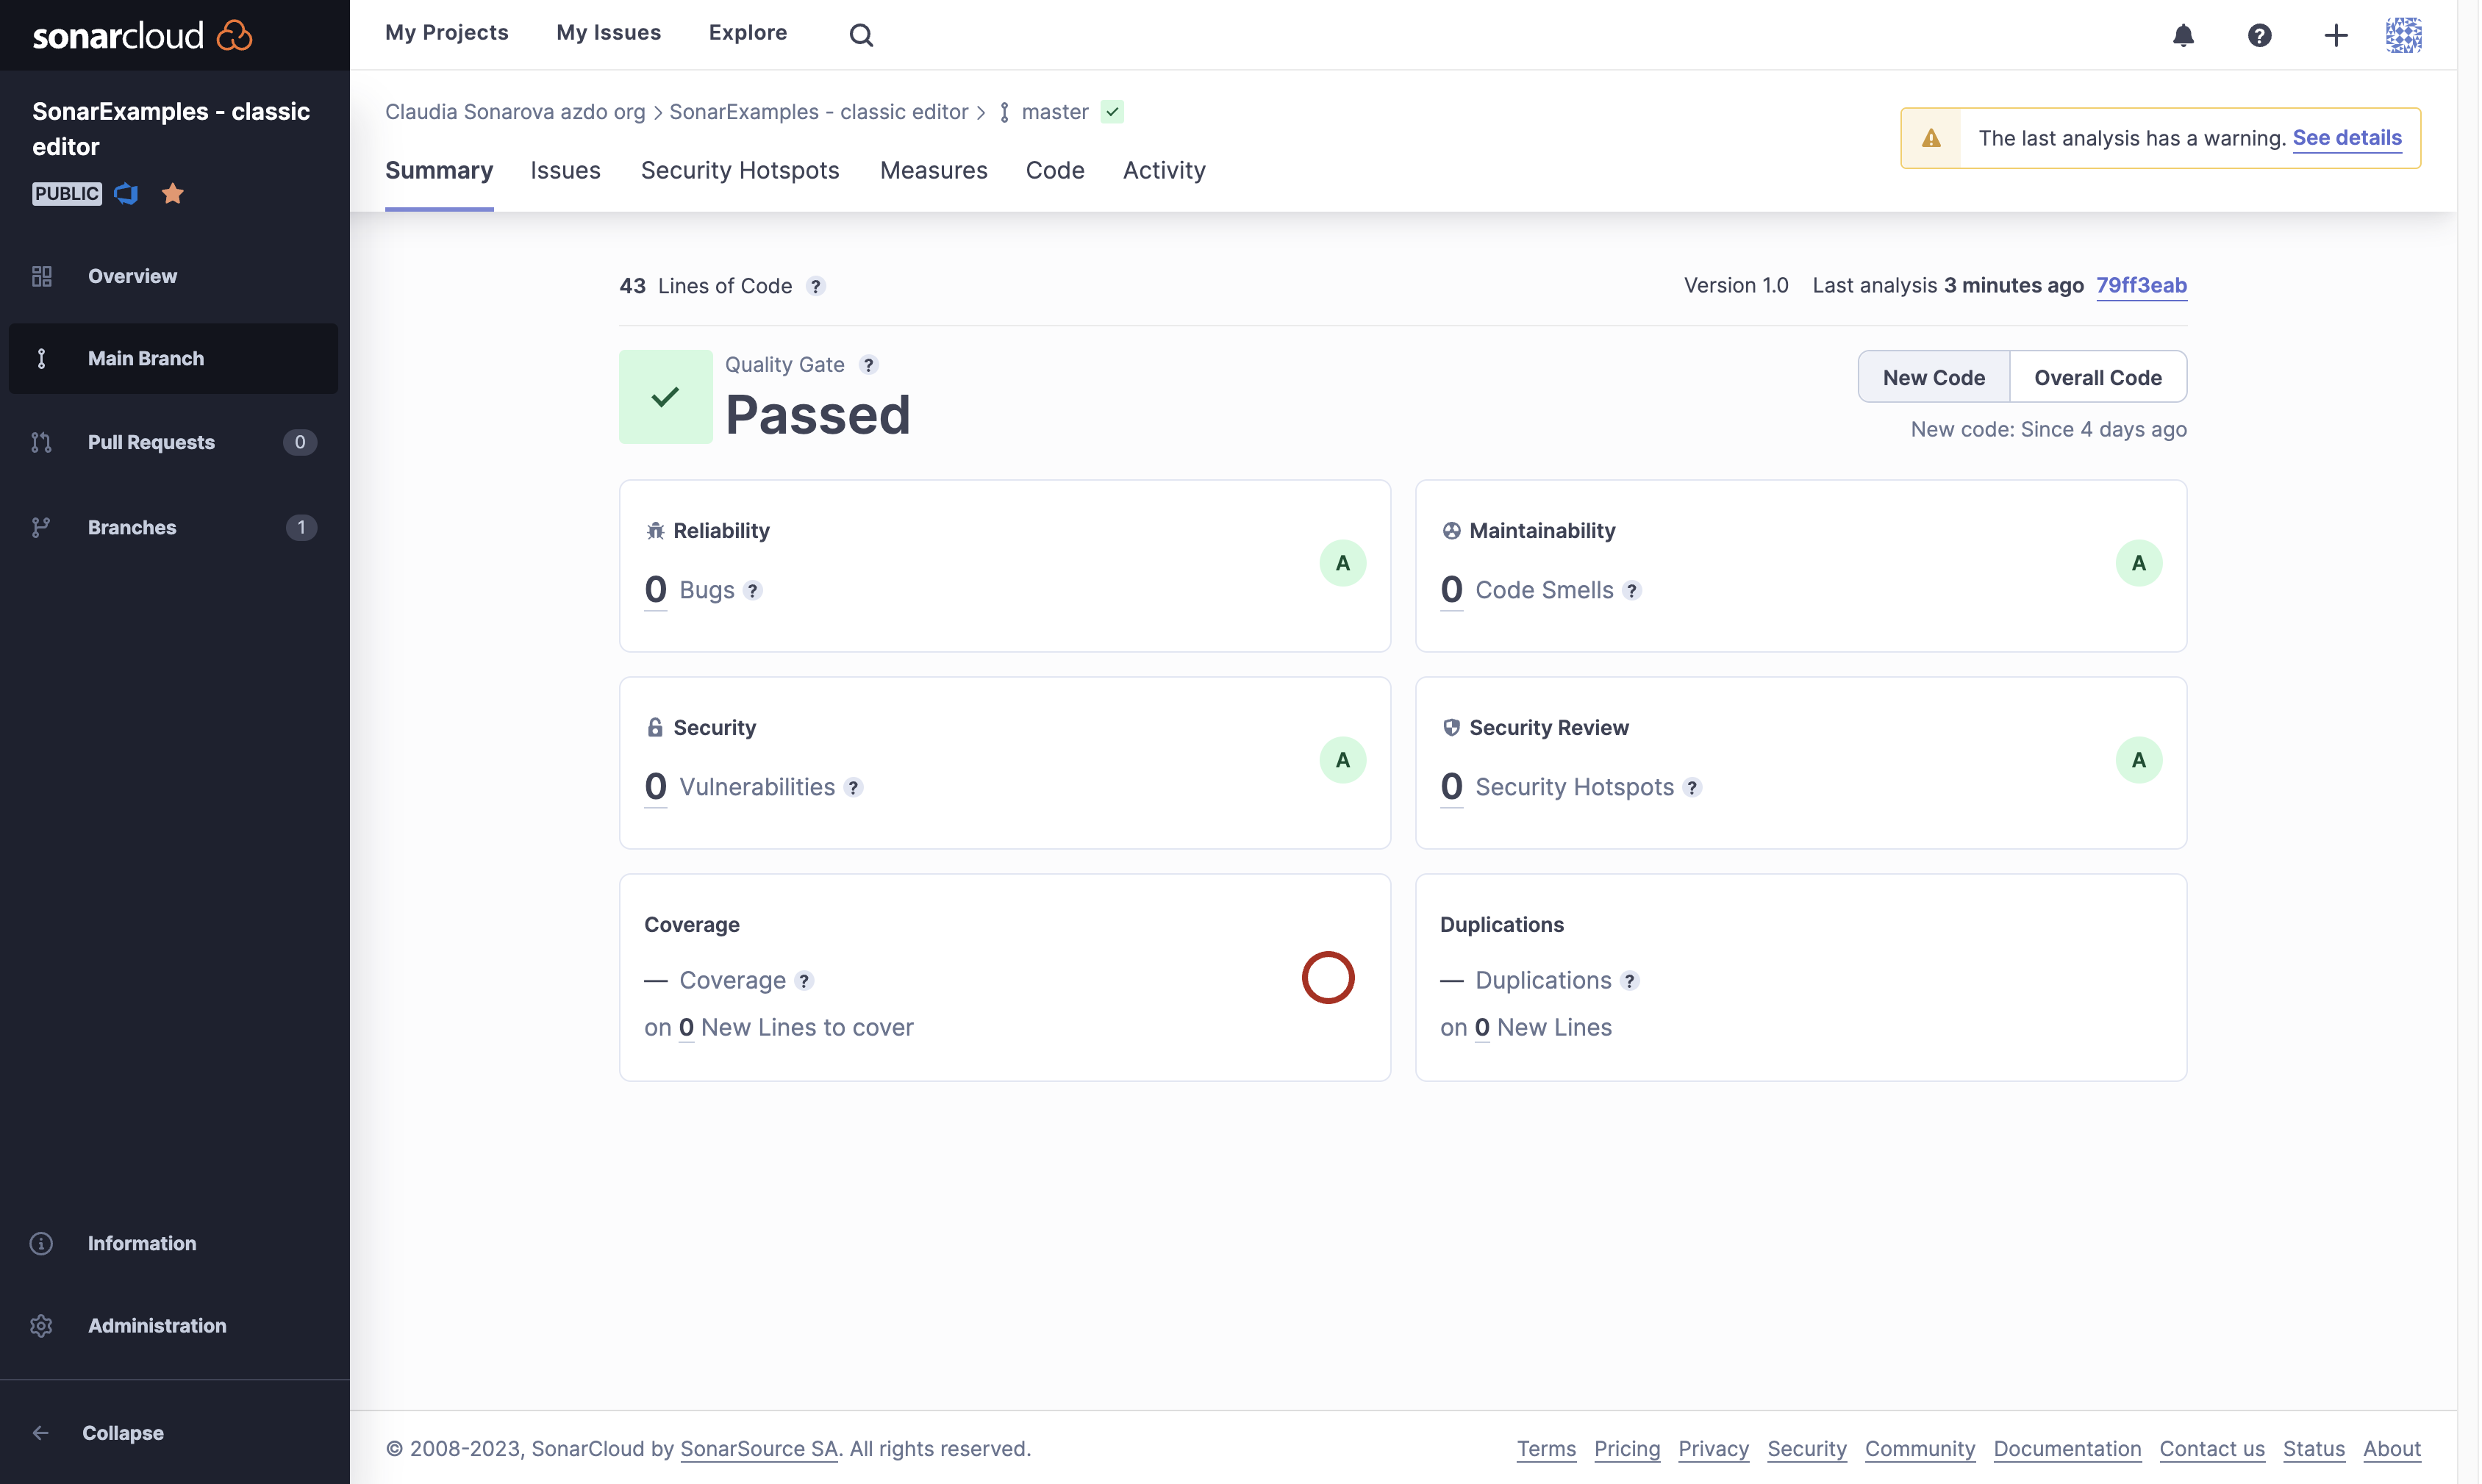
Let’s keep using the SonarExamples project to illustrate concepts in this tutorial. In SonarCloud, navigate to My Project > SonarExamples and go to the Summary page by selecting Main Branch.
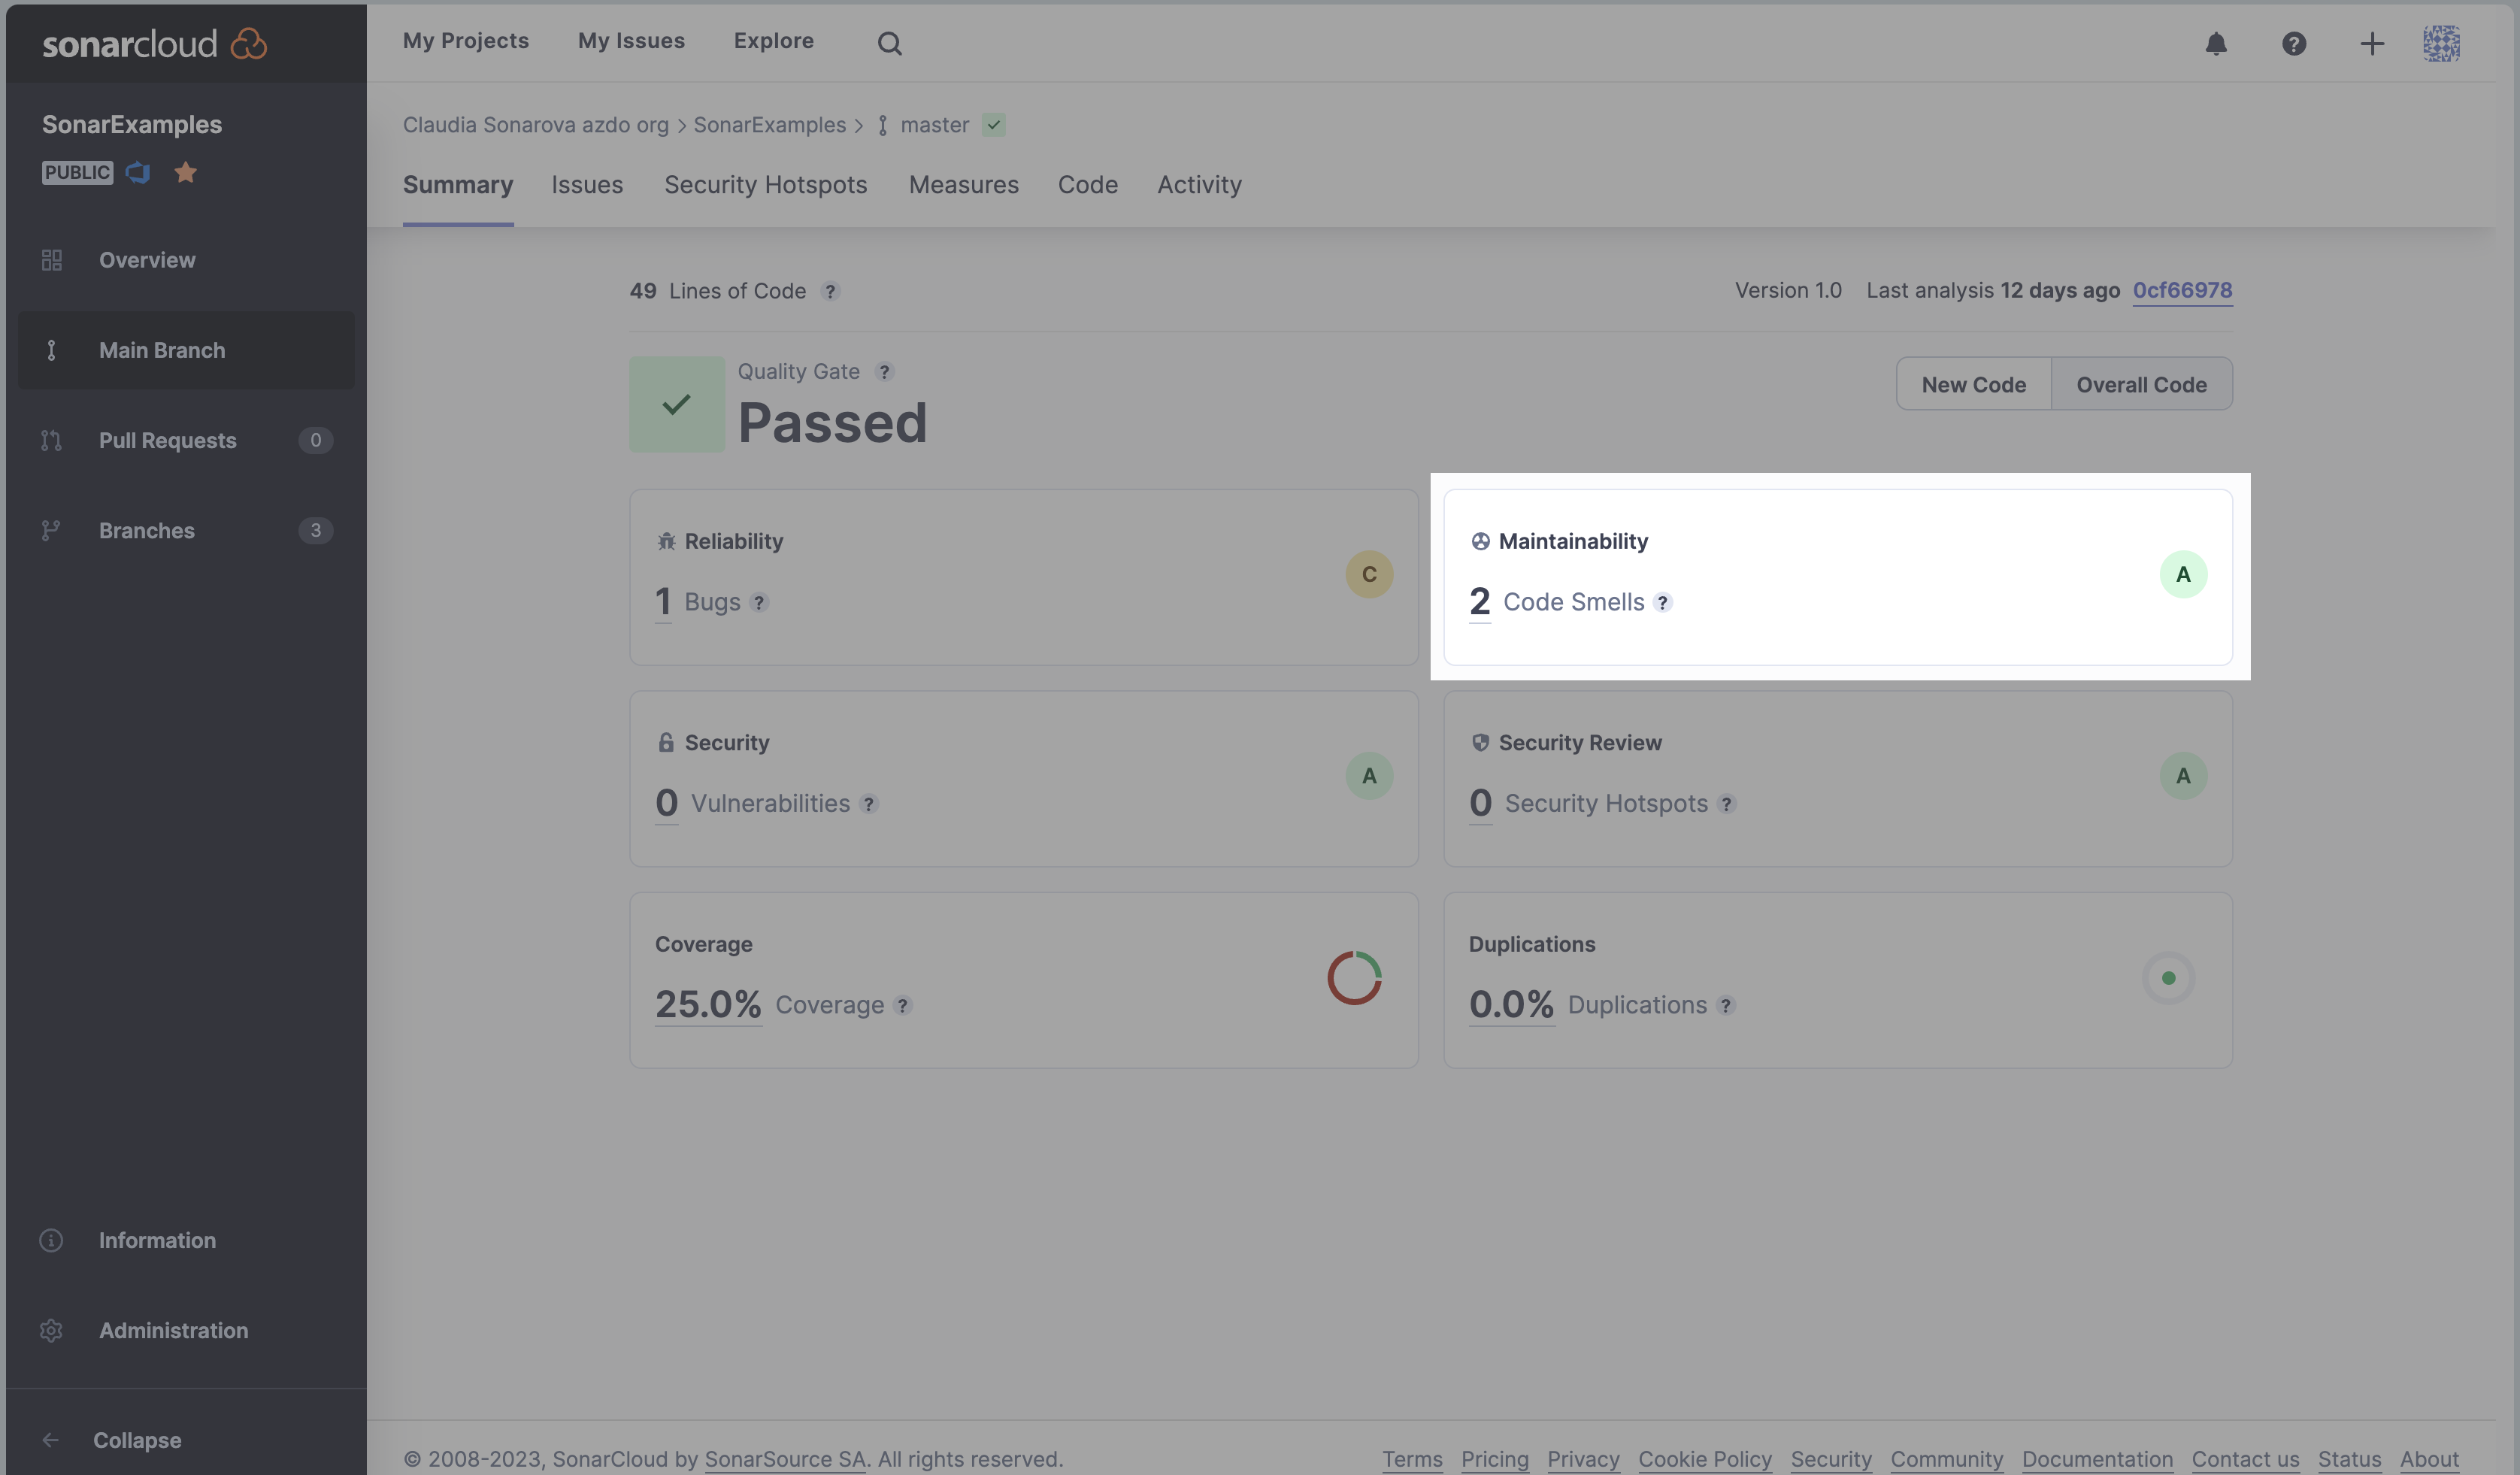
In the Maintainability container, we can see that two code smells have been found.
The Summary page has other metrics such as Vulnerabilities, Coverage, Code Smells, Security Hotspots, Duplications, and will tell you how many Lines of Code you are using in this project. The following table briefly explains each of those terms.
| Terms | Description |
|---|---|
| Bugs | An issue that represents something wrong in the code. If this has not broken yet, it will, and probably at the worst possible moment. This needs to be fixed |
| Vulnerabilities | A security-related issue which represents a potential backdoor for attackers |
| Coverage | To determine what proportion of your project’s code is actually being tested by tests such as unit tests, code coverage is used. To guard effectively against bugs, these tests should exercise or ‘cover’ a large proportion of your code |
| Code Smells | A maintainability-related issue in the code. Leaving it as-is means that at best maintainers will have a harder time than they should make changes to the code. At worst, they’ll be so confused by the state of the code that they’ll introduce additional errors as they make changes |
| Duplications | The duplications decoration shows which parts of the source code are duplicated |
| Lines of Code | Provides a count of lines of code being analyzed within the project; including the number of statements, functions, classes, files, and directories |
-
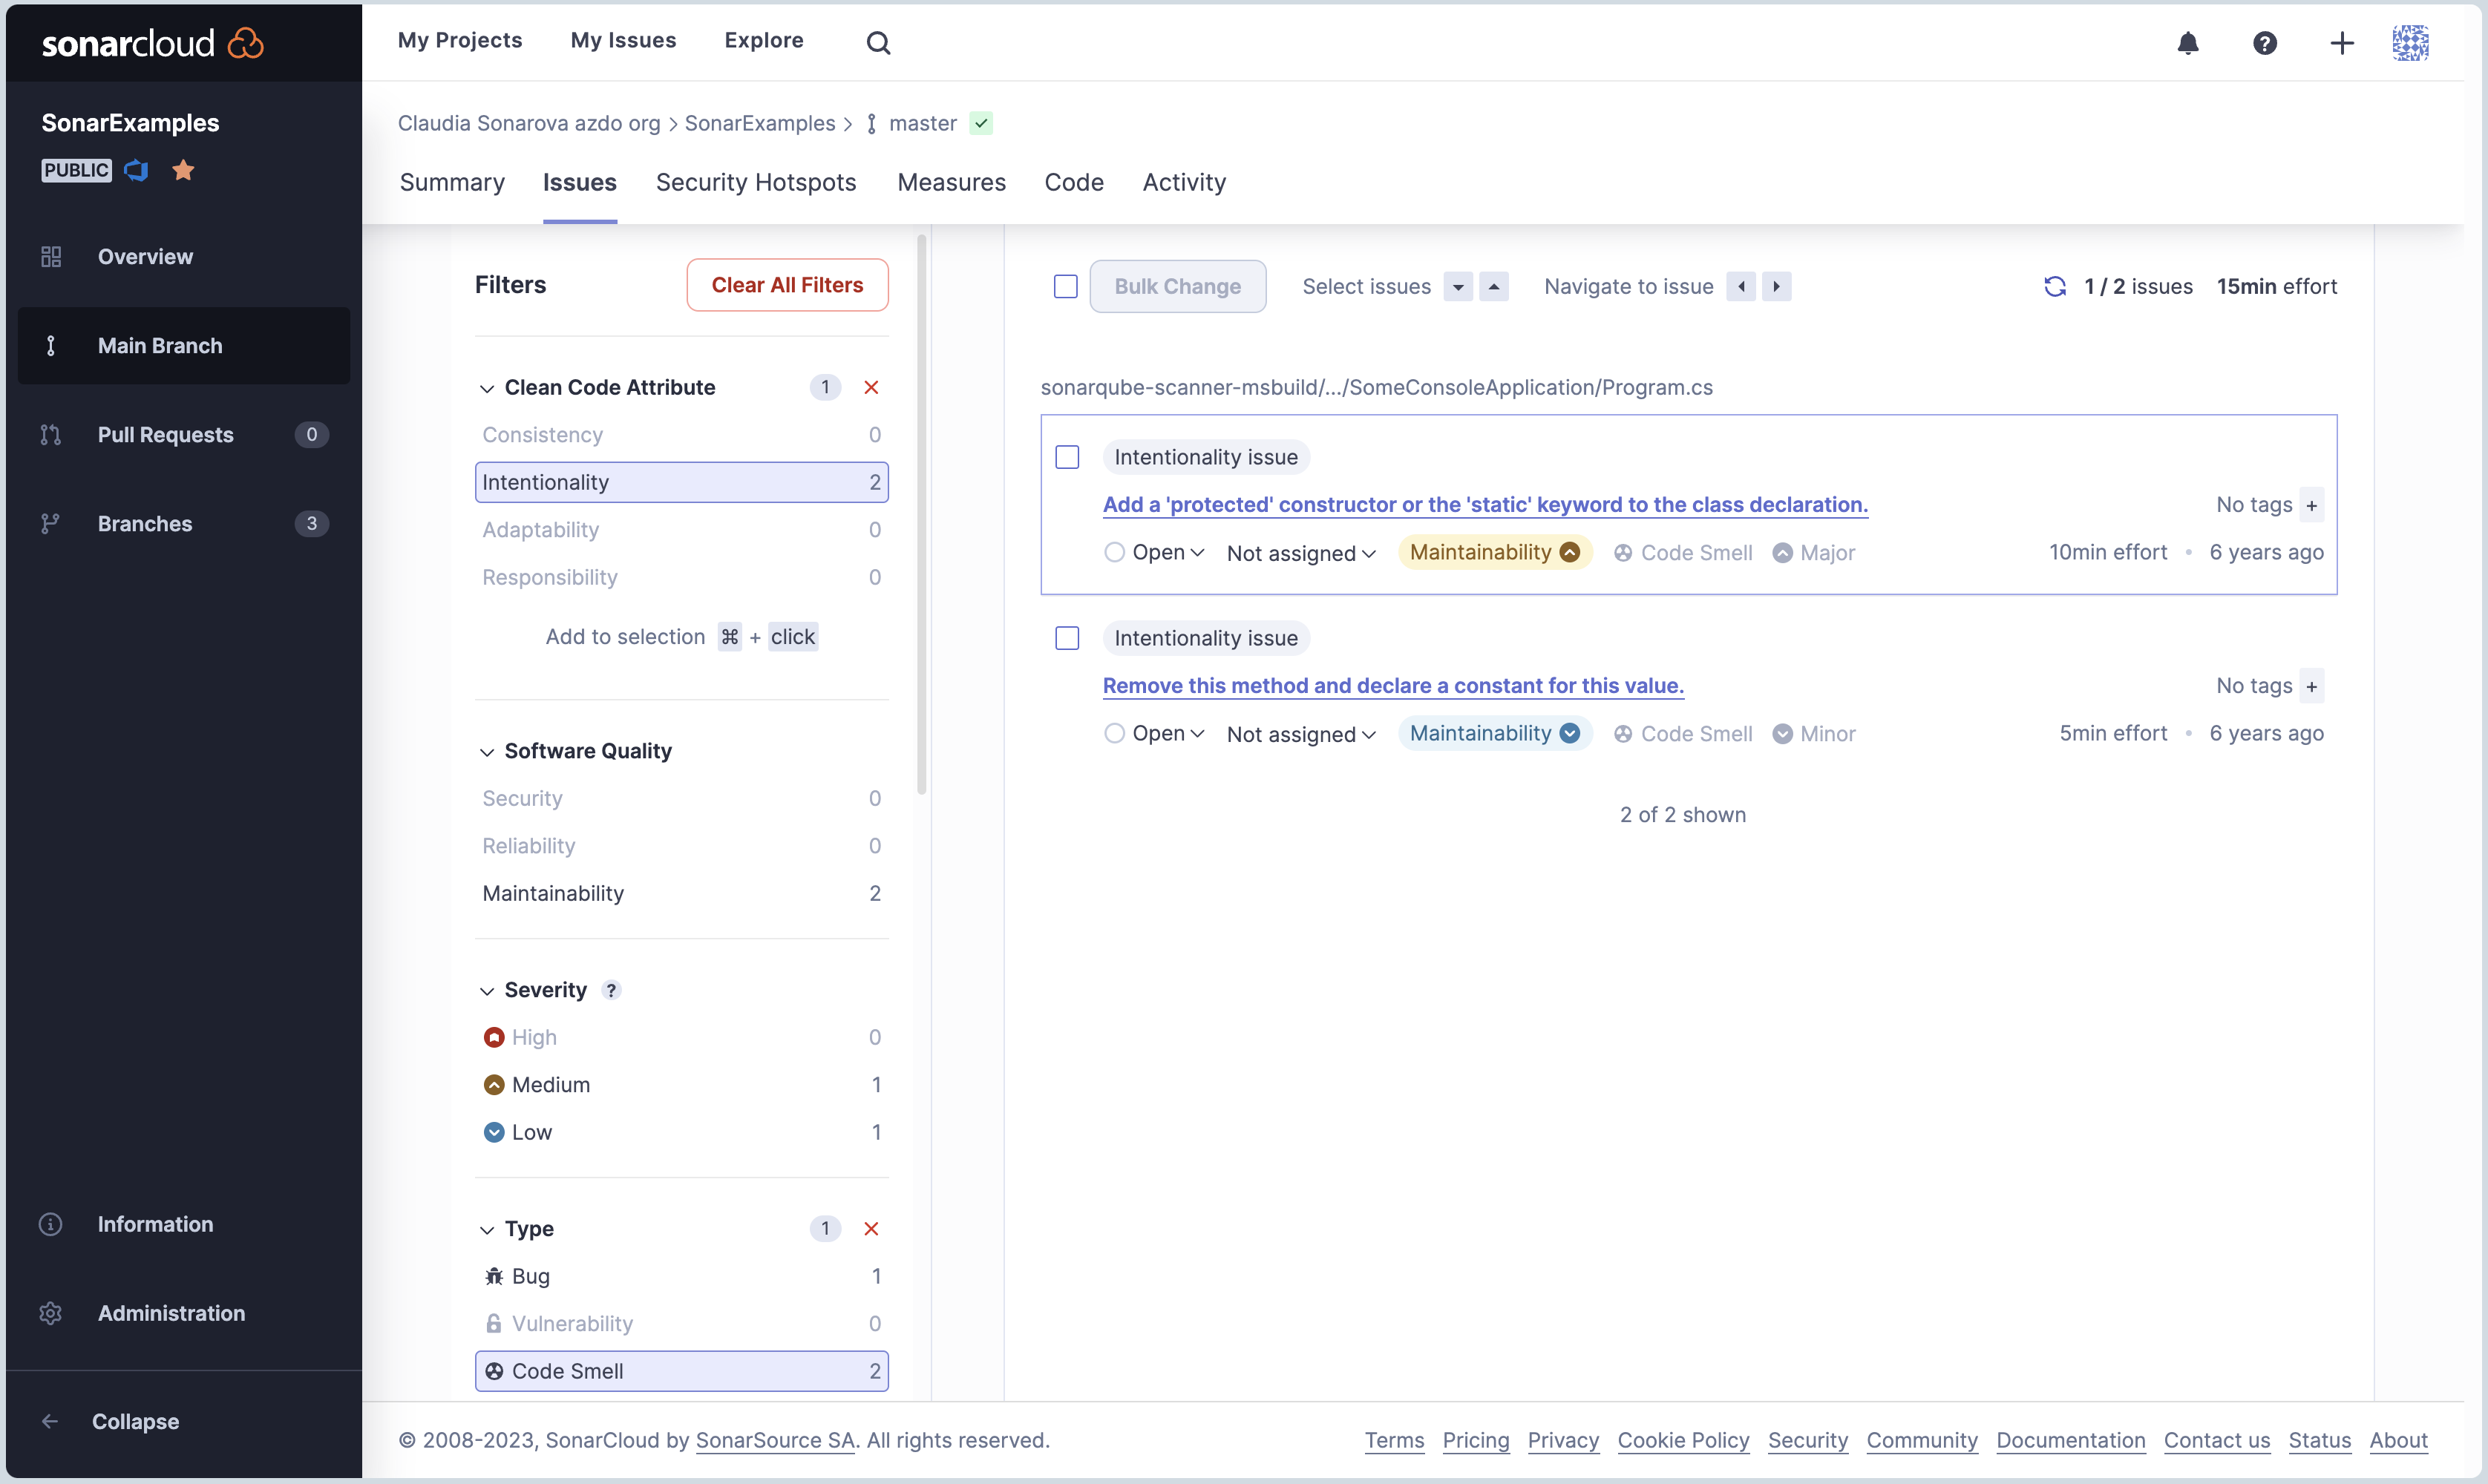
Click on the Code Smells count number to open the Issues page with the Code Smell type filter applied:
-
Click on the issue to navigate to the code. If you select the first issue, you fill find that it is on line number 4 of the
Program.csfile (note the breadcrumb in the UI): Add a ‘protected’ constructor or the ‘static’ keyword to the class declaration.: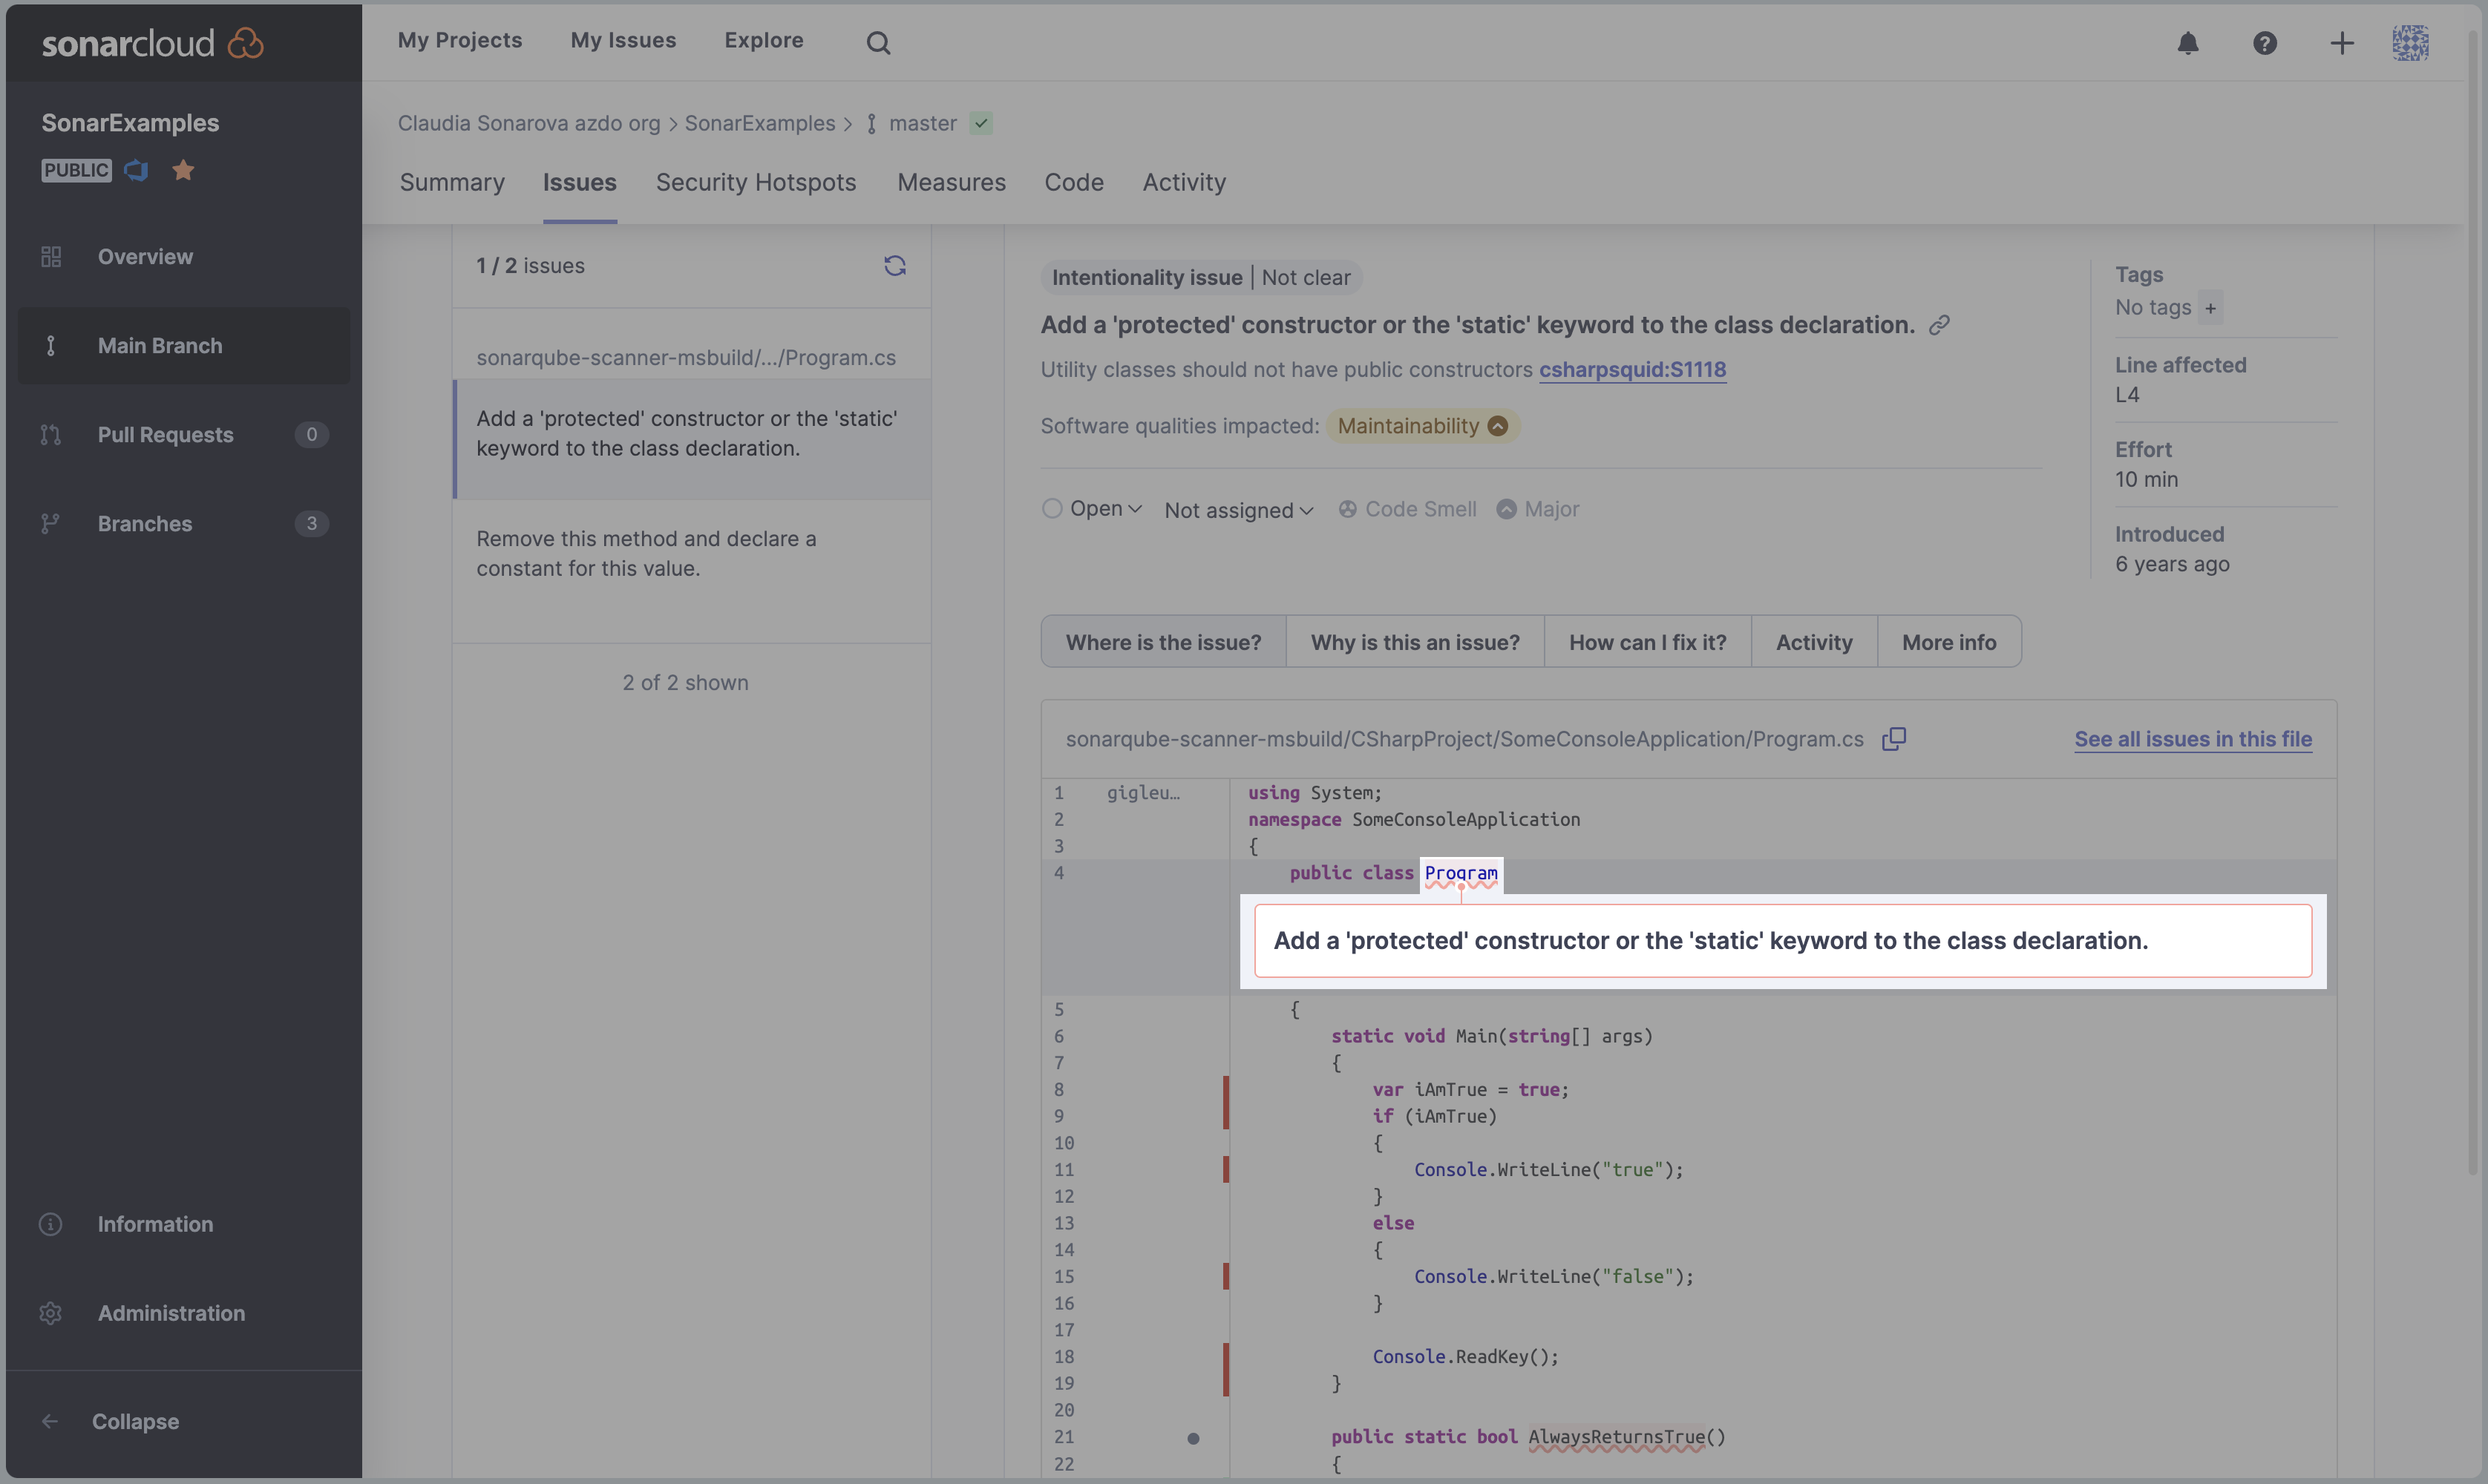
-
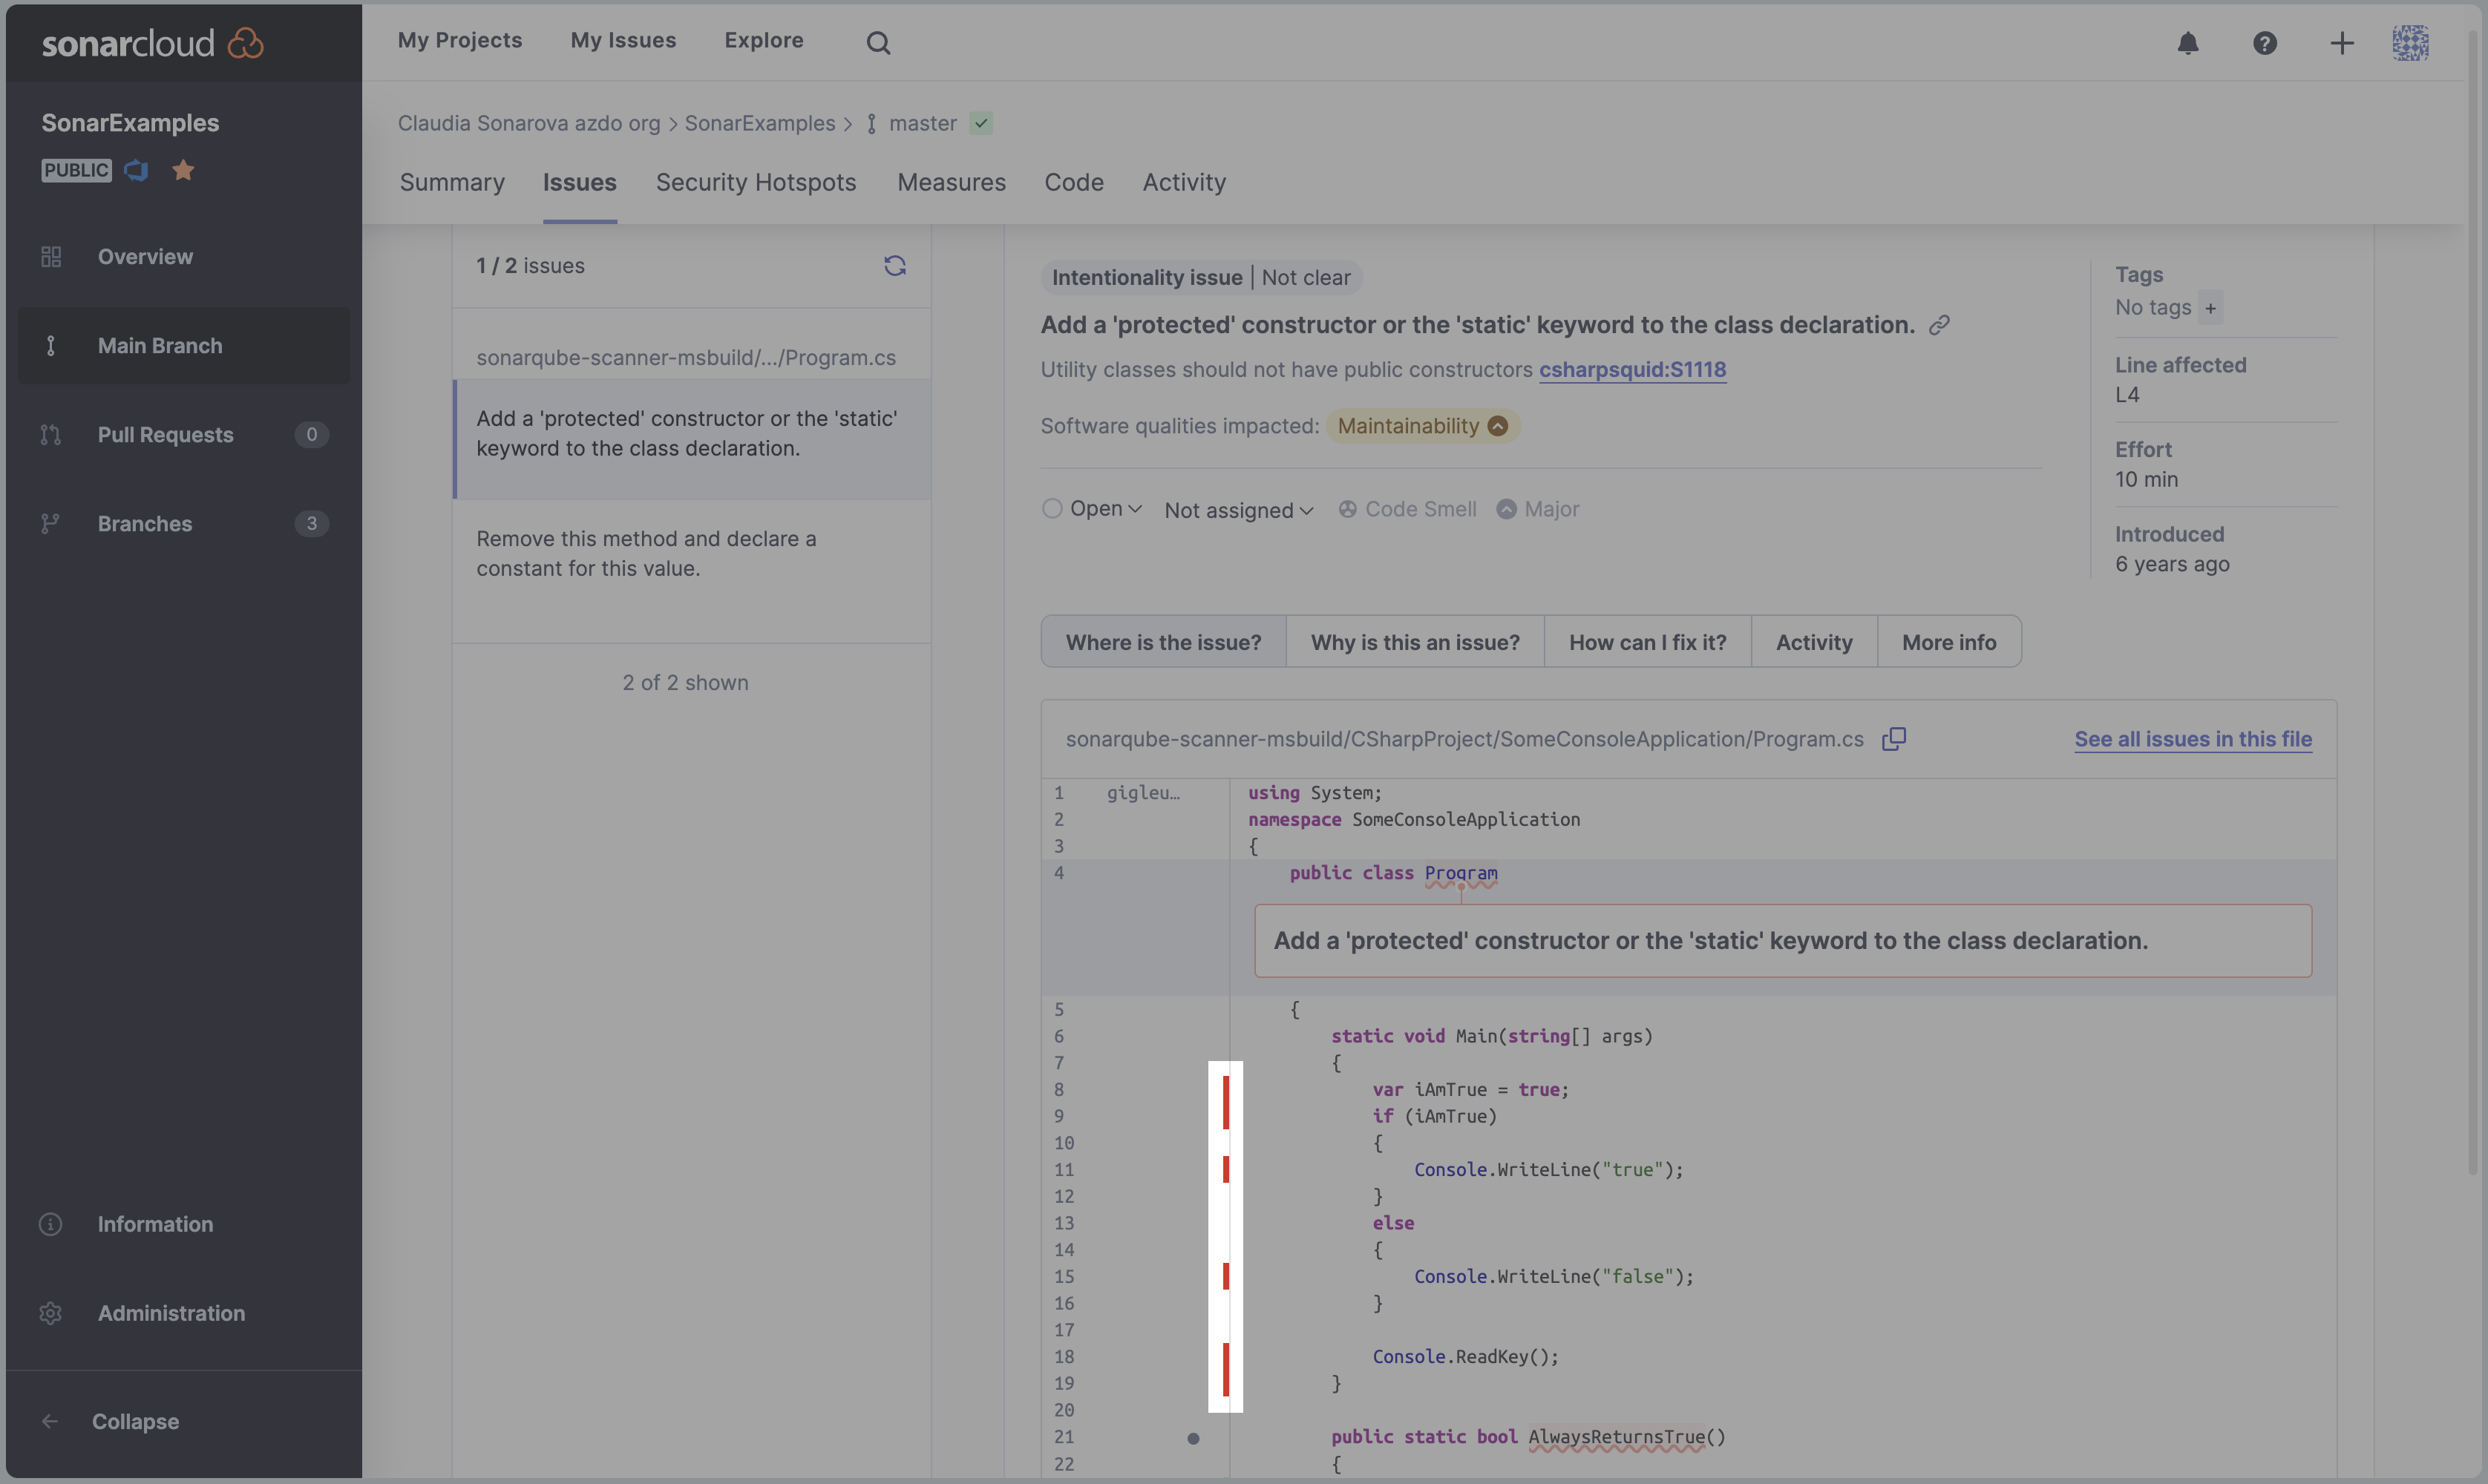
We can also see which lines of code are not covered by tests; hover over those red lines to see a pop-up message giving you more details:
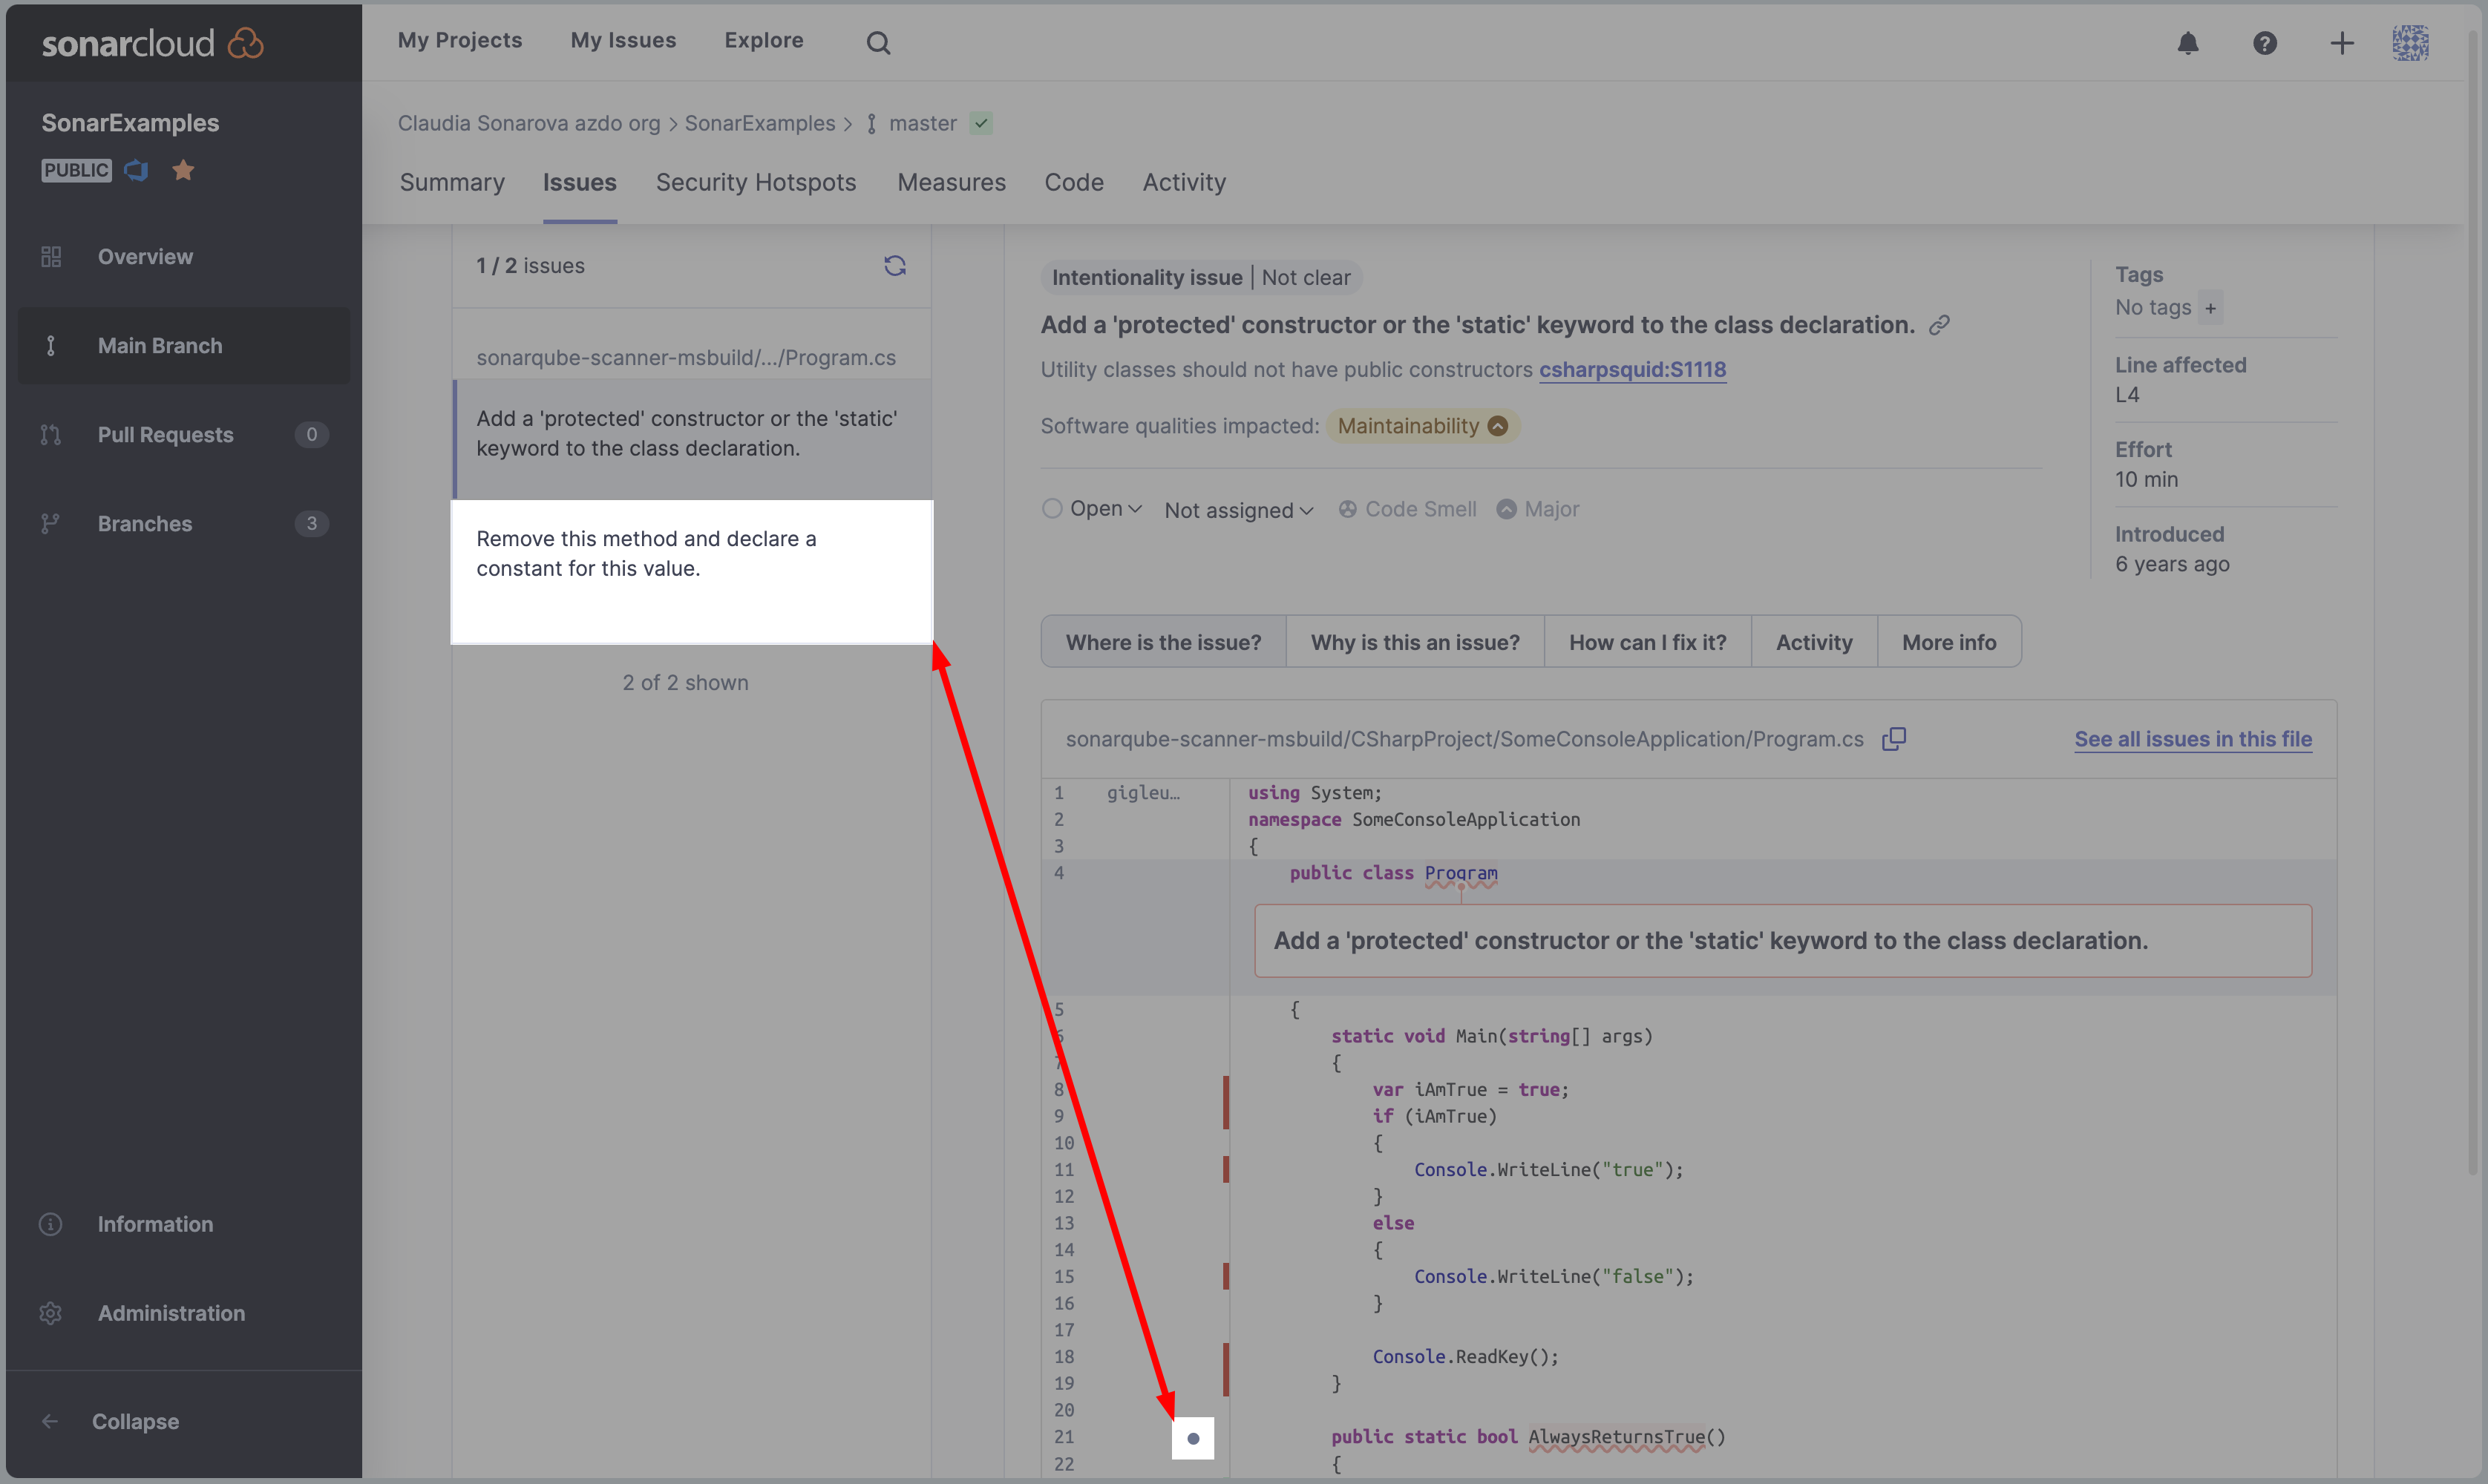
And you can select and review other issues nearby (in your code) by clicking on the issue list (in the left menu) or on the grey dot (in the code explorer):
Our sample project is very small and has no historical data but, there are thousands of public projects on SonarCloud that have more interesting and realistic results. Go have a look!
Exercise 3: Set up pull request integration
Configuring SonarCloud analysis to run when a pull request is created involves two steps.
- A SonarCloud project needs to be provided with an access token so it can add PR comments to Azure DevOps, and
- A Branch Policy needs to be configured in Azure DevOps to trigger the PR build
Step 1: Create a PAT and apply it to SonarCloud
-
1.1. To create a PAT in Azure DevOps:
-
Navigate to User settings > Personal access tokens, then select New Token.
-
Make sure to set the scope under Code to Read & write.
-
When ready, click Create and copy the generated token and save it to a secure location. Personal Access Tokens are like passwords; it is recommended that you save them somewhere safe so that you can re-use them for future requests.
If you need more details about creating tokens, there are instructions in this article.
SonarCloud will post comments to the pull request as if it is a user who owns the personal access token. The recommended practice is to create a separate “bot” Azure DevOps user for this so that it is clear which comments are from real developers and which are from SonarCloud.
-
-
1.2 Apply your PAT to SonarCloud:
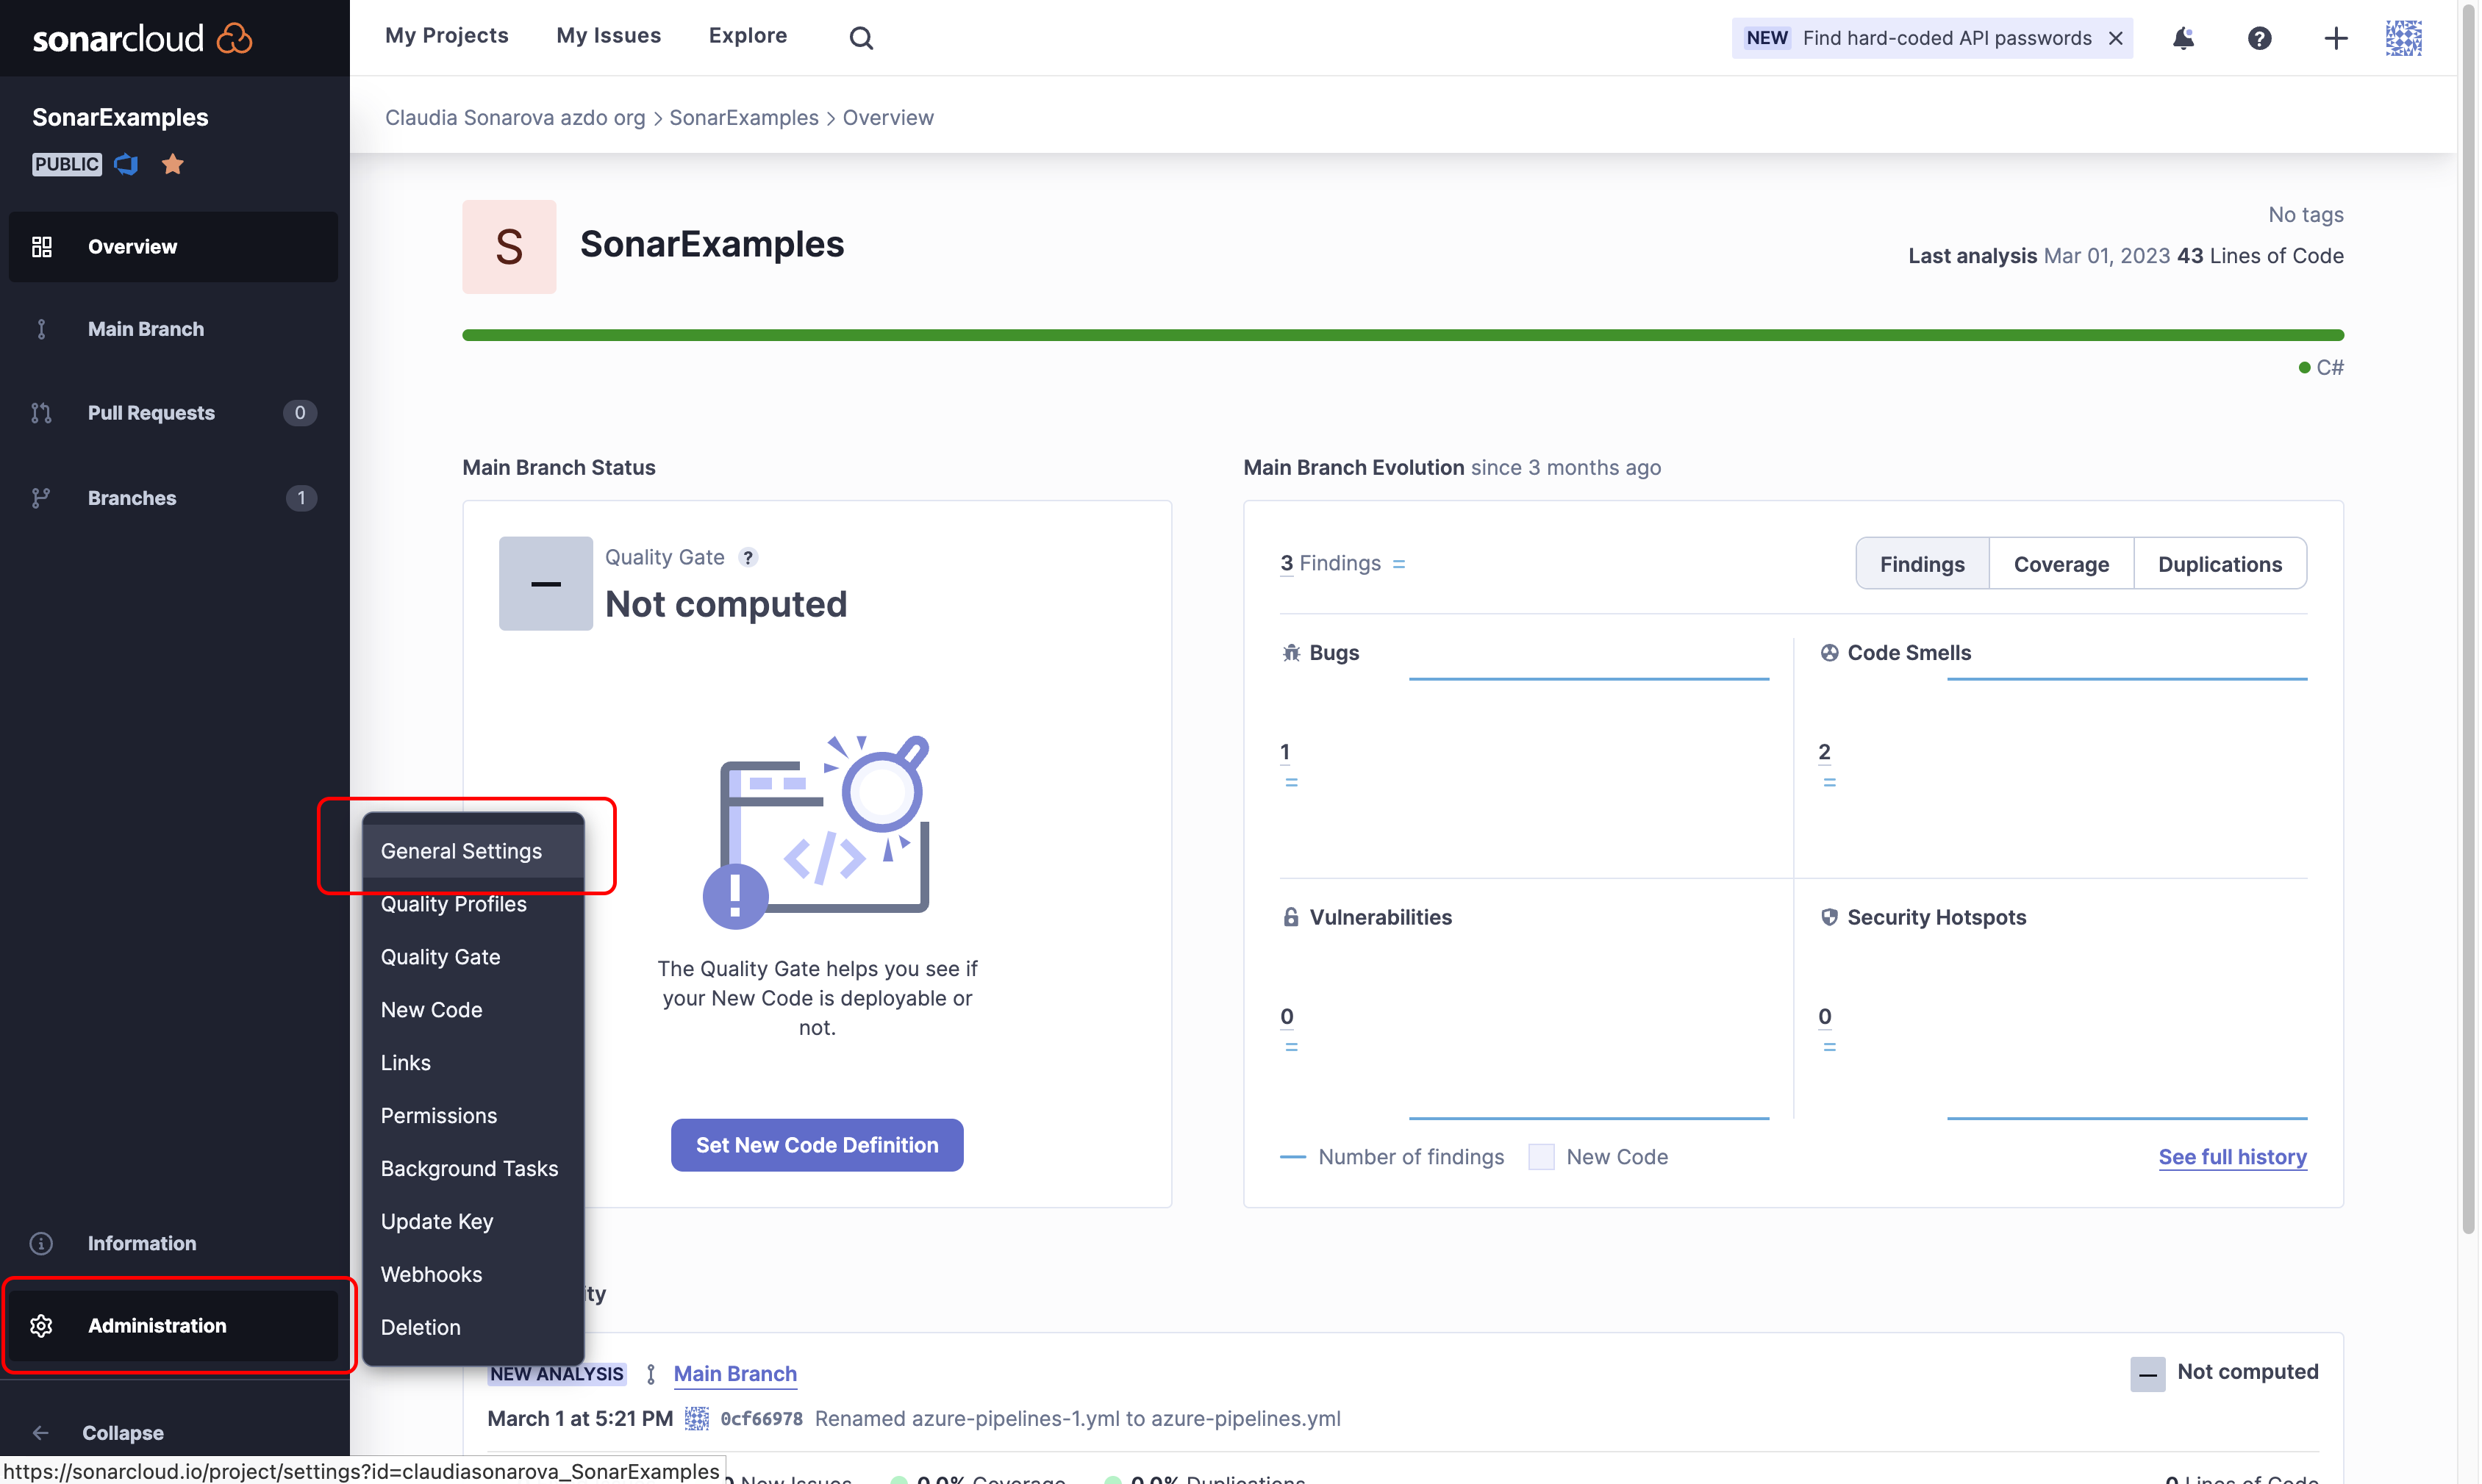
- Navigate to the Sonar Examples dashboard in SonarCloud (or your Project’s dashboard).
-
Select Administration > General Settings
- Select the Pull Requests tab.
- Set the Provider drop-down to Azure DevOps Services and Save.
-
Paste in the Personal access token you copied earlier and Save.
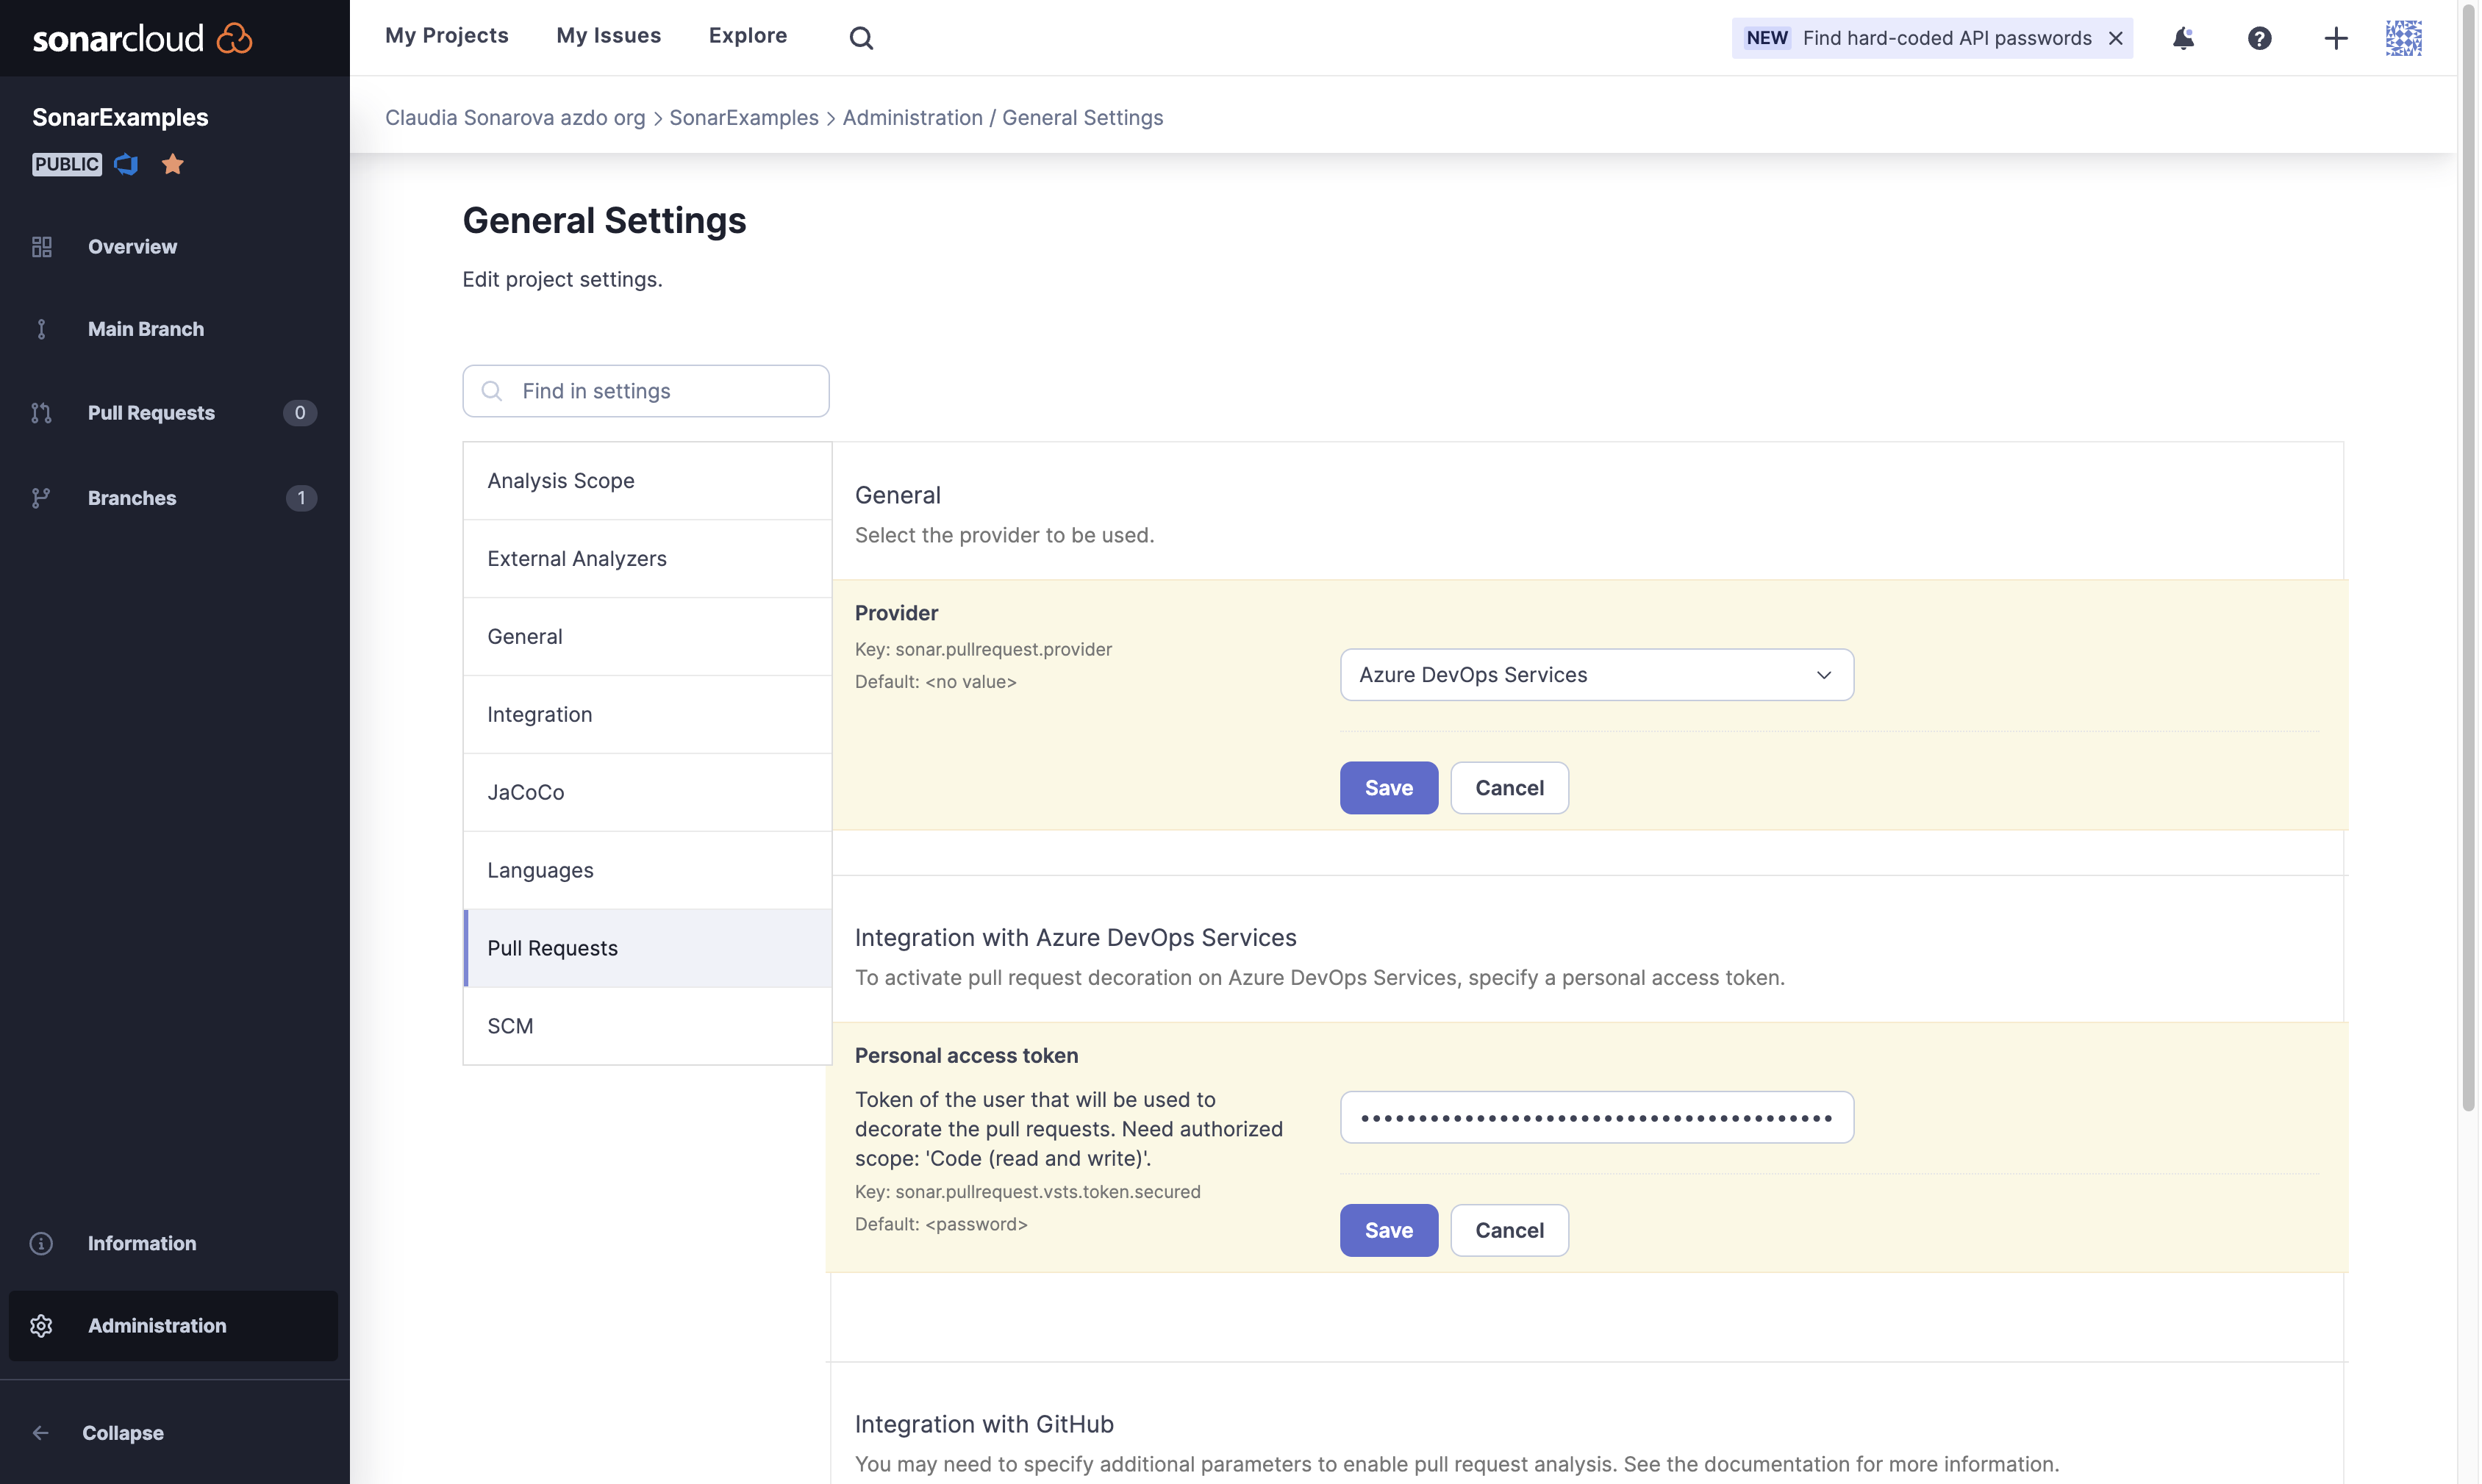
Remember that your PAT will expire and should be updated as needed or your PR analysis will fail. In addition, Azure DevOps cannot allow PATs to be configured at the organization and project levels simultaneously.
Step 2: Add a branch policy to your project in Azure
-
2.1. To configure the branch policy for the project in Azure DevOps:
- Navigate to the SonarExamples project in Azure DevOps
- Select Repos > Branches to view the list of branches.
-
Find your
masterbranch and click on the 3-dots menu to open the More options > Branch policies page.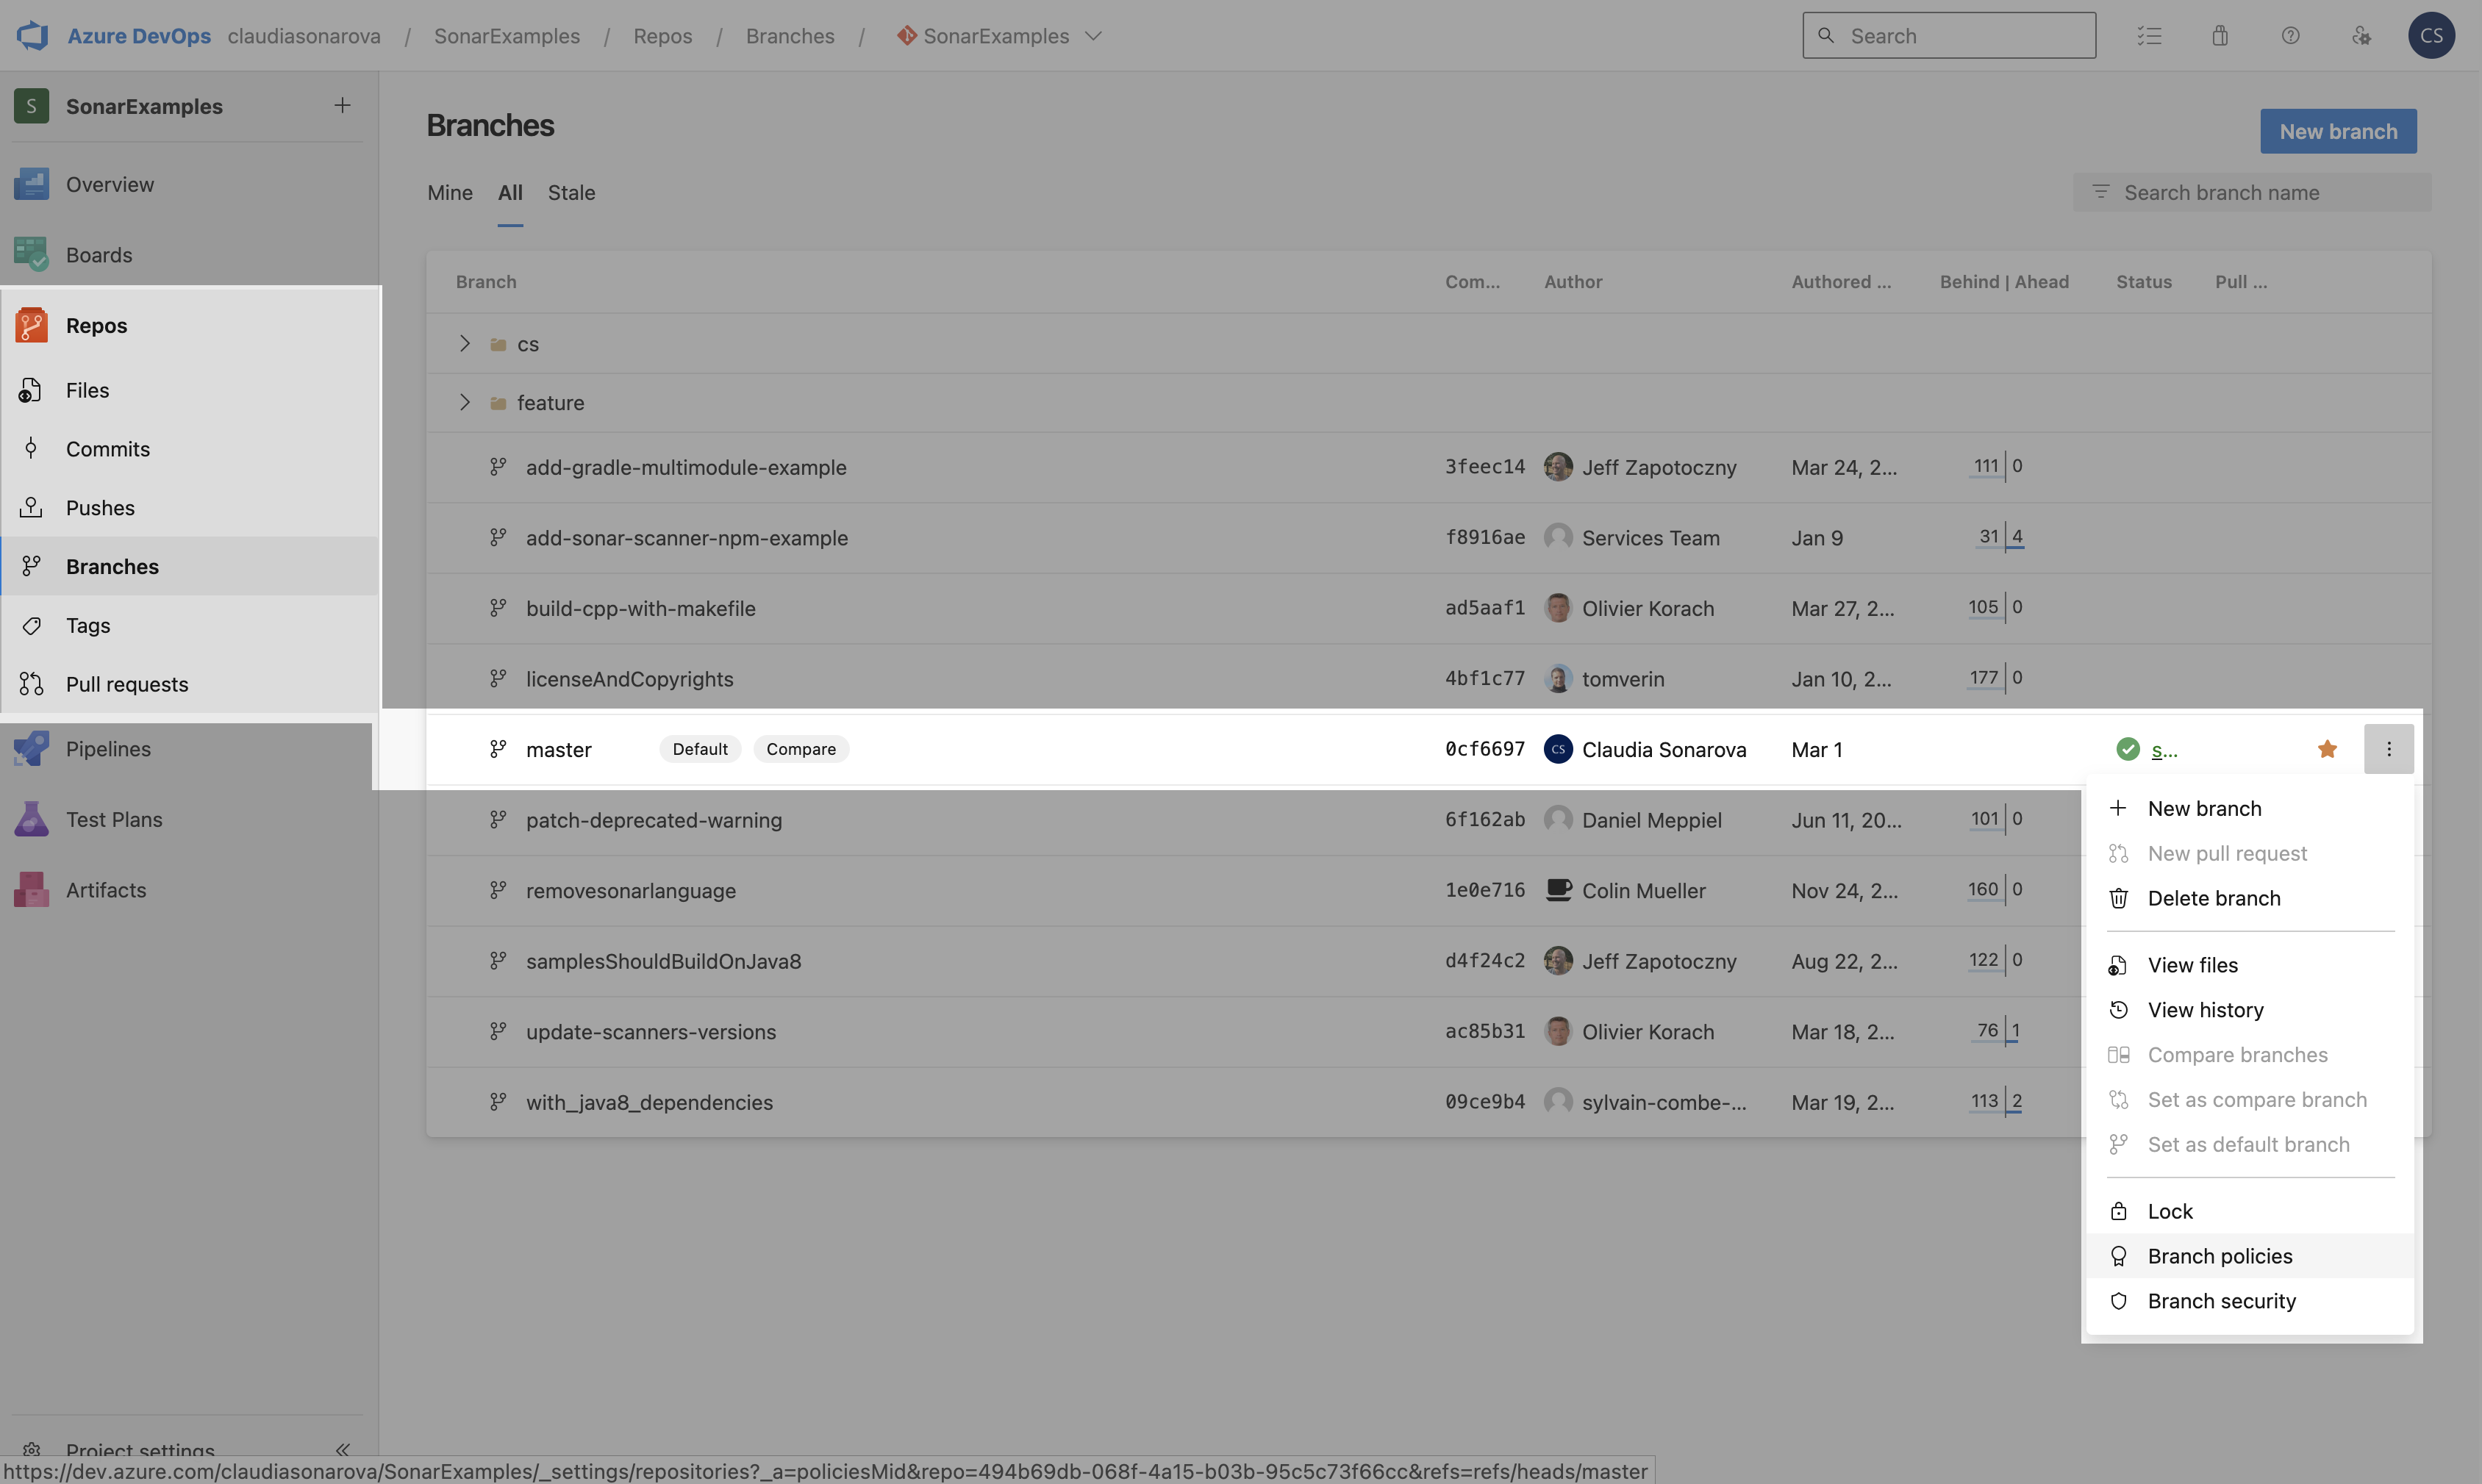
-
Click the + beside Build Validation to add a new build policy:
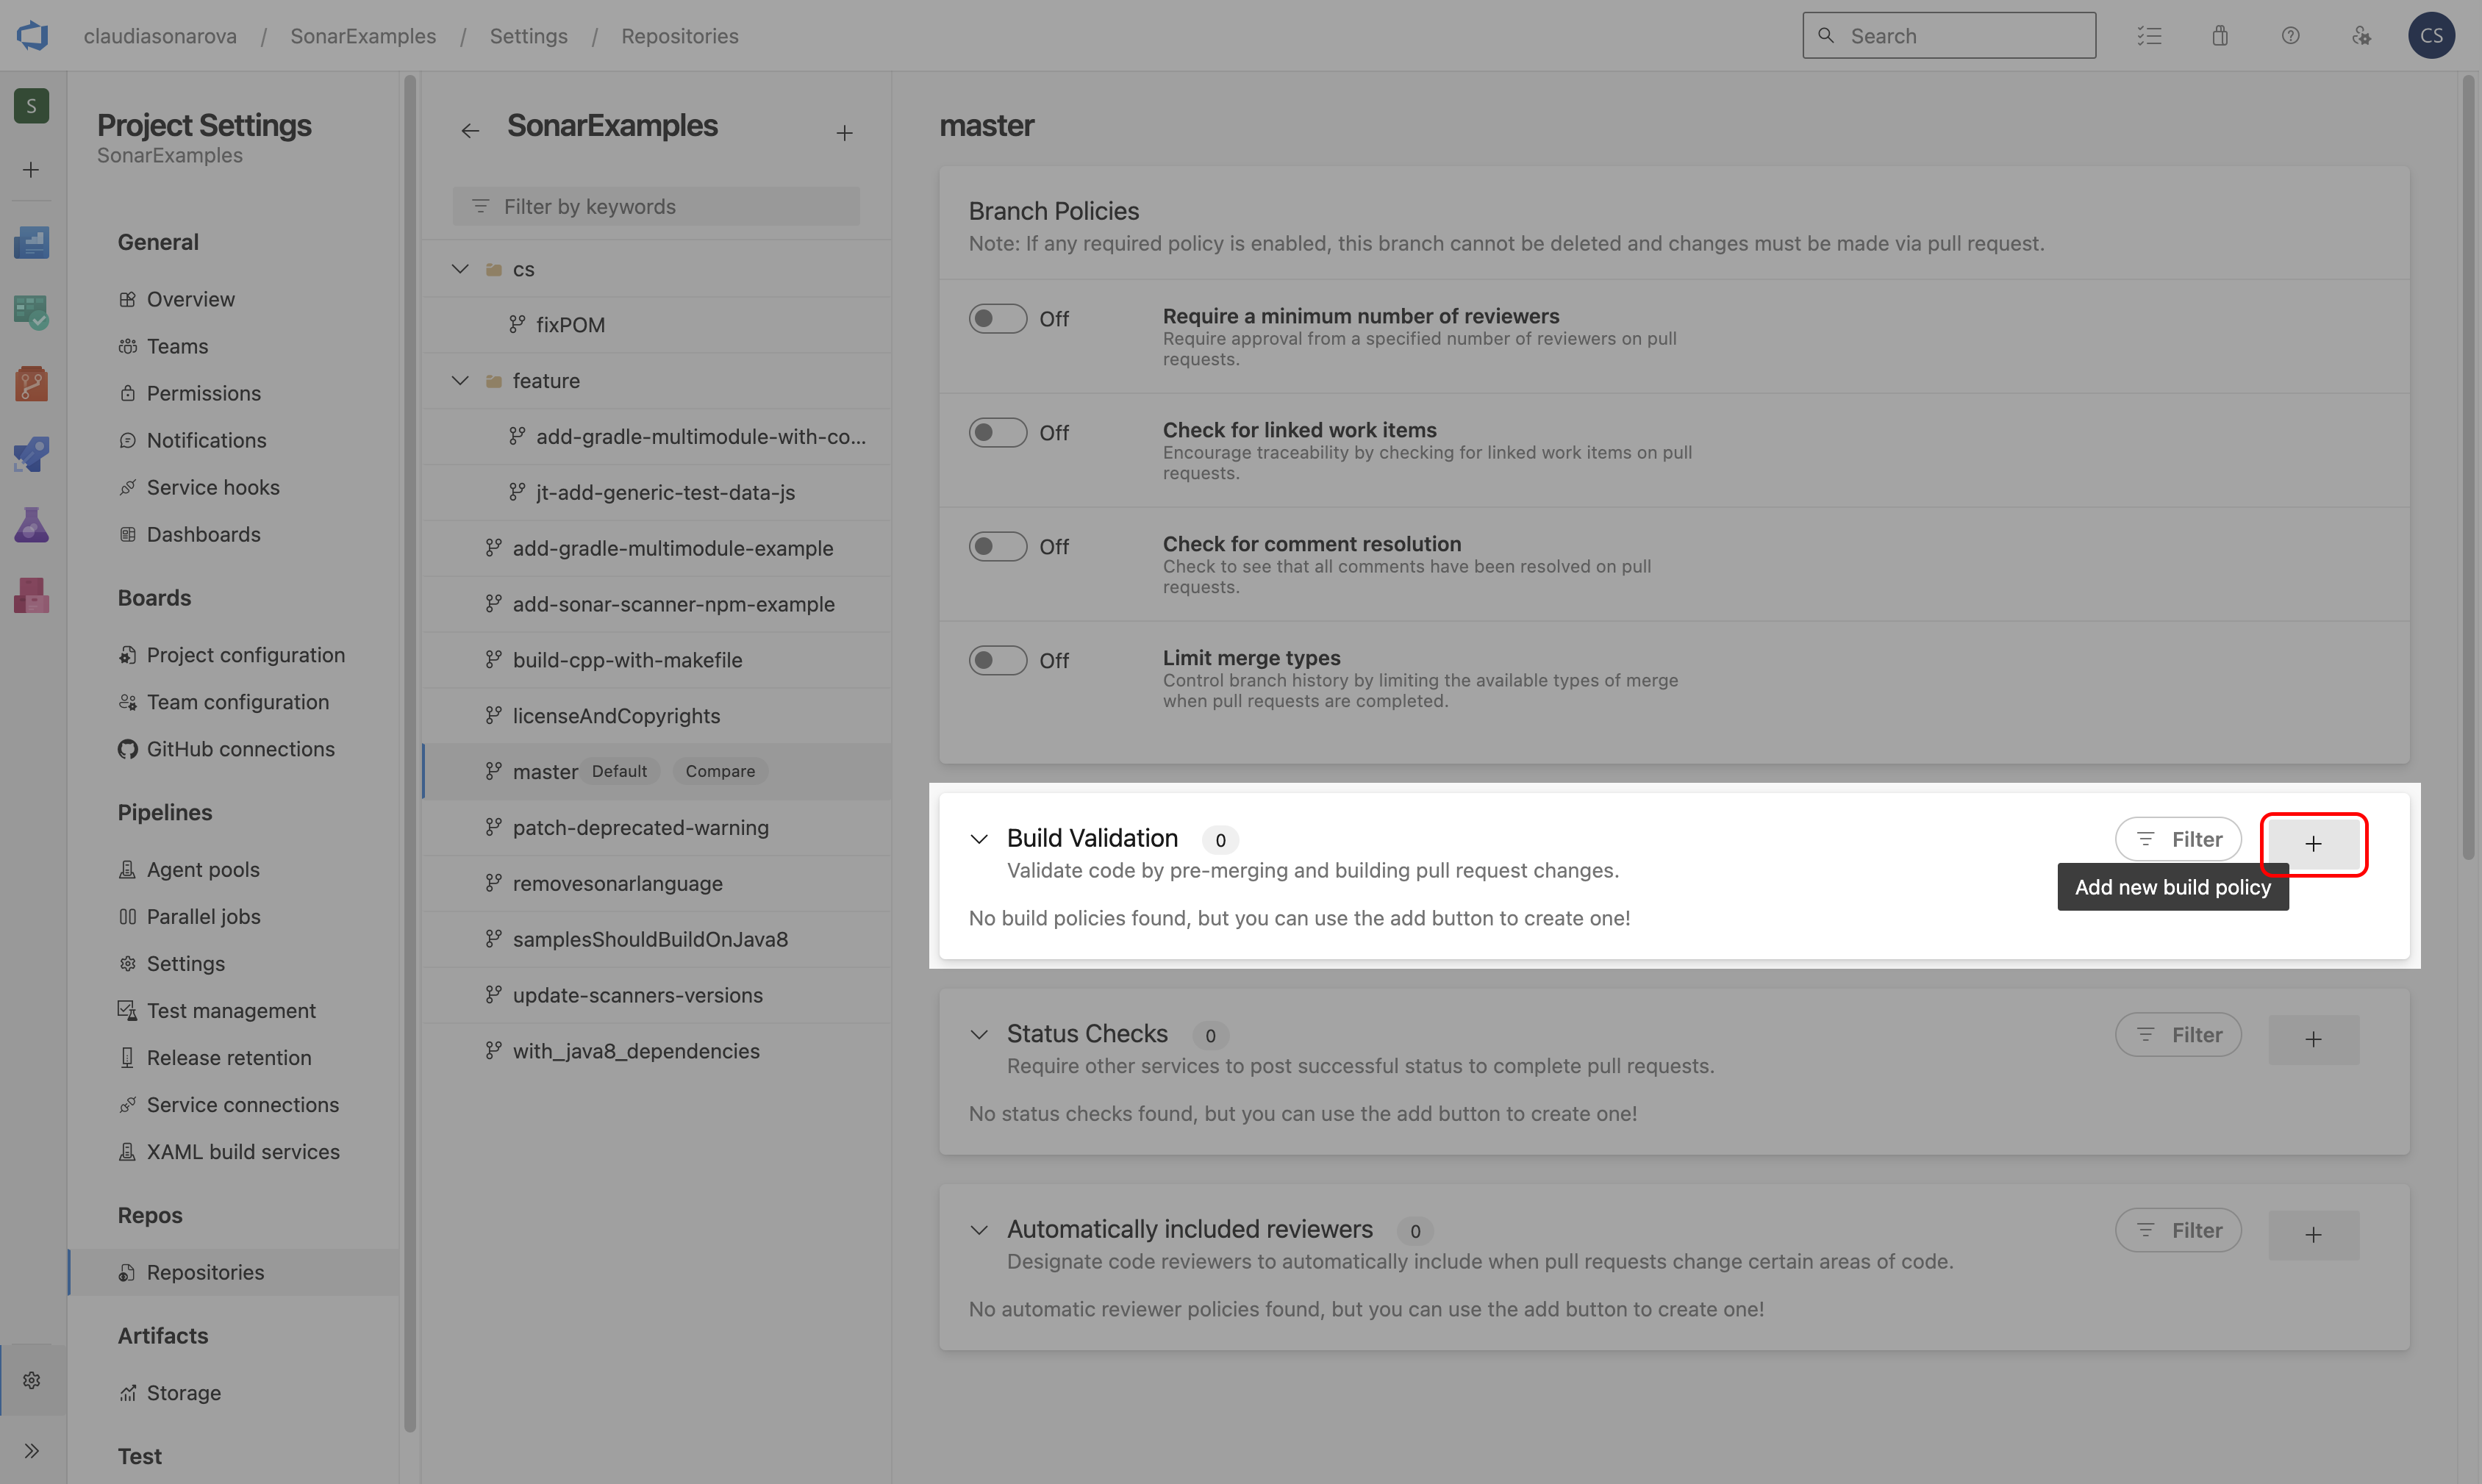
- From the Build definition drop-down, select the build policy your just created,
- Set the Display name to SonarCloud analysis and,
-
click Save.
Azure DevOps is now configured to trigger a SonarCloud analysis when any pull request targeting the master branch is created.
Test your setup
Now we will make a change to a file and create a new request so that we can check that the pull request triggers an analysis.
-
Create a new pull request
- In Azure, navigate to the code file Program.cs at sonarqube-scanner-msbuild/CSharpProject/SomeConsoleApplication/Program.cs and select Edit
- Add an empty method (such as
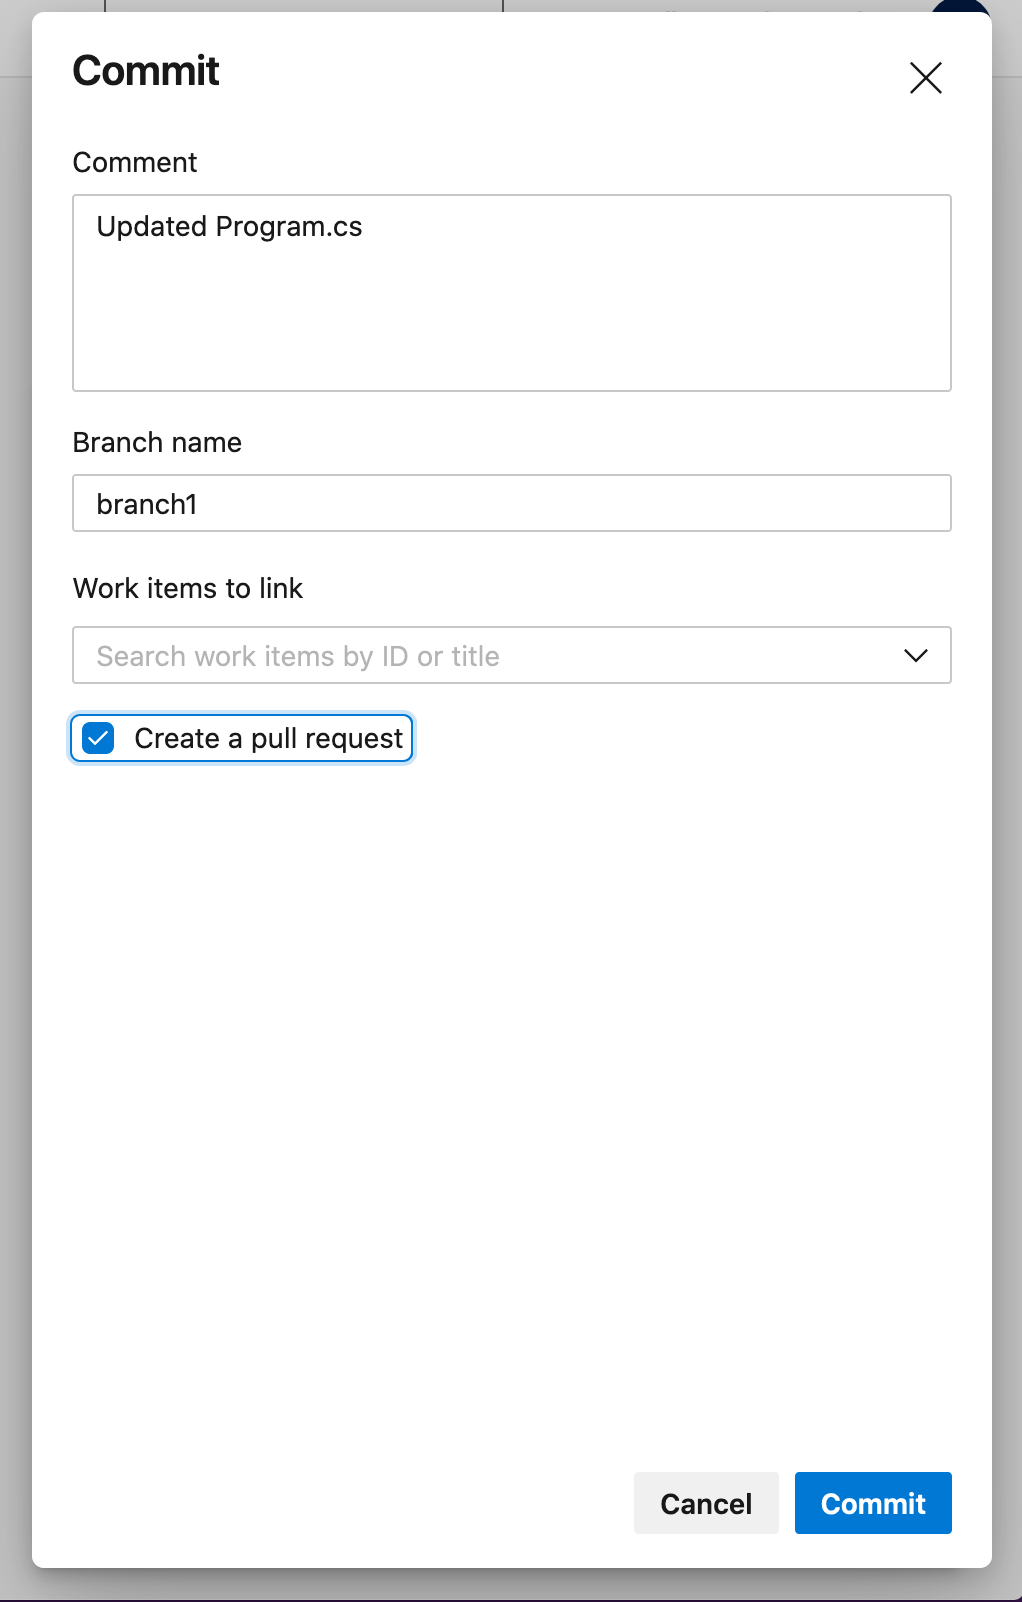
public void Unused(){}) to the code as shown in the following screen shot. -
Then select Commit… to continue:

In the Commit dialog box that appears:
- Change the branch name from master to branch1.
- Select the Create a pull request checkbox.
-
Then select Commit, and Create on the next screen to create a new pull request.
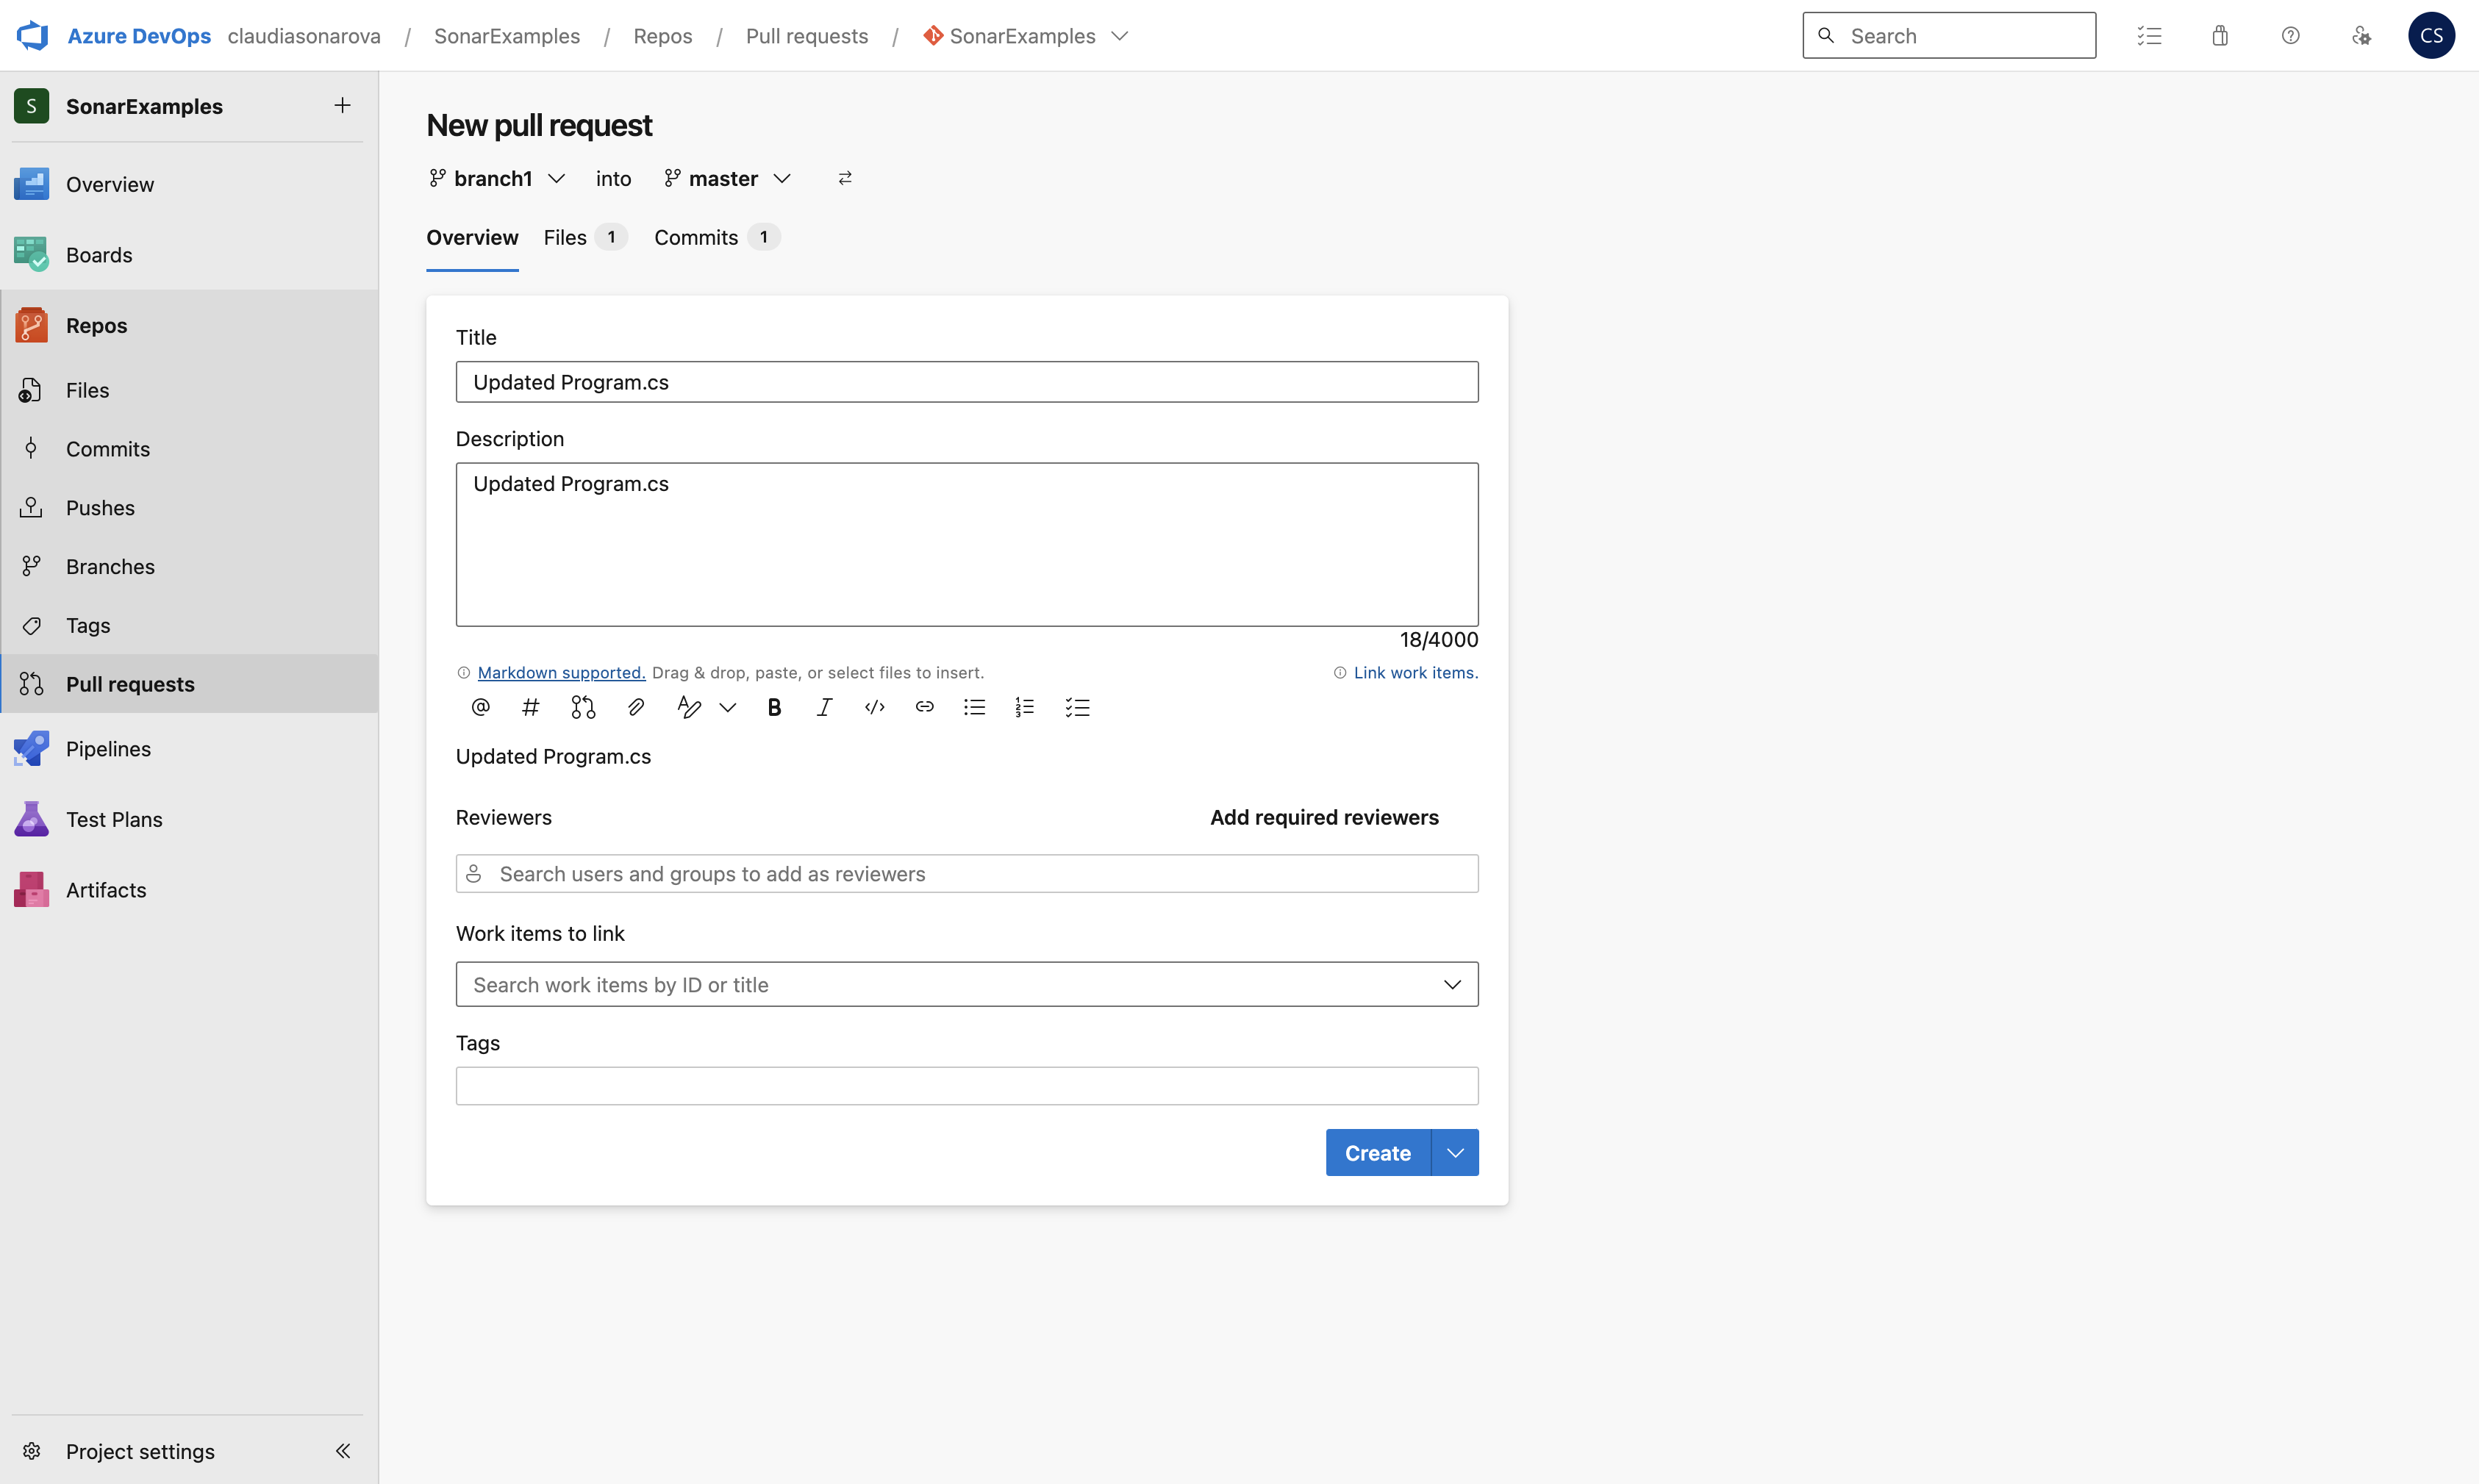
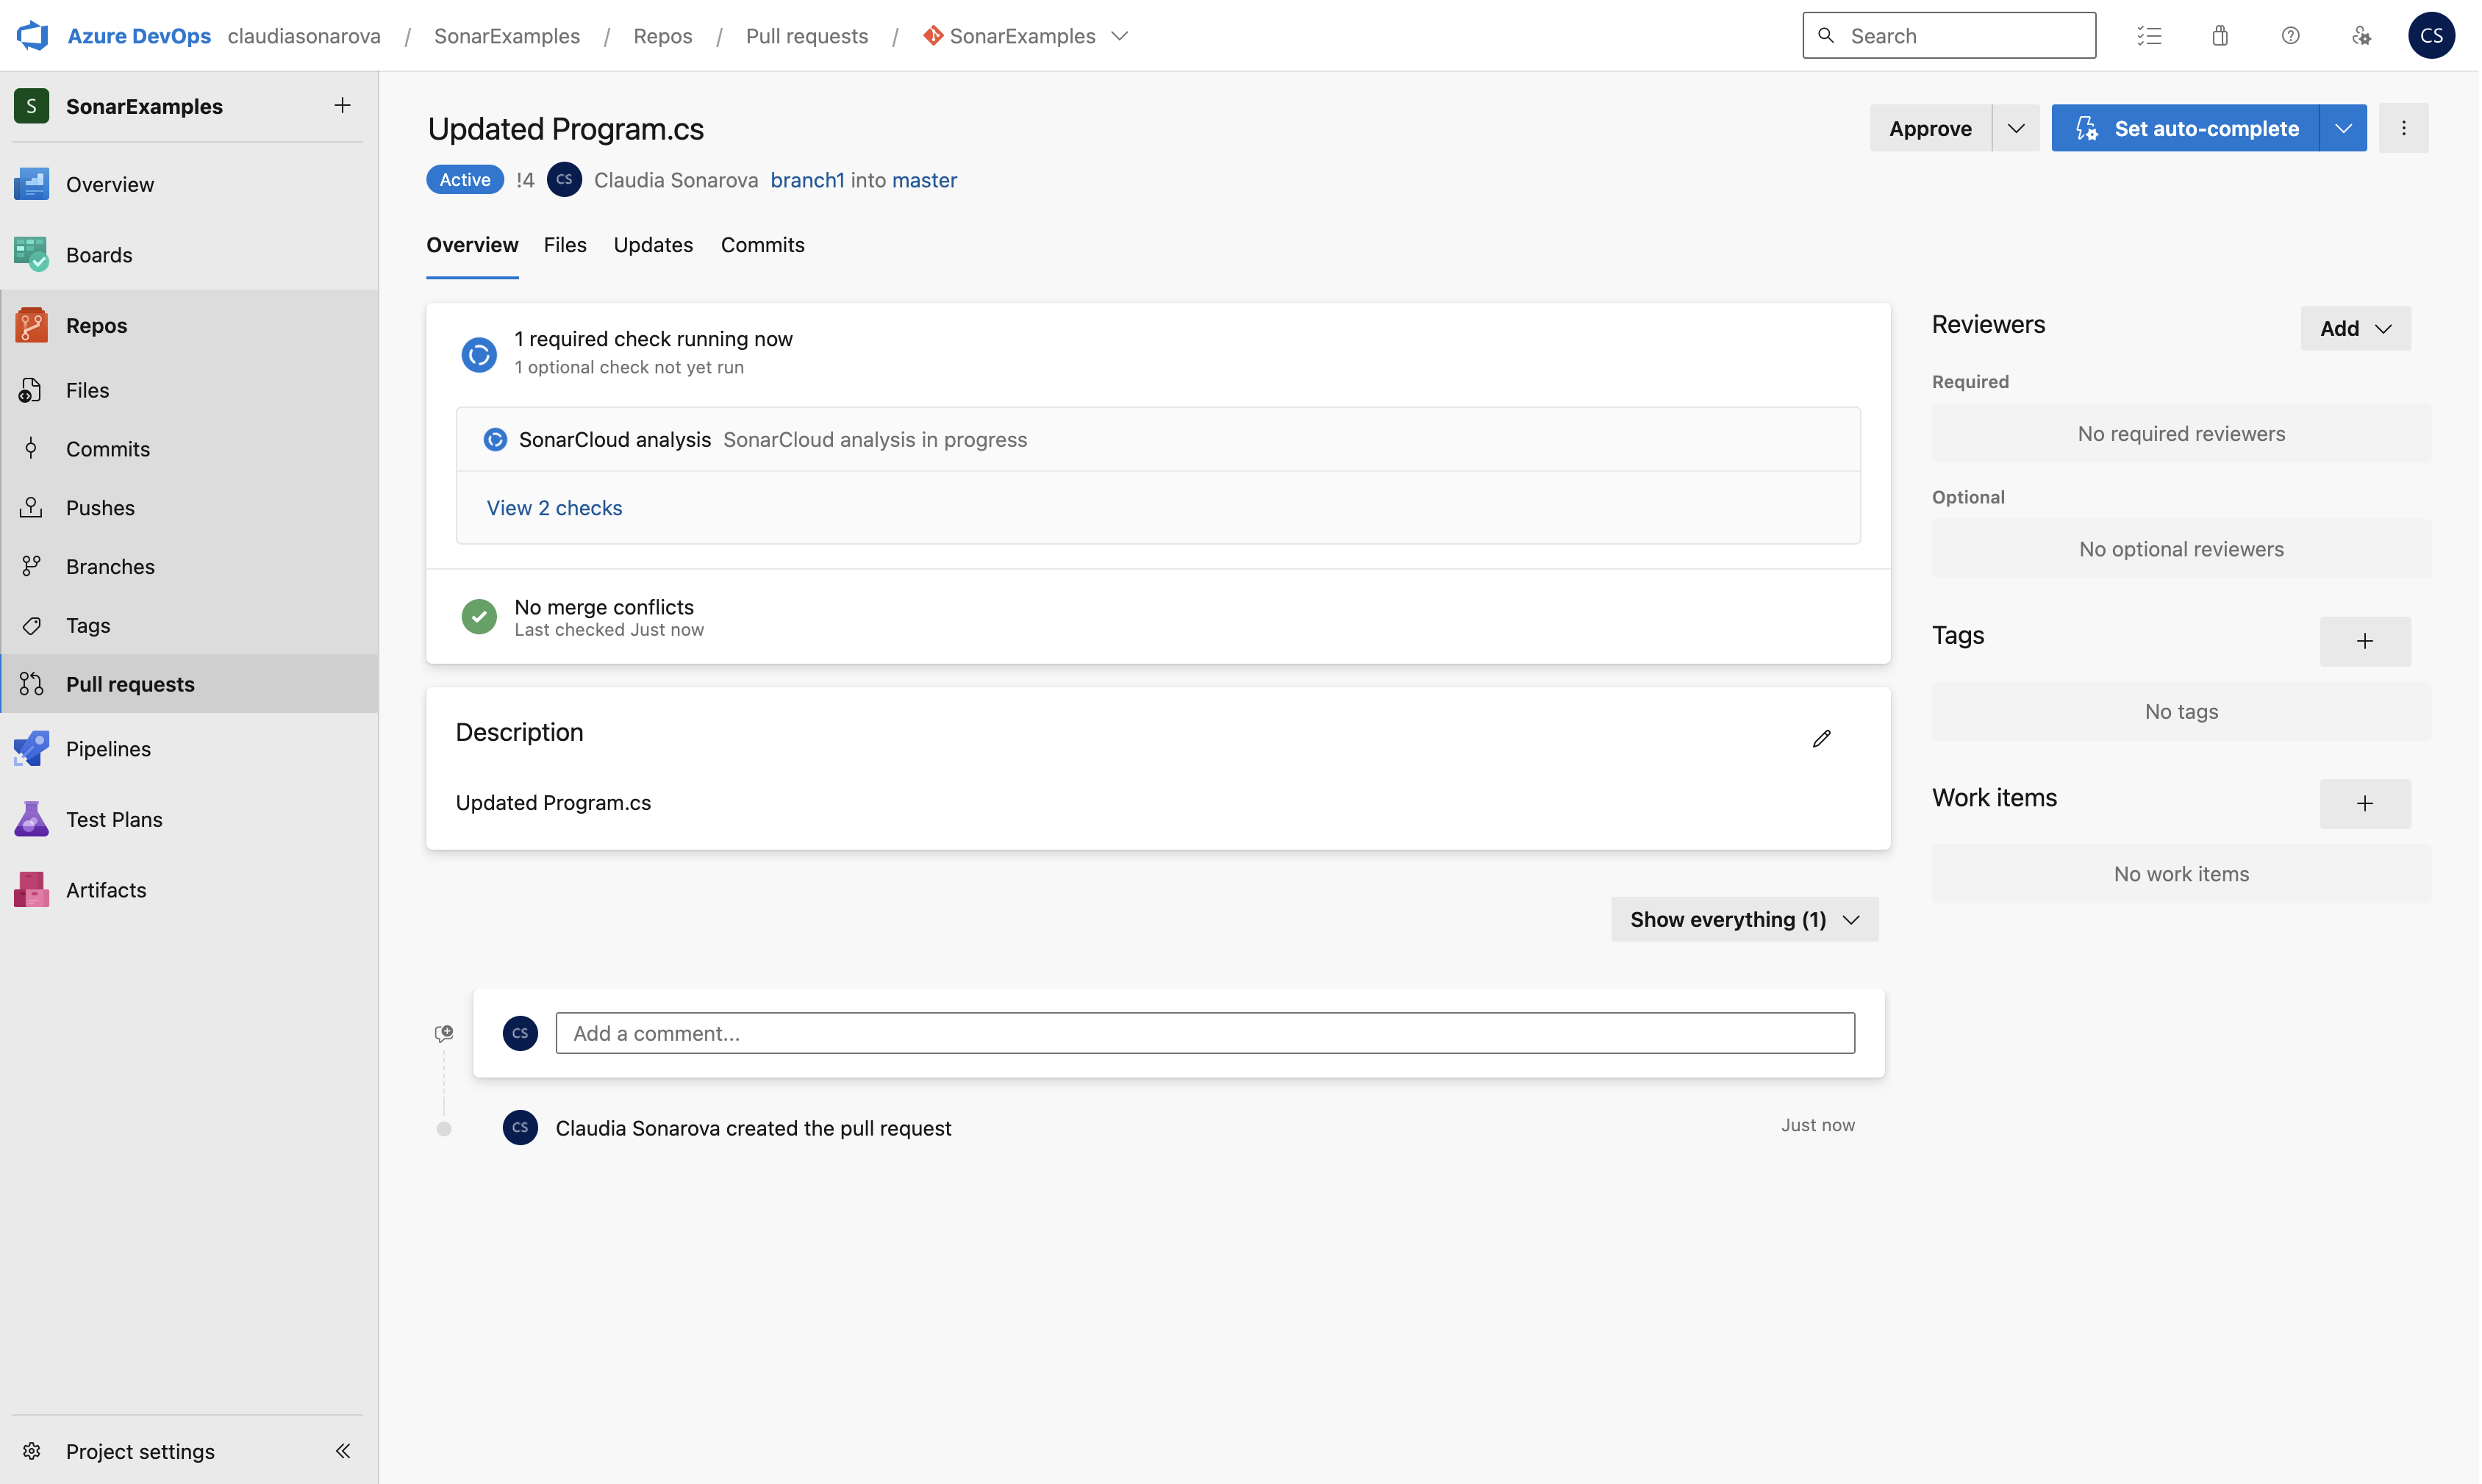
If the pull request integration is configured correctly, the UI will show that an analysis build is in progress.
-
Review the results of the Pull Request analysis
The results show that the analysis builds completed successfully, but that the new code in the PR failed the Code Quality check. Comment has been posted to the PR for the new issue that was discovered.
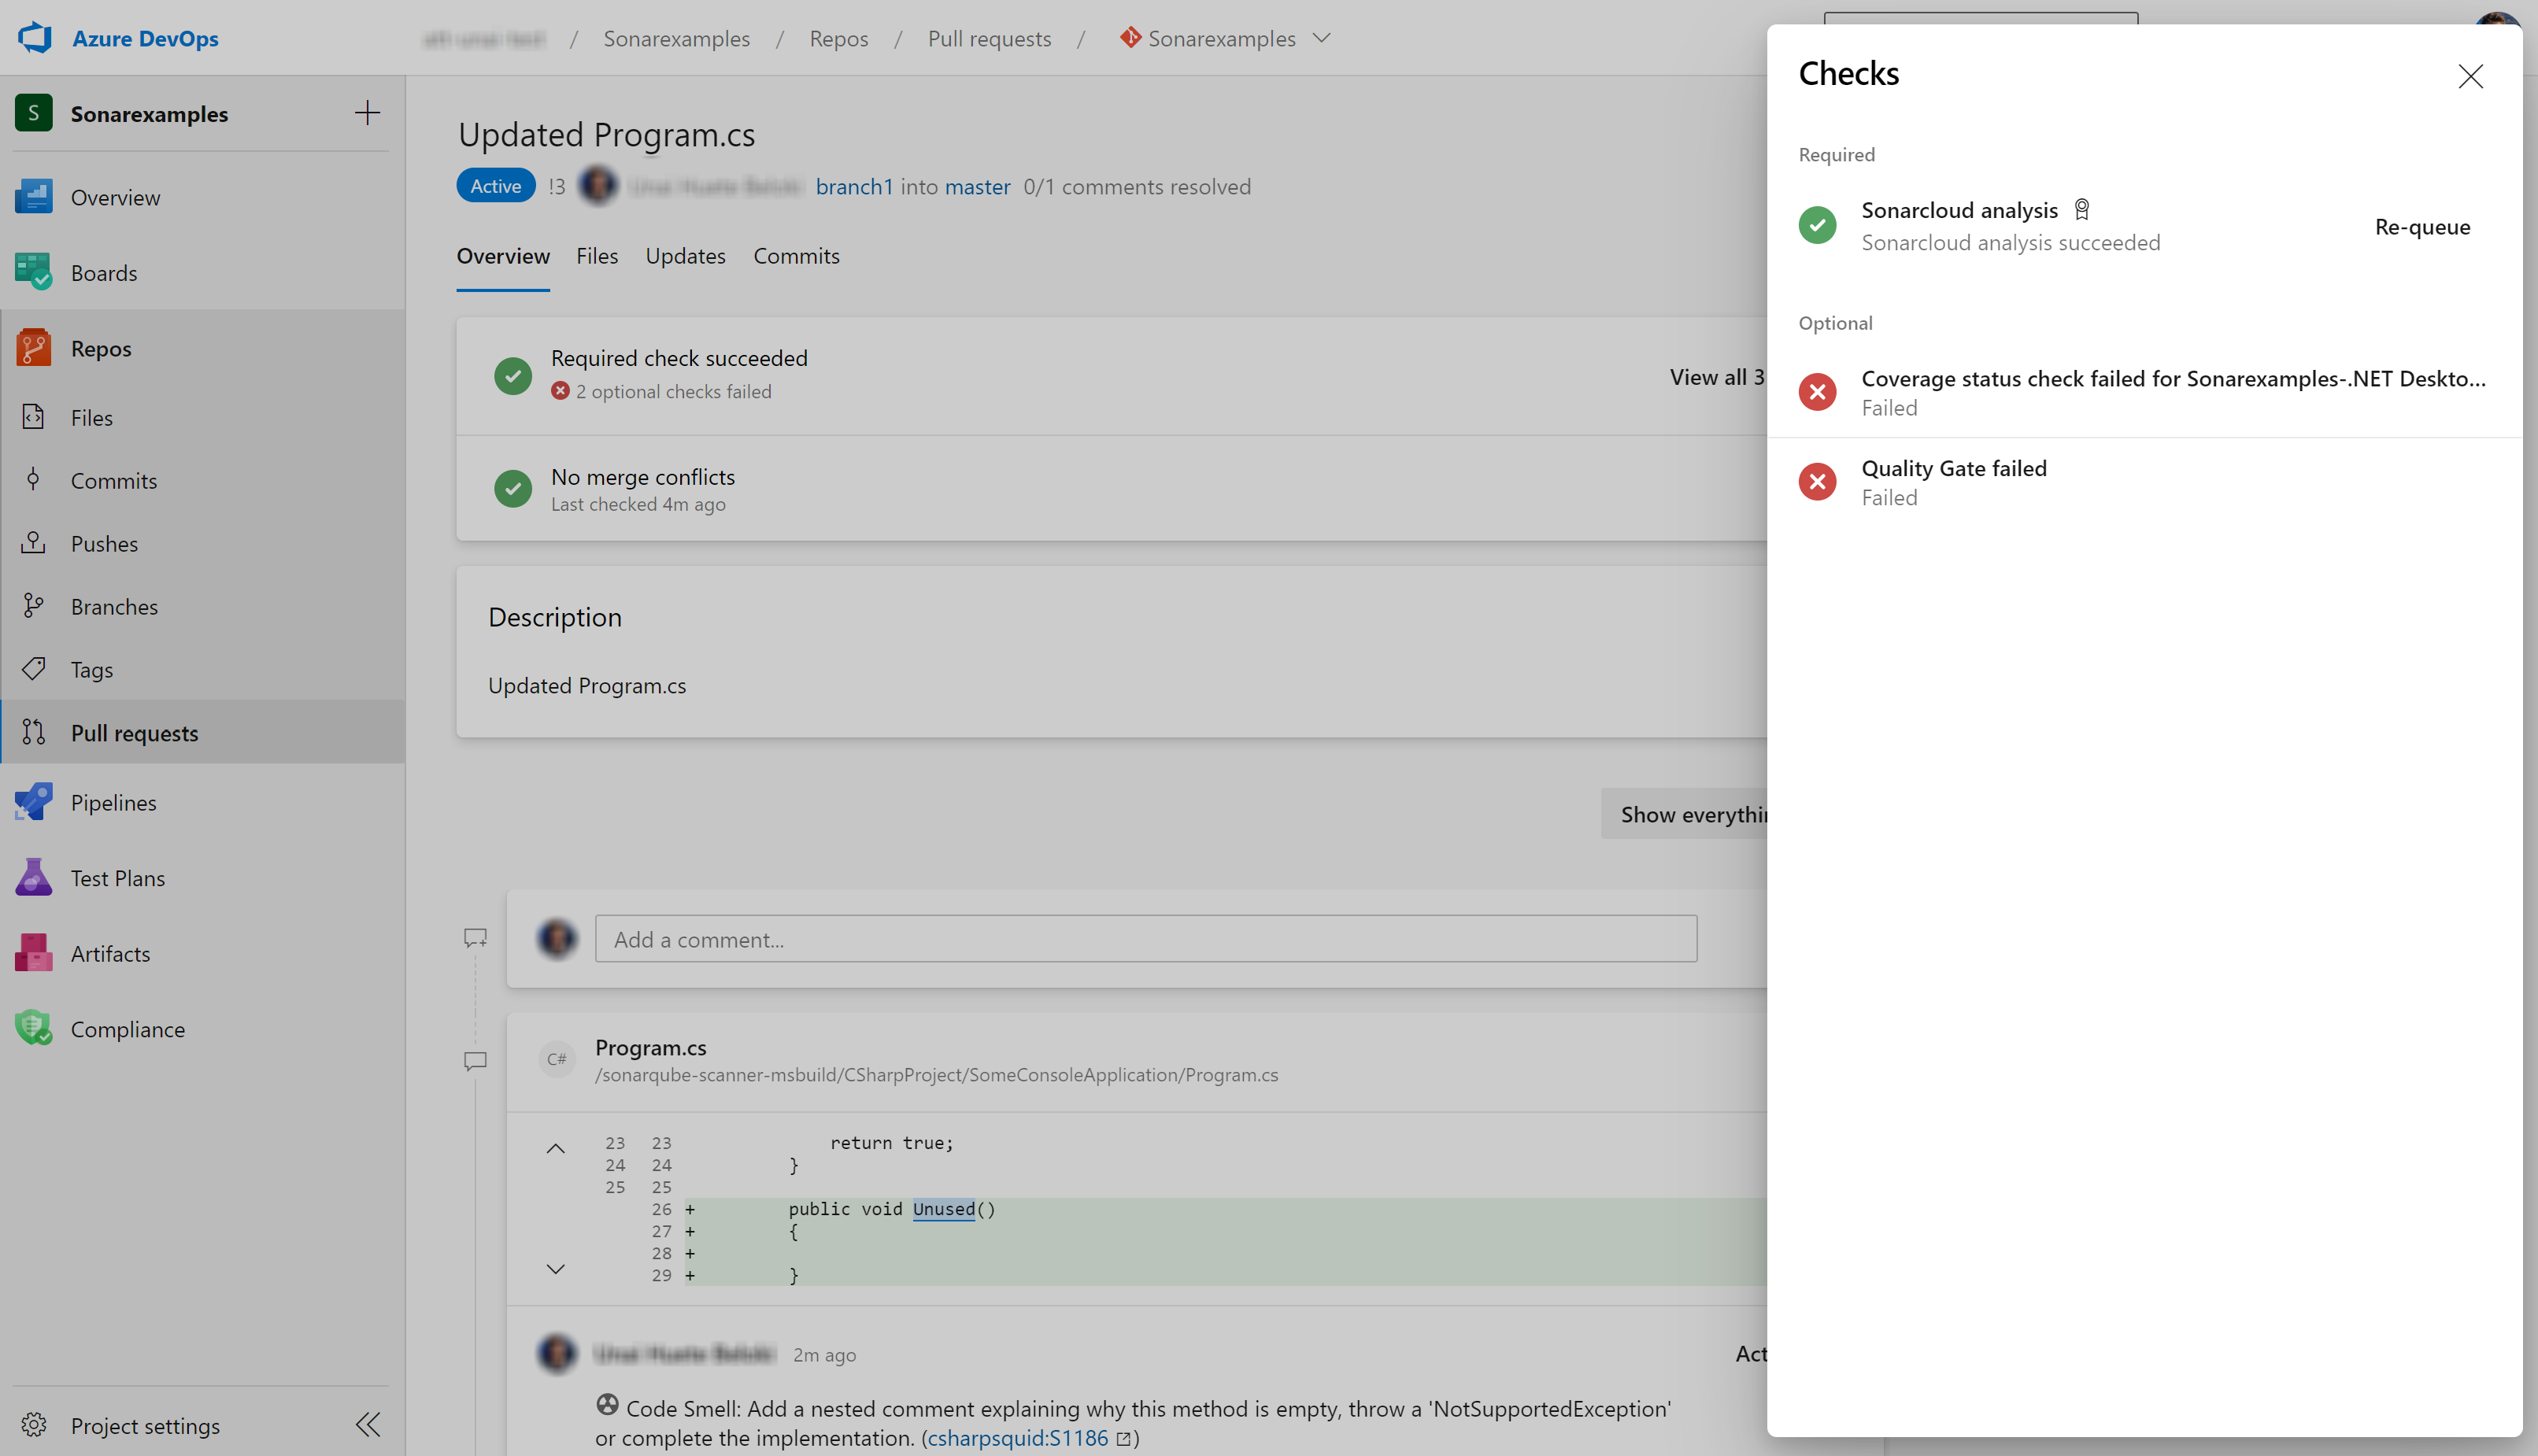
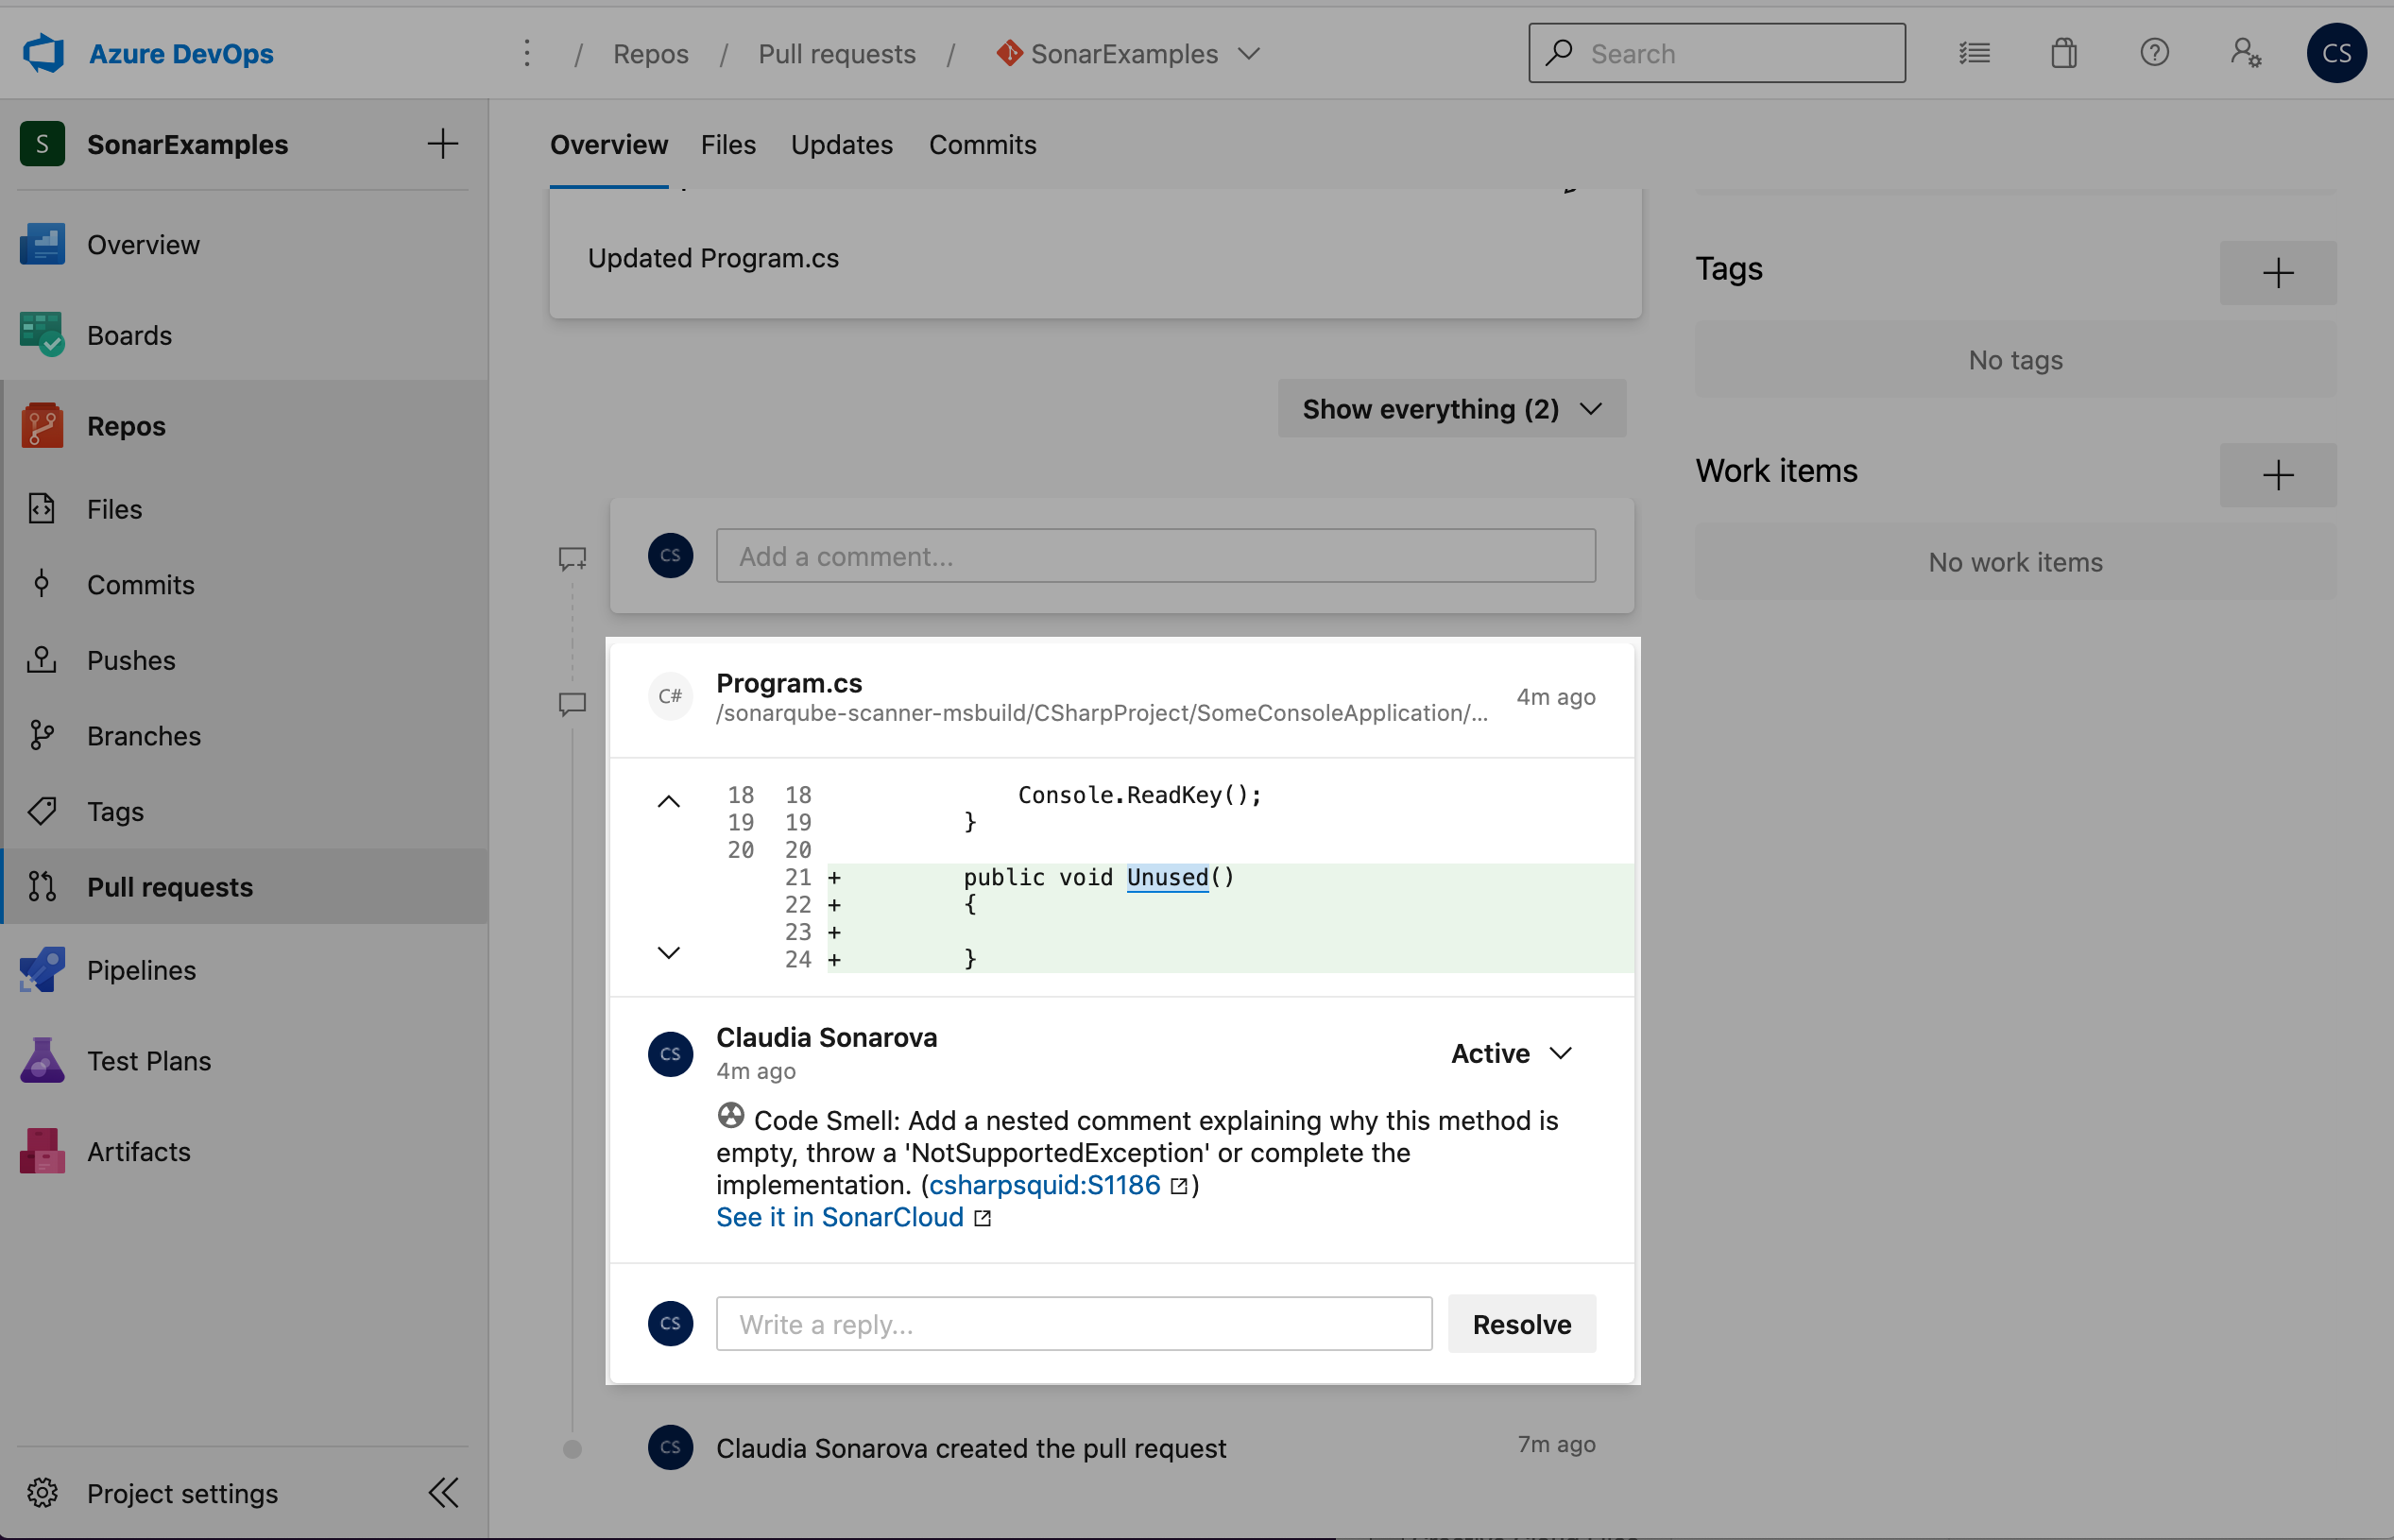
Note that the only issues in code that were changed or added in the pull request are reported - pre-existing issues in Program.cs and other files are ignored.
Block pull requests if the Code Quality check failed
At this point, it is still possible to complete the pull request and commit the changes even though the code quality check has failed. Nevertheless, it is simple to configure Azure DevOps to block the PR unless the Sonar Quality Gate check passes.
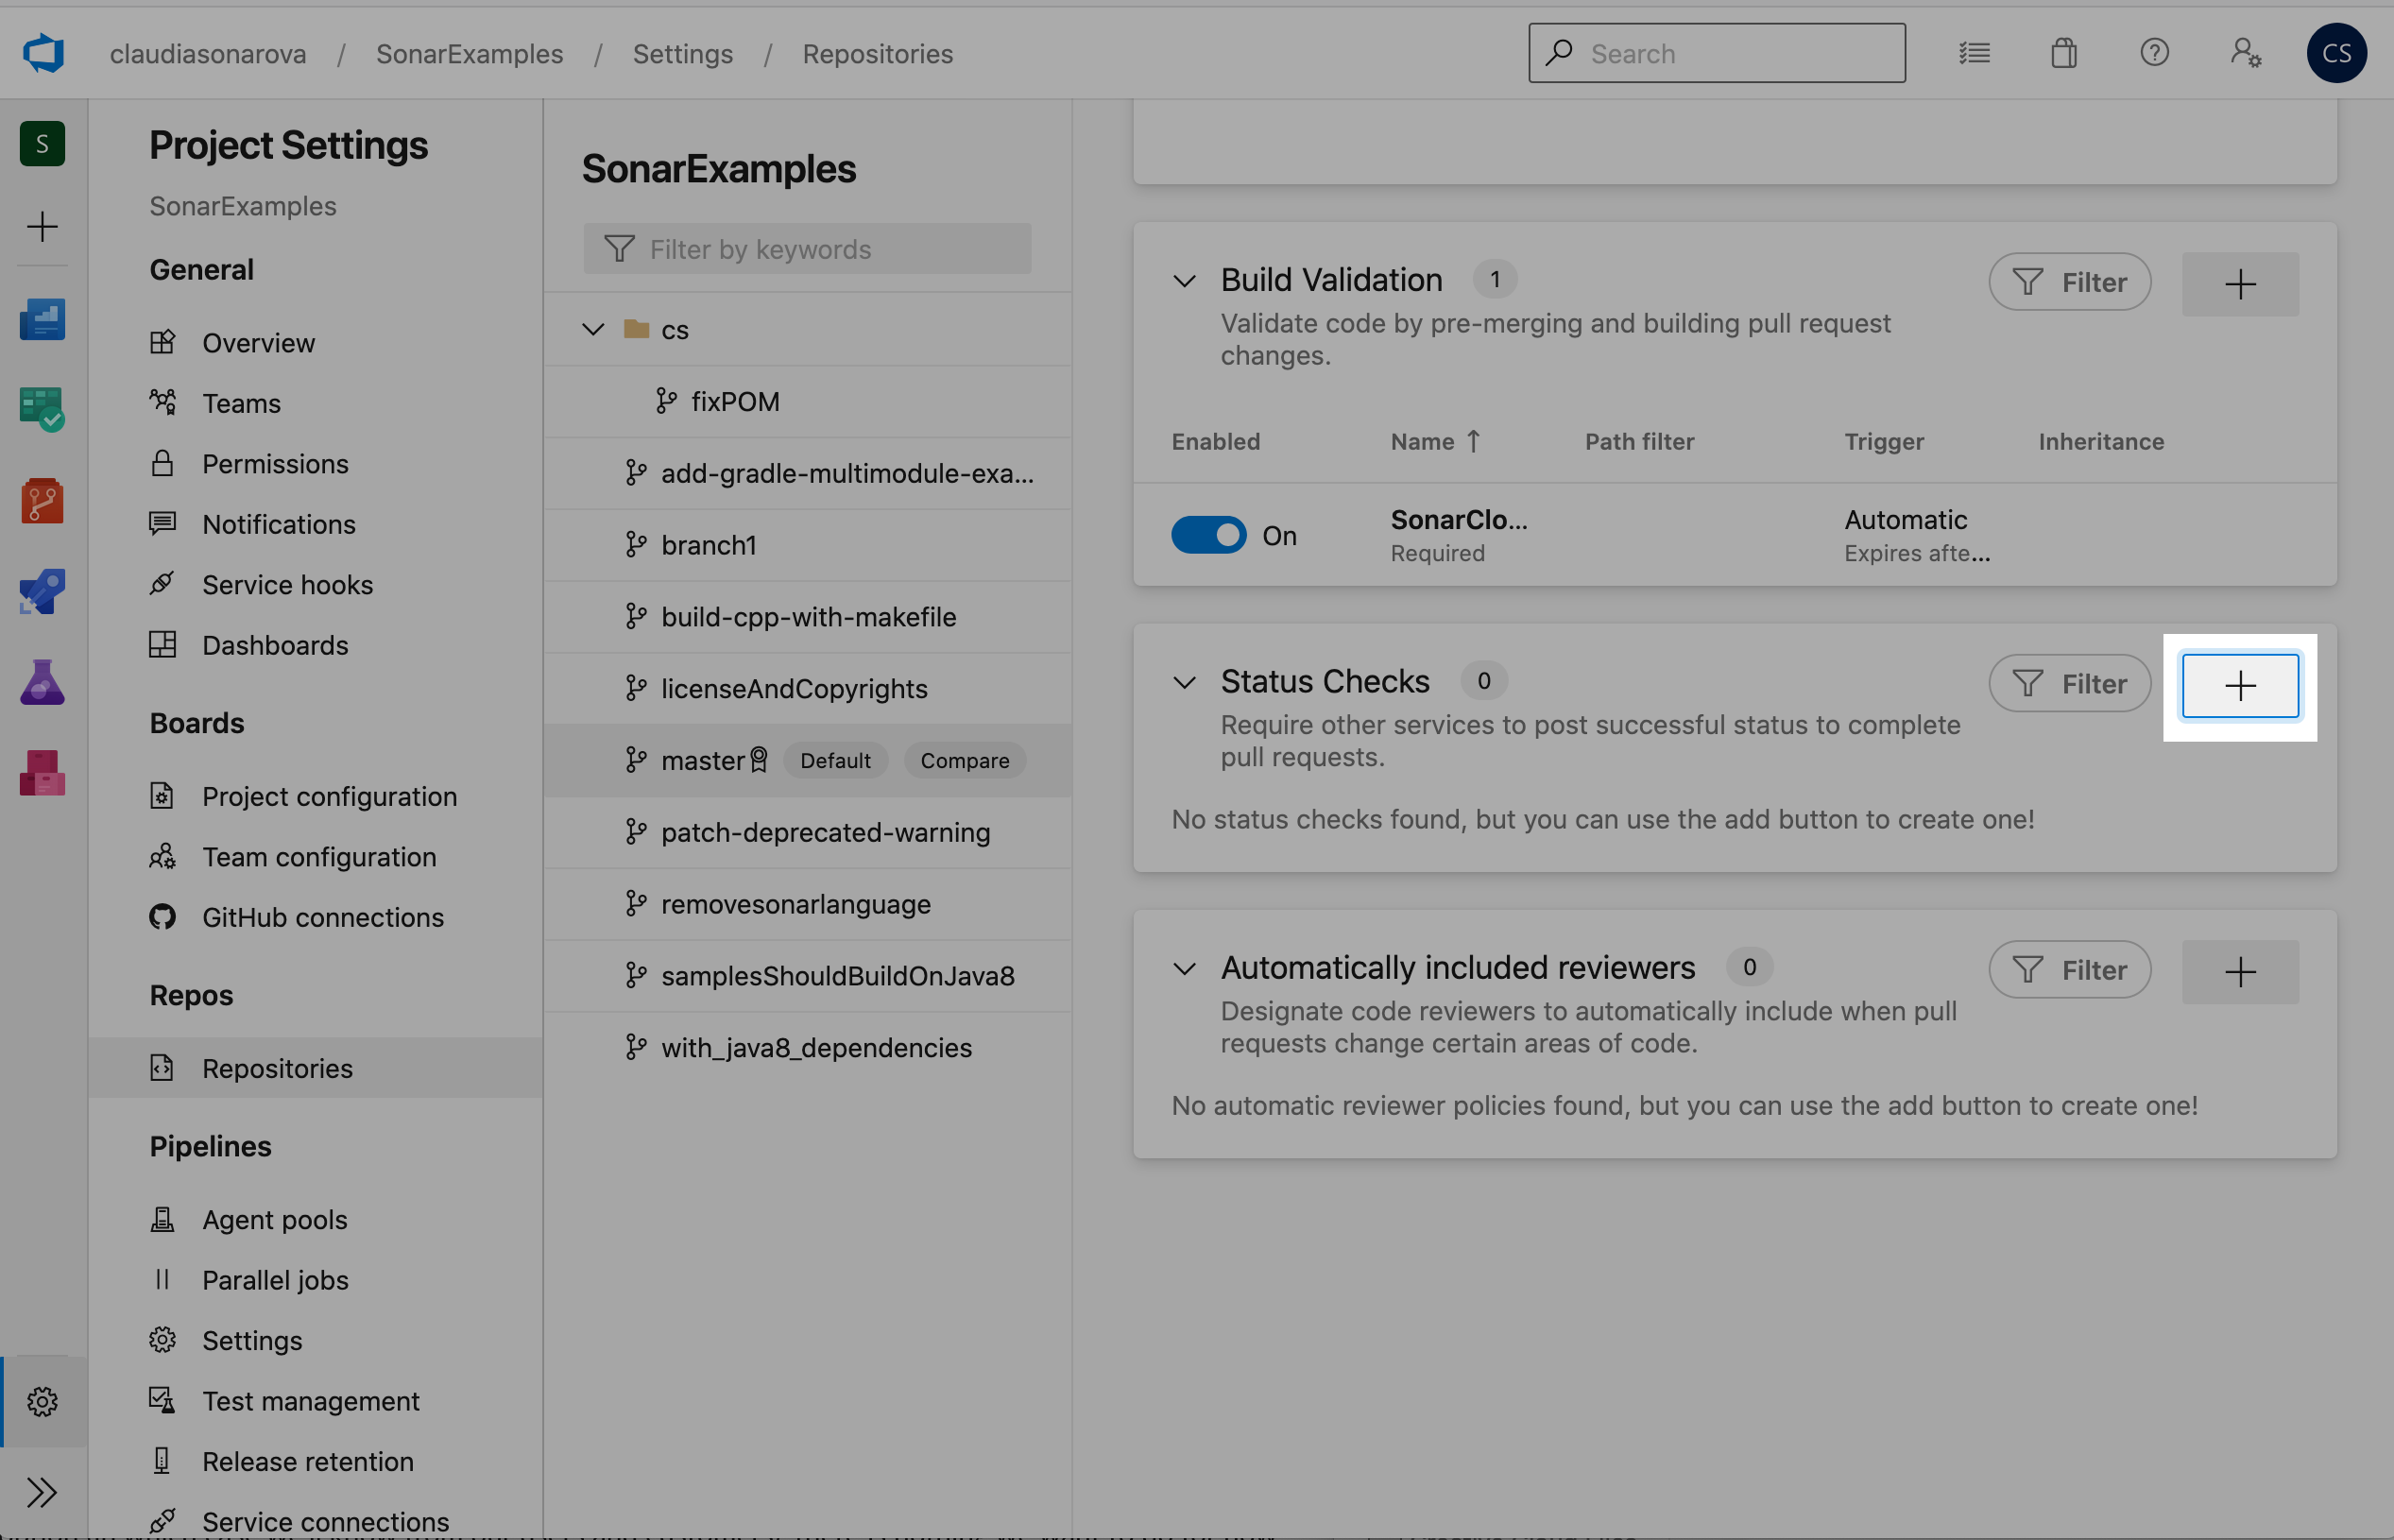
- As we did in Step 2.1 above to add a branch policy, go to the Branch Policy page of the master branch. Because the
masterbranch is the one you will want your PRs to merge into, this is where you have to adjust the policy.-
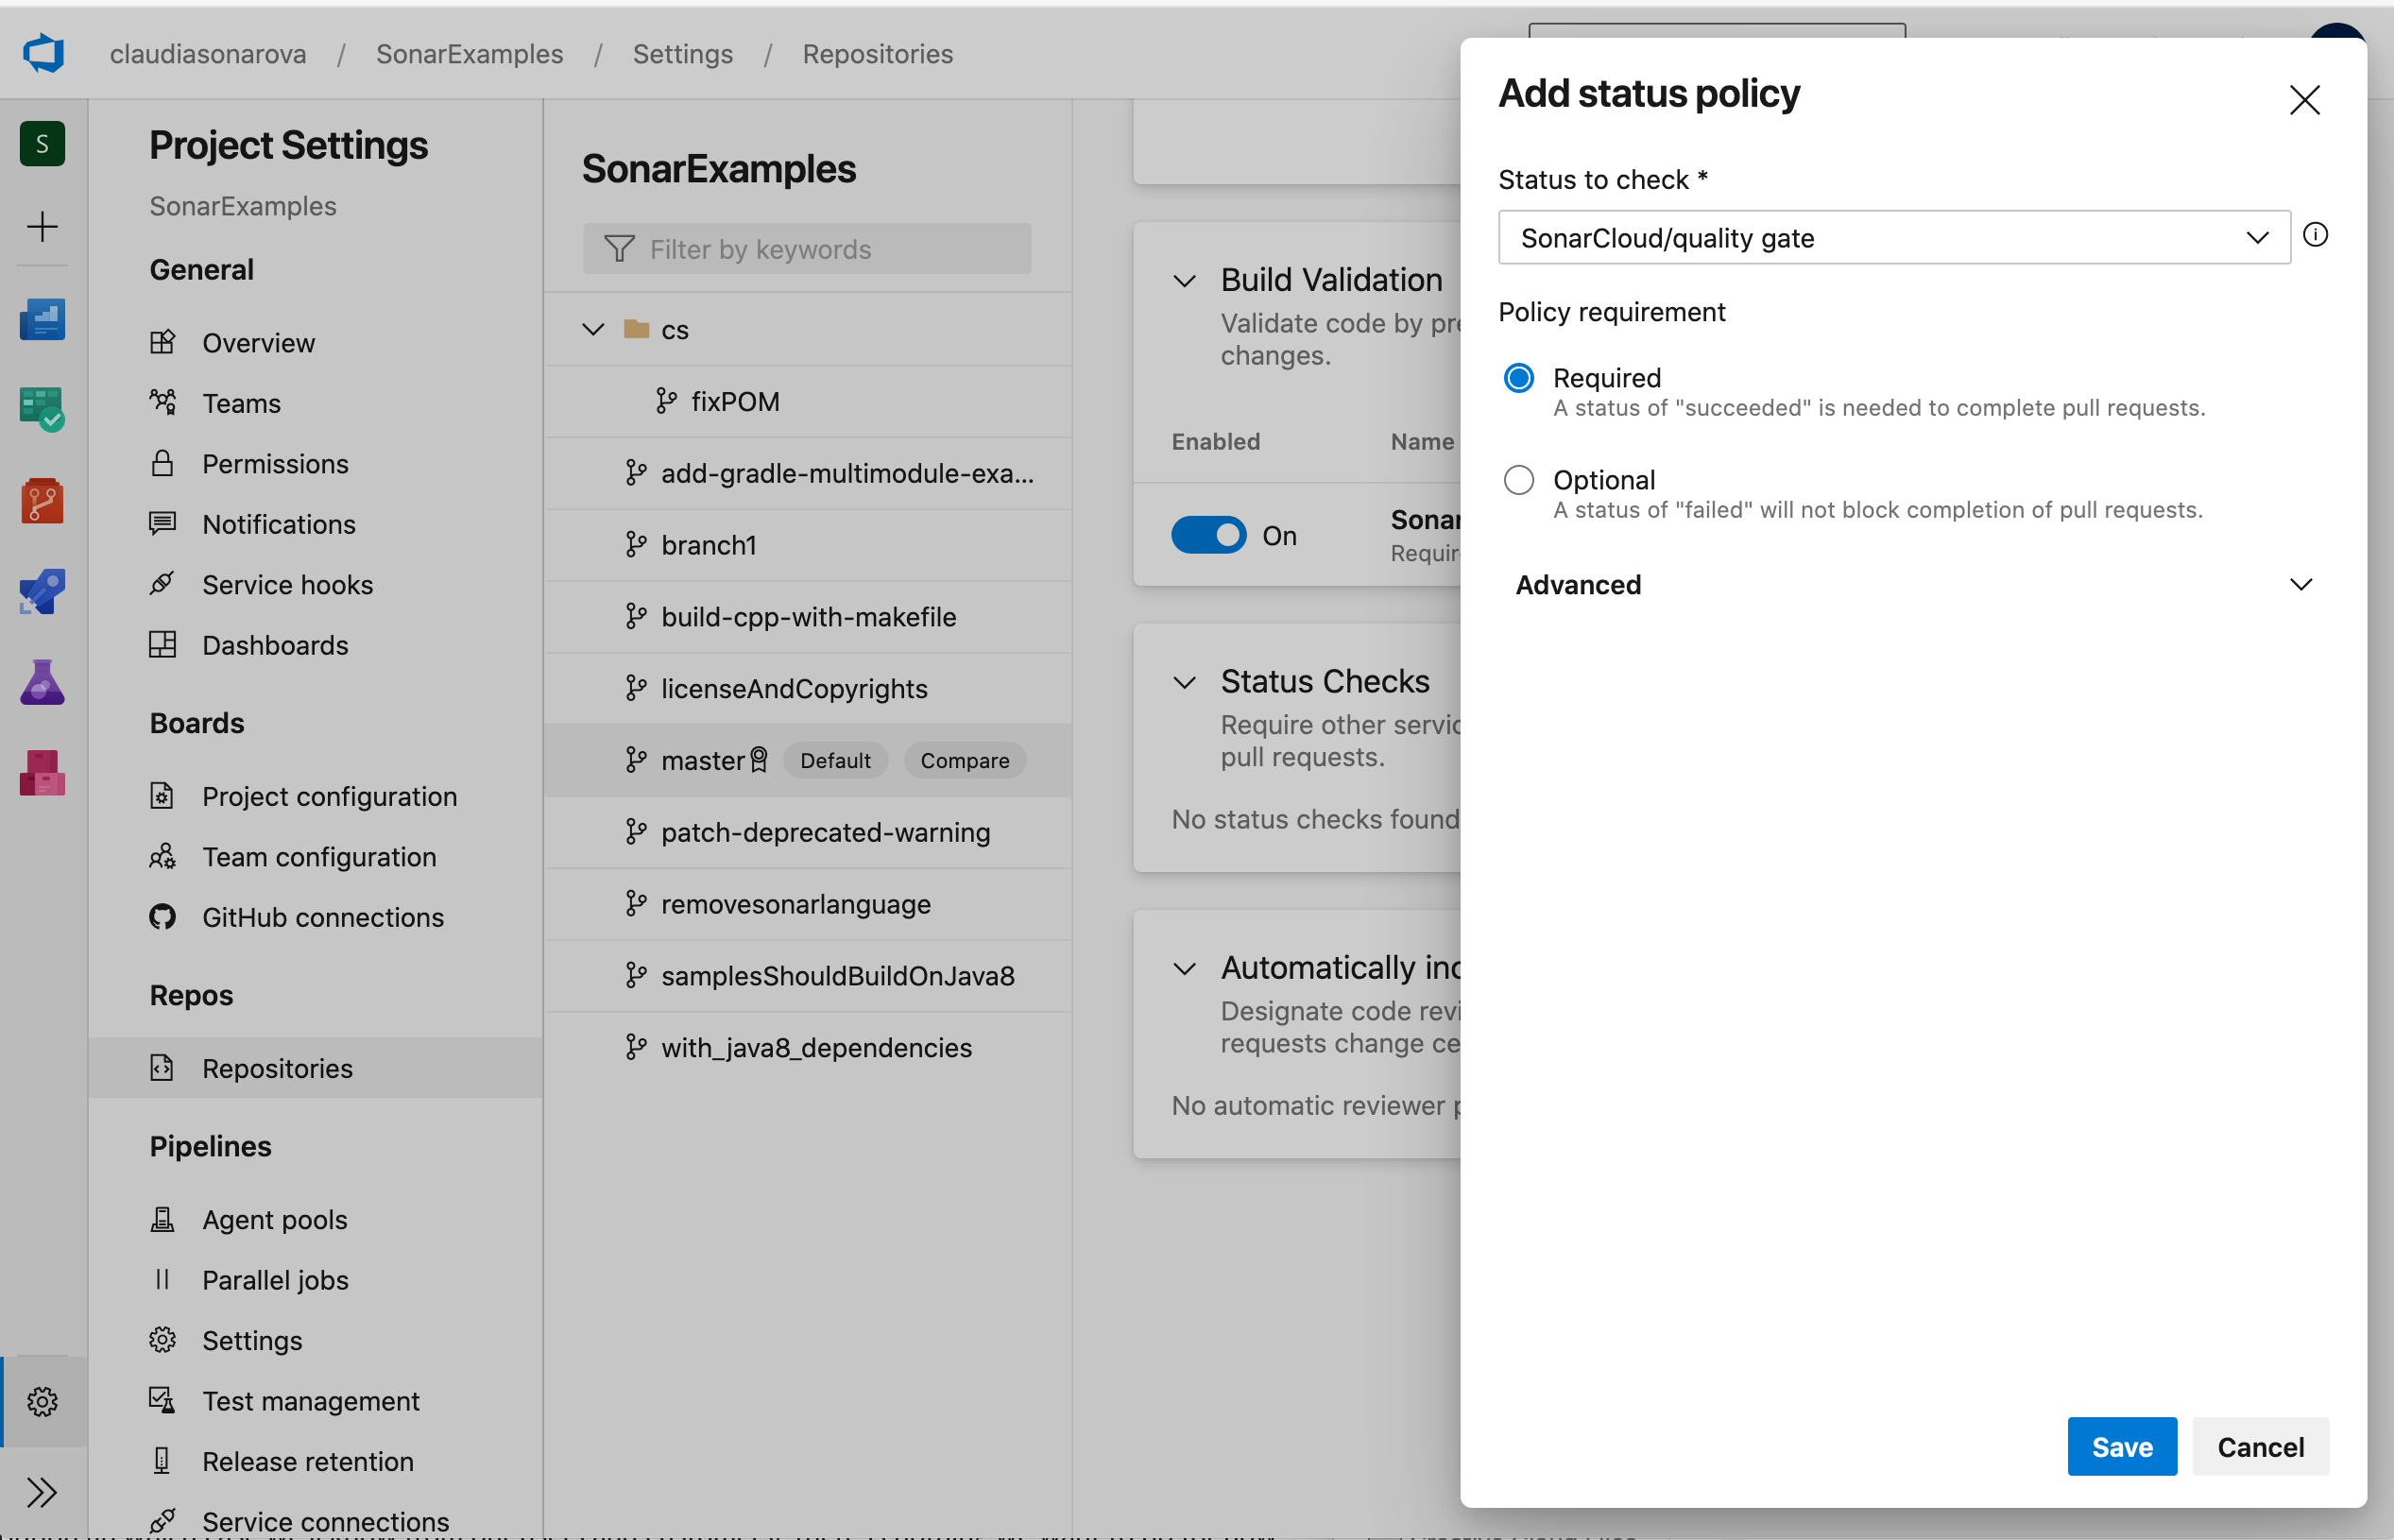
Under Status Checks, Click Add status policy
- Select SonarCloud/quality gate from the Status to check drop-down.
- Set the Policy requirement to Required.
-
Select Save to continue.
Users will now be unable to merge their pull request until the Code Quality check is successful (the Code Quality check succeeds when all issues have been either fixed or marked as confirmed or resolved in SonarCloud).
-
Exercise 4: Check the SonarCloud Quality Gate status in a Continuous Deployment scenario (In Preview)
Disclaimer: This feature is in preview, and may not reflect its final version. Please look at the notes at the end of this exercise for more information.
Starting from version 1.8.0 of the SonarCloud extension for Azure DevOps, a pre-deployment gate is available for your release pipeline. It allows you to check the status of the SonarCloud Quality Gate for the artifact you want to deploy and block the deployment if the Quality Gate failed.
Prerequisites :
- Enable the Publish Quality Gate Result in your build pipeline
- Have an artifact built and published in this pipeline to feed the release pipeline
Setup :
-
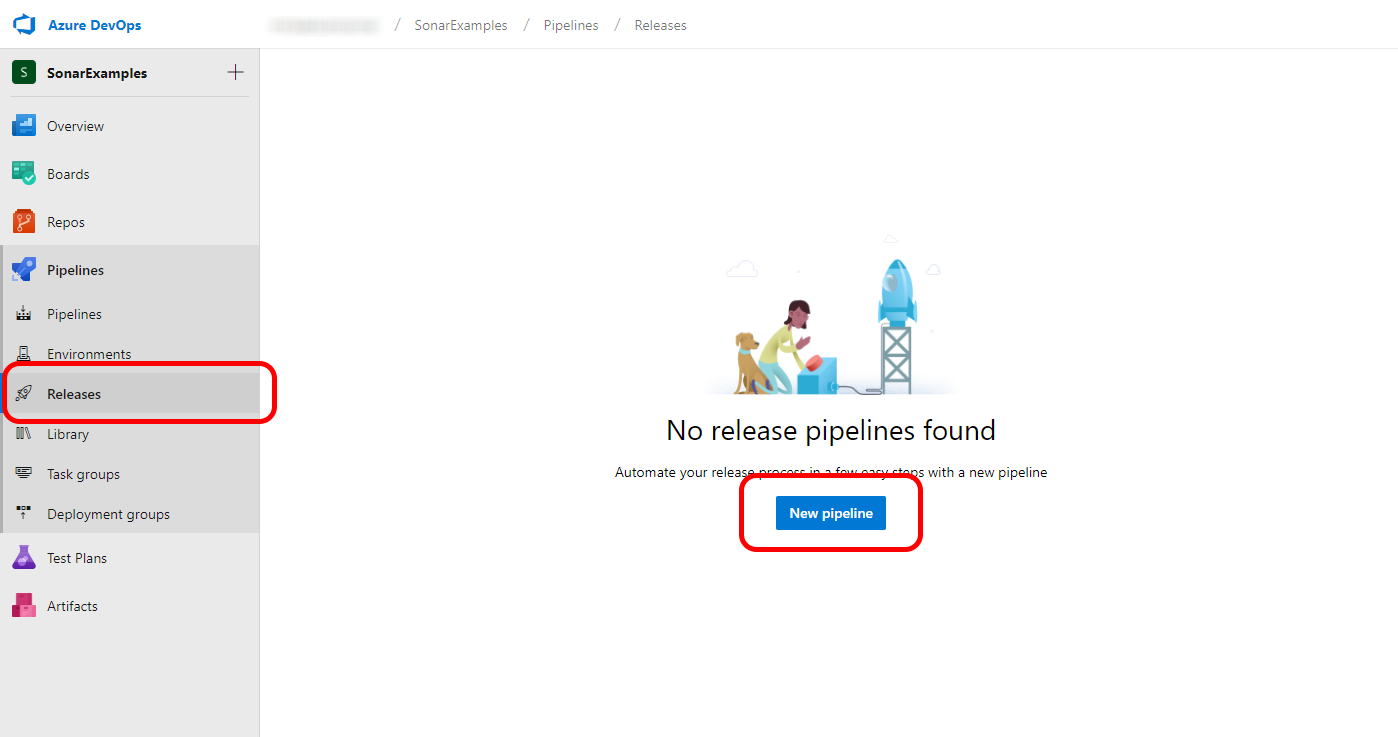
In the left panel, navigate to Pipelines > Releases, and select New pipeline to get started.
-
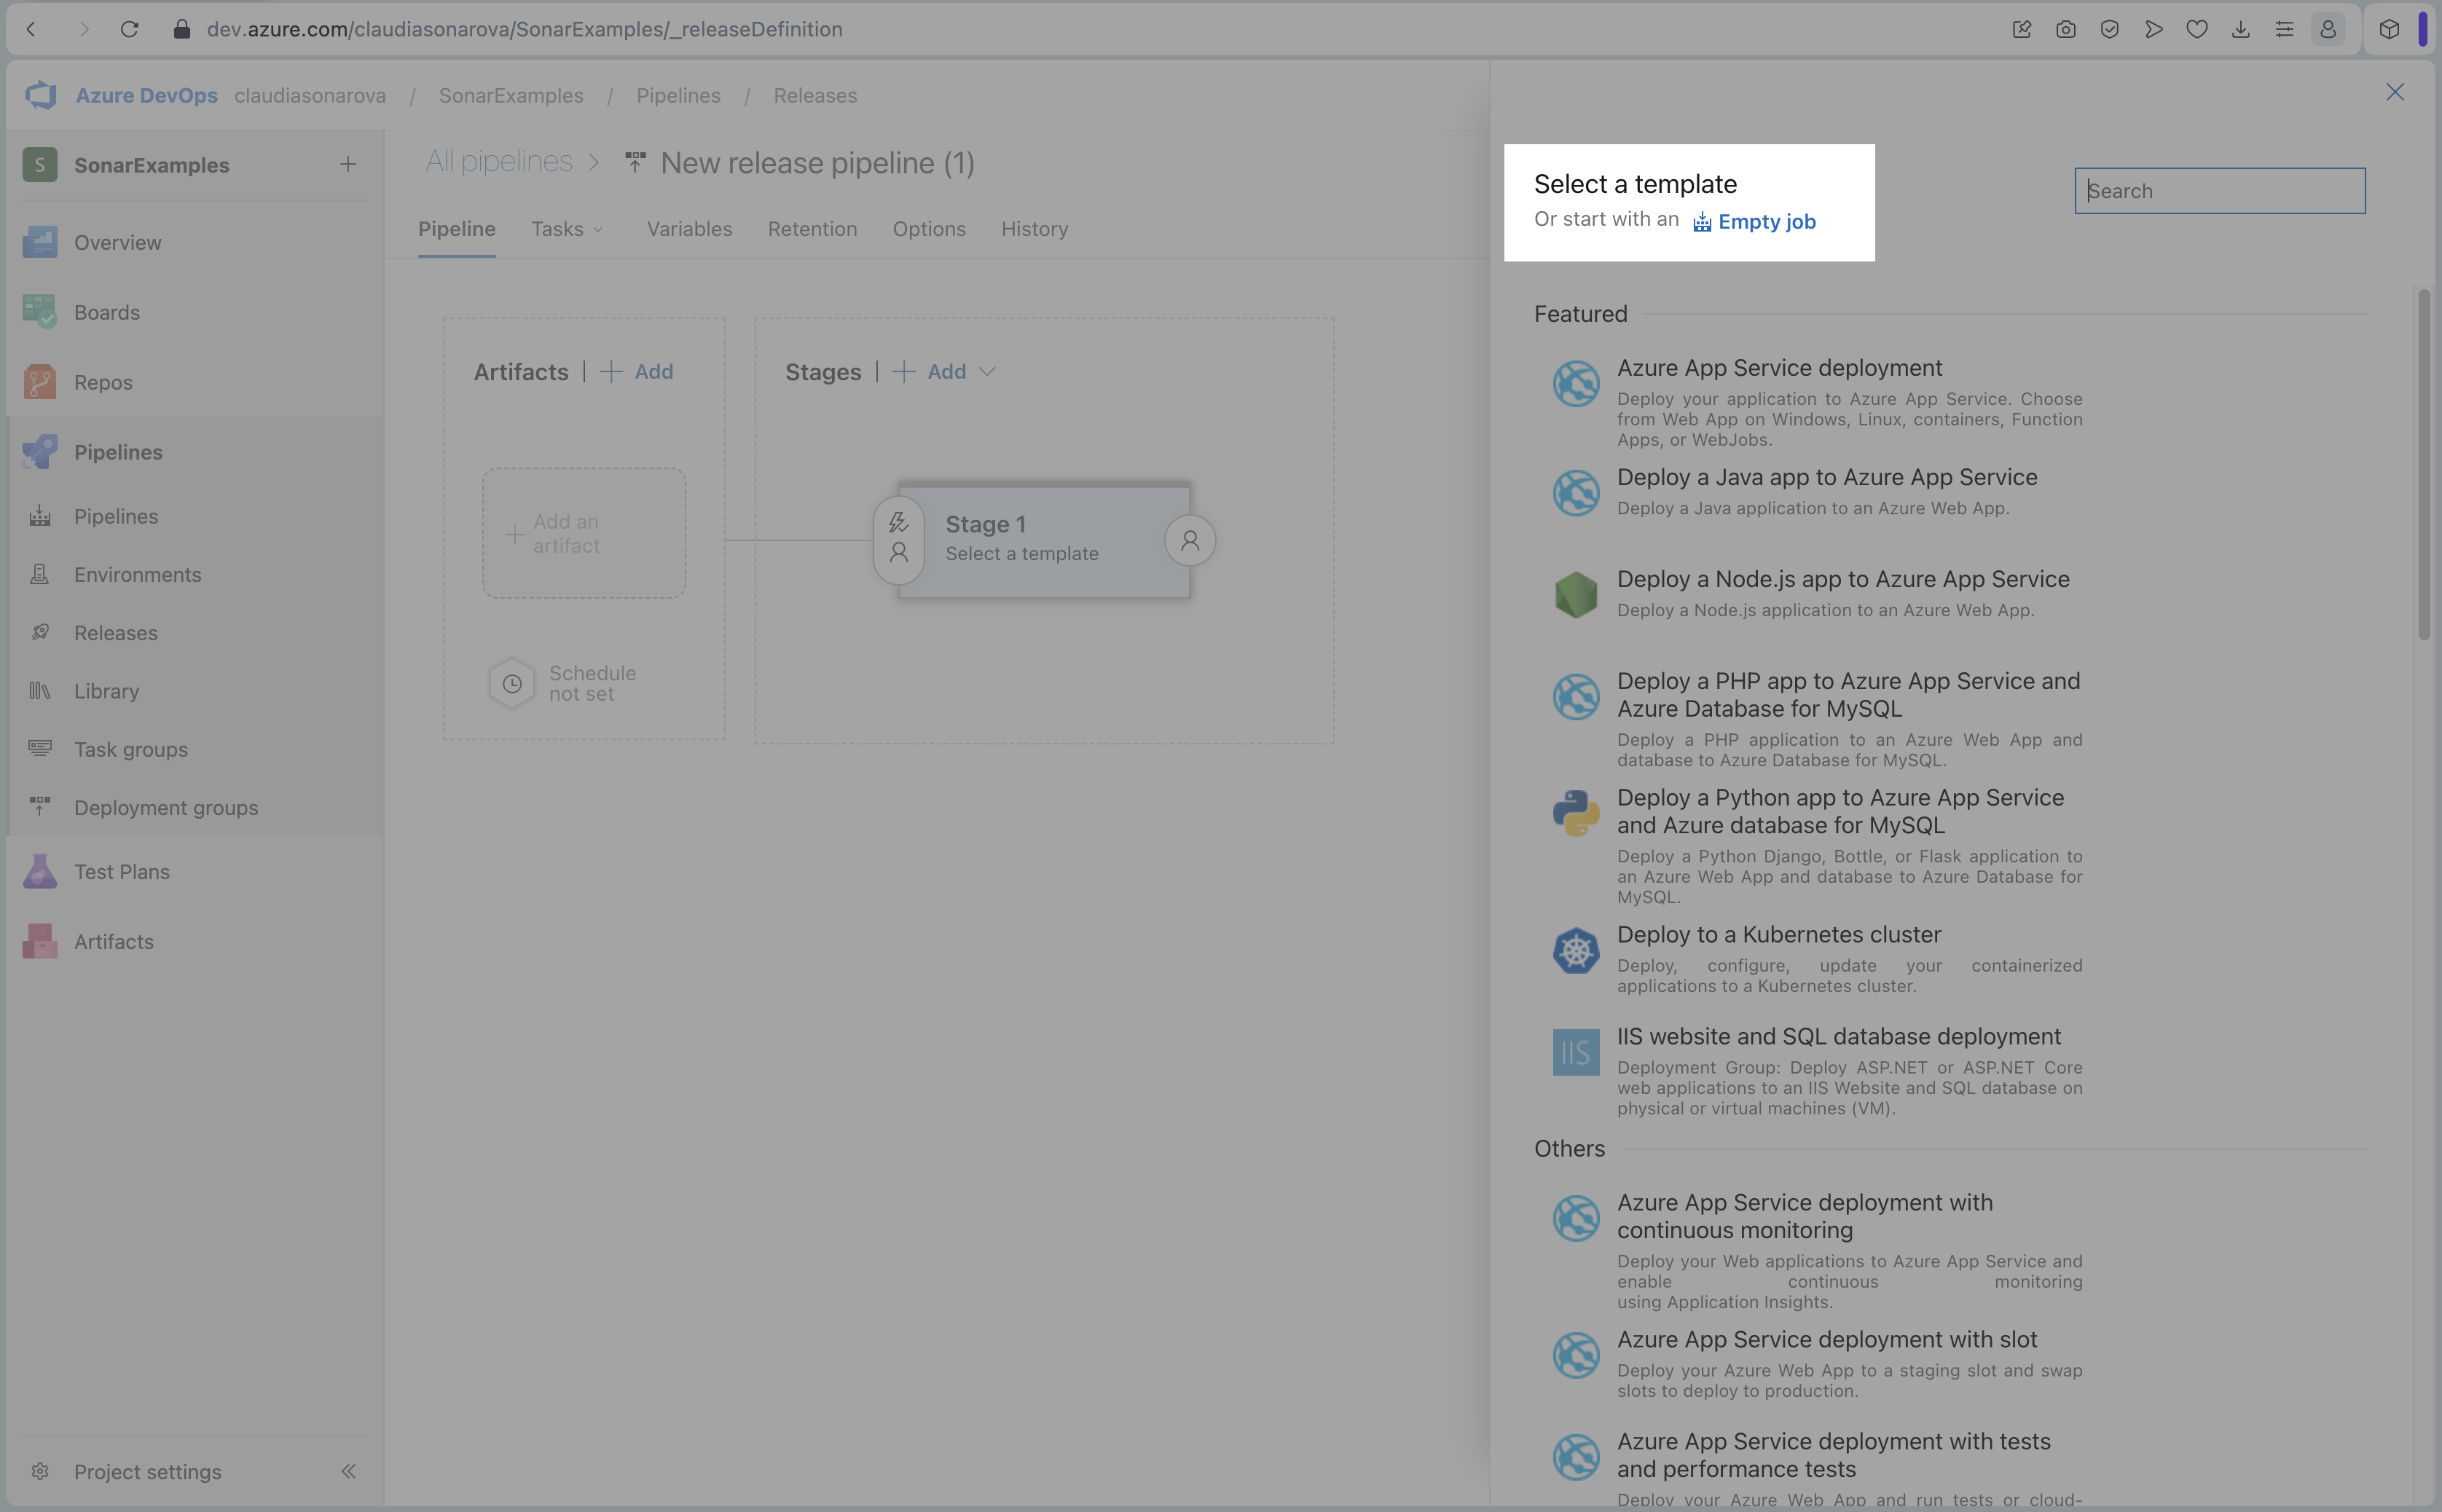
On the next page, choose the template you want. We will select Empty job for this exercise.
-
For now, ignore the Stage properties and select the Pre-deployment conditions on Stage 1.
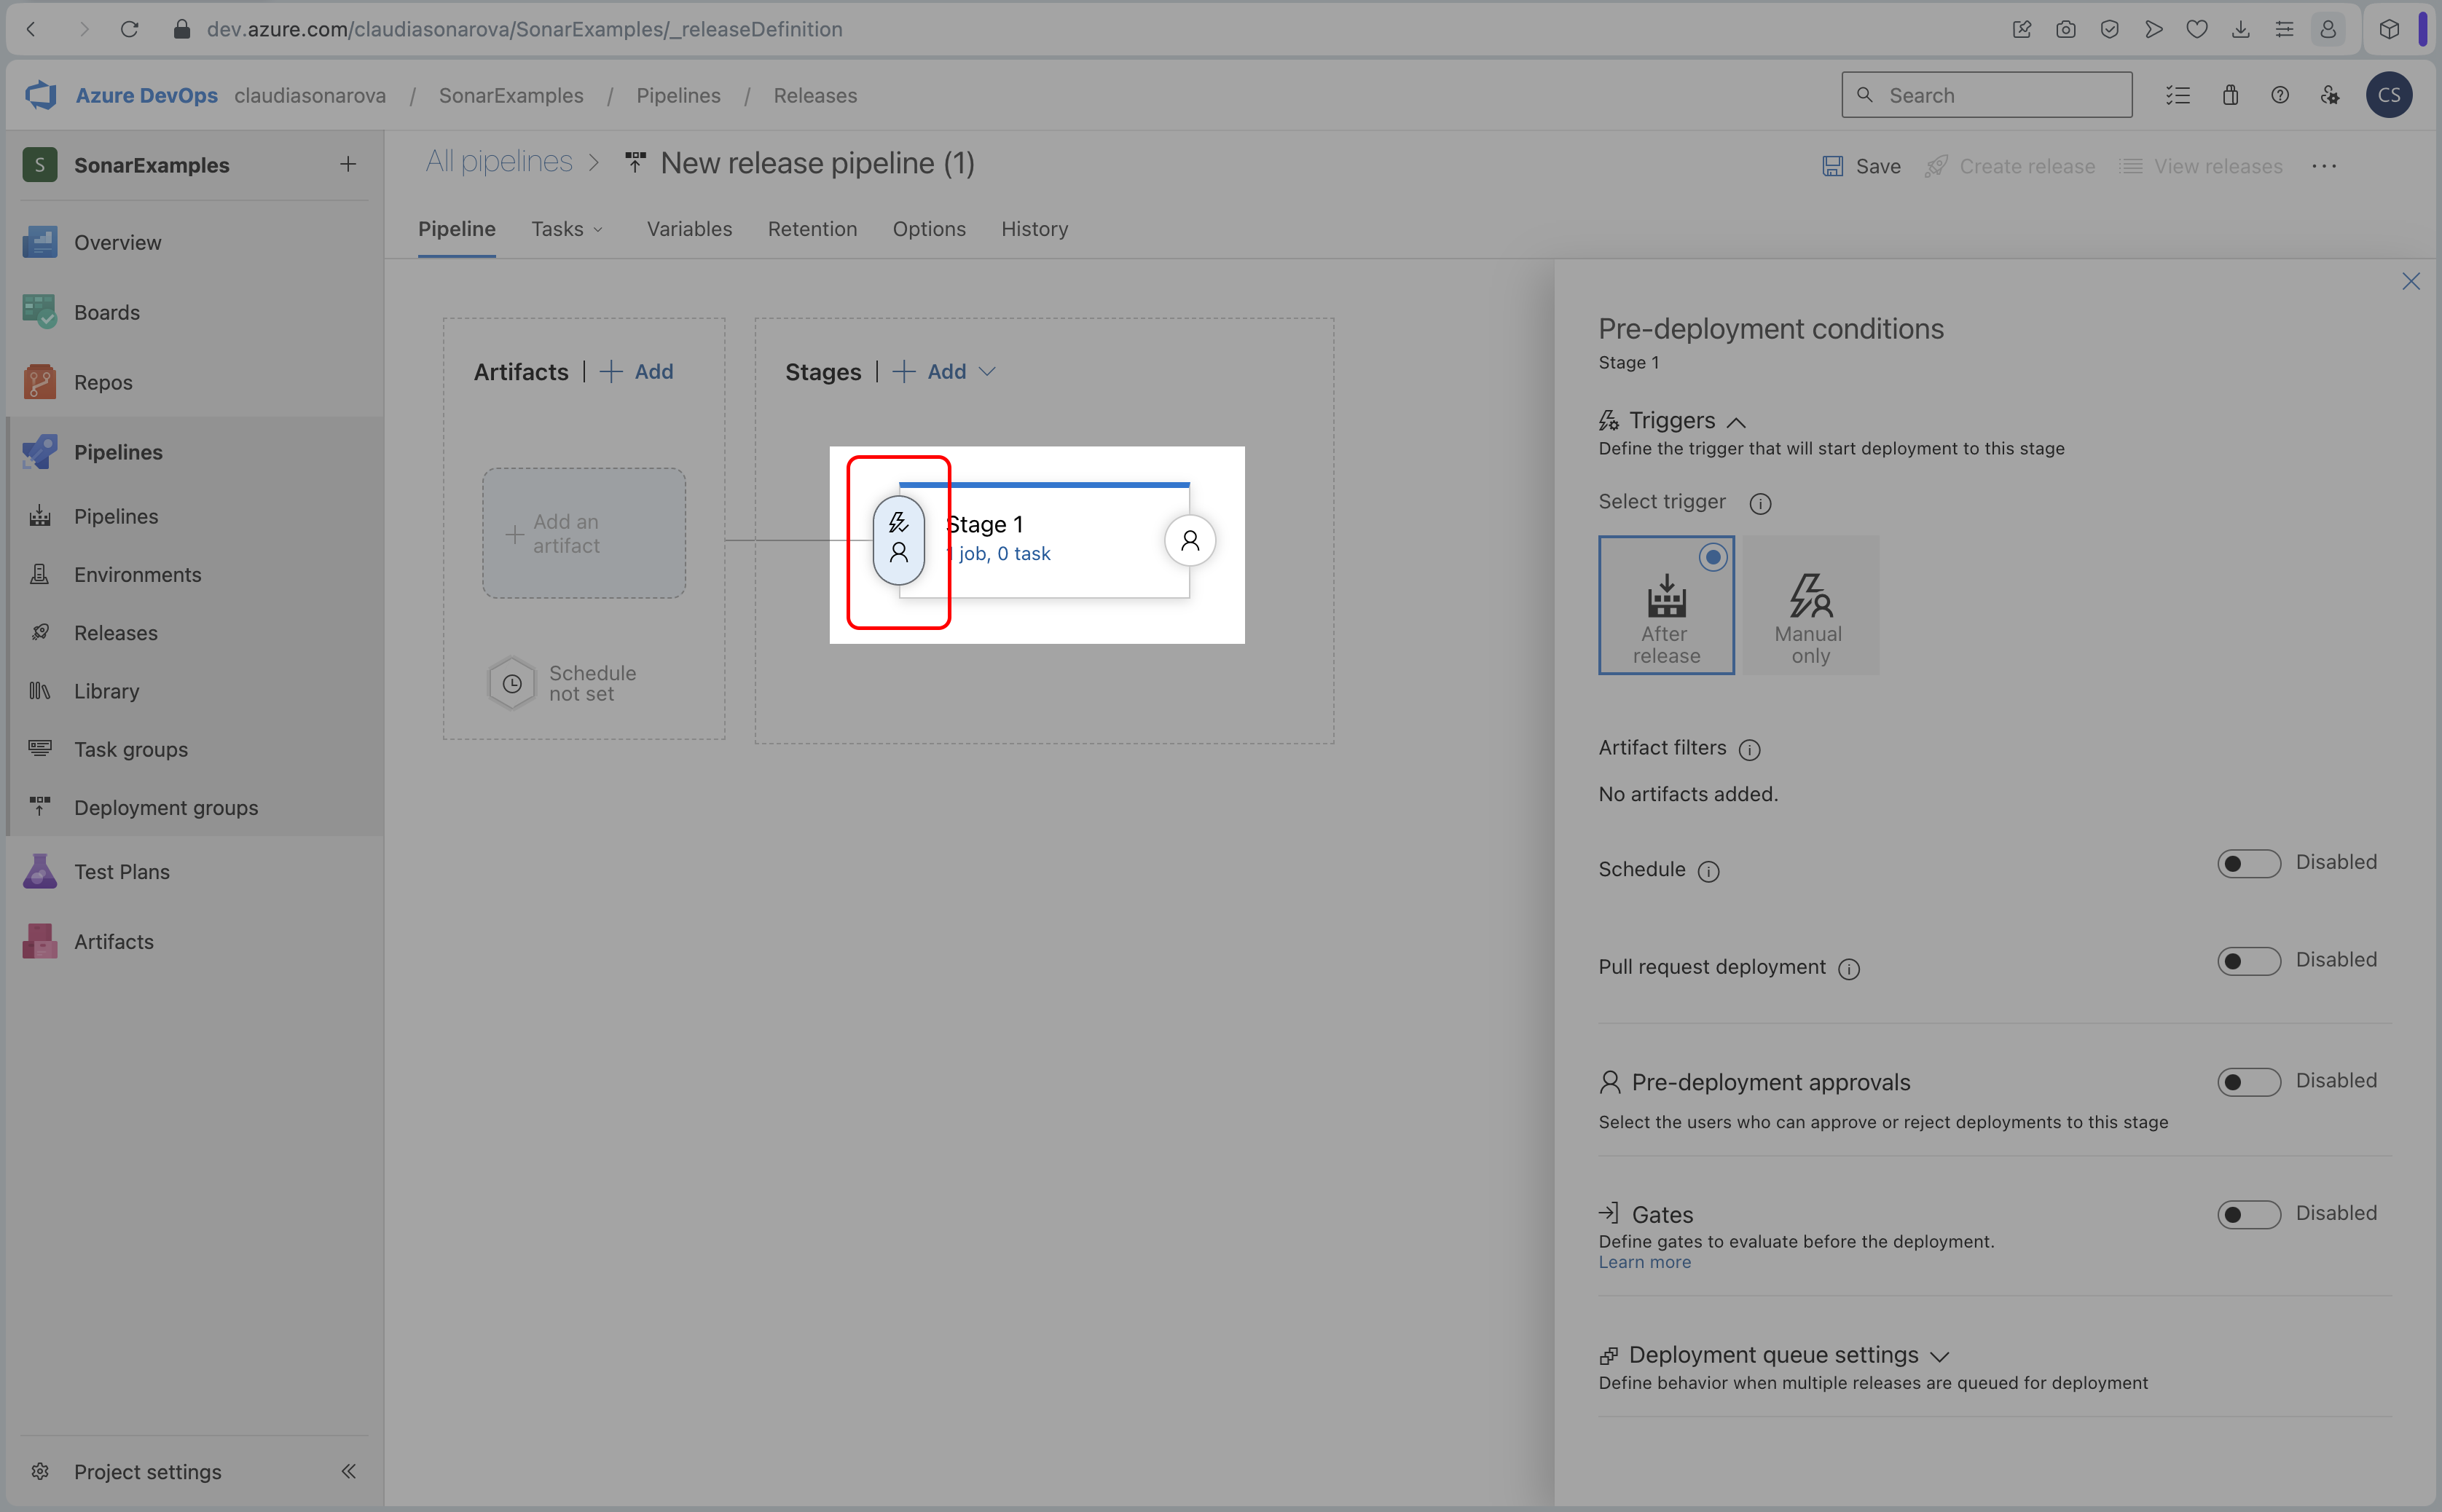
- Select Enabled beside Gates
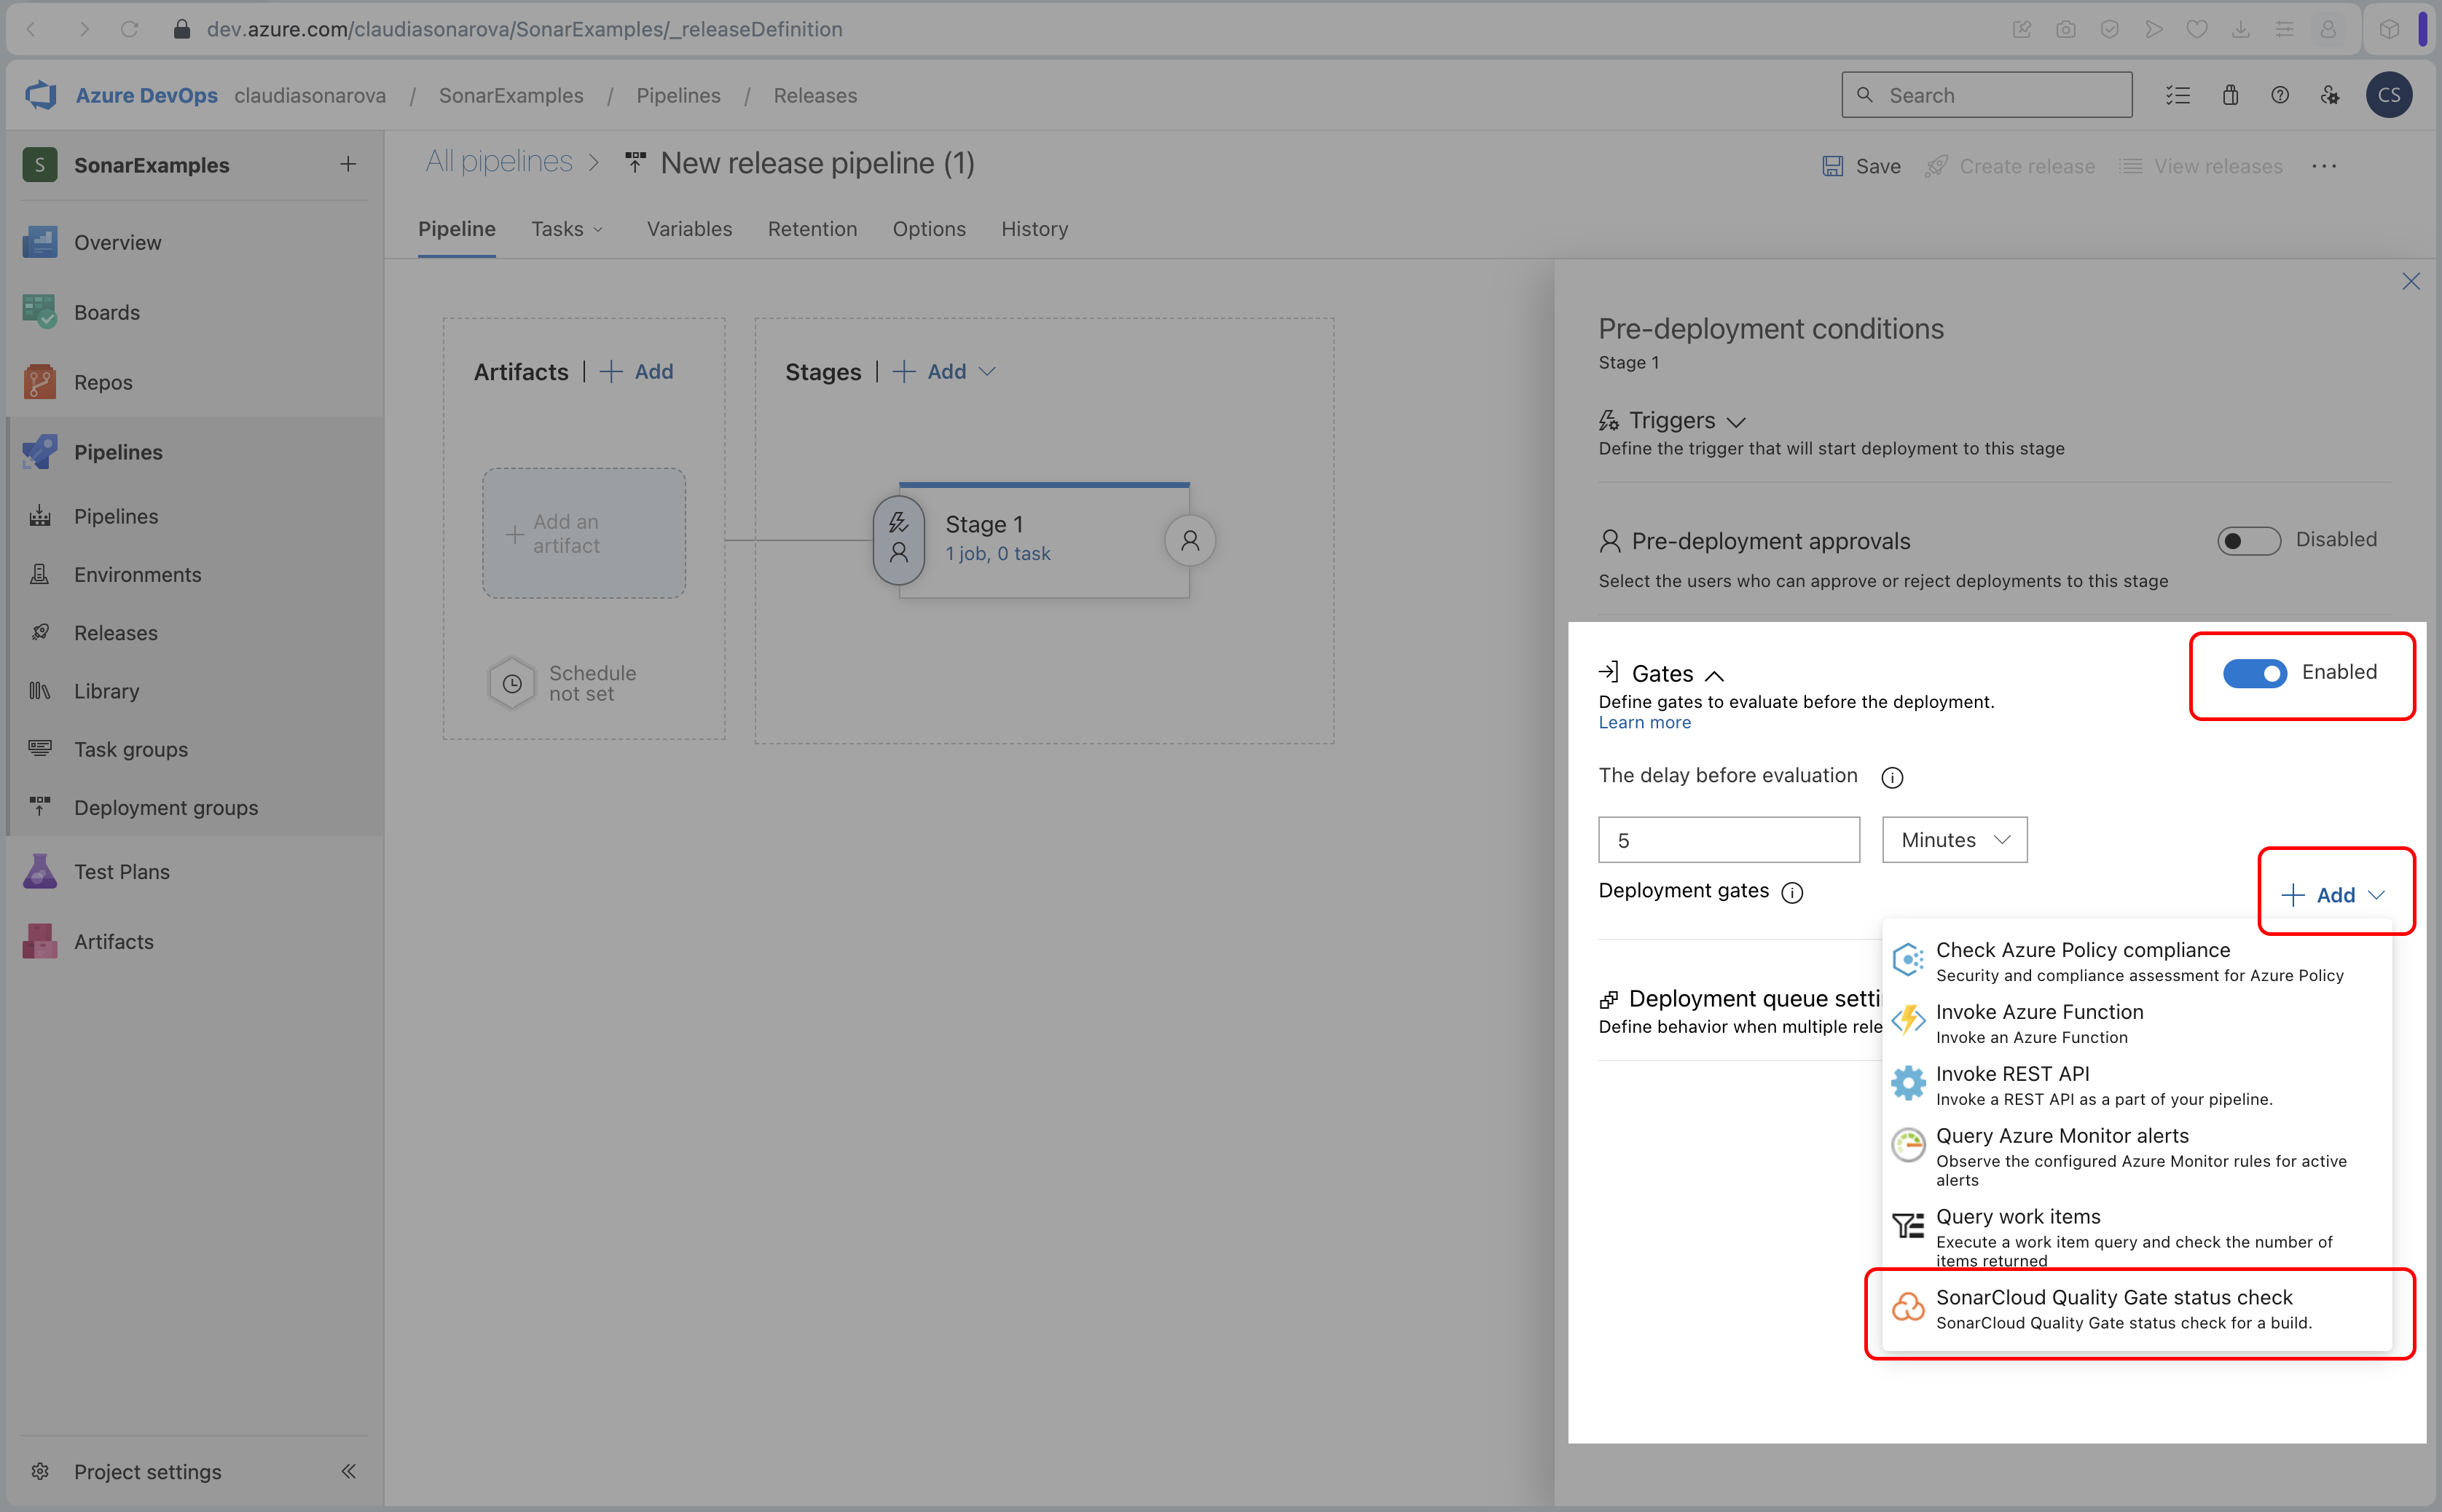
-
Select + Add, then choose the SonarCloud Quality Gate status check Deployment gate.
-
To have the fastest result possible for this exercise, we recommend you to define the Evaluation options as shown in this screenshot. Check the Microsoft Documentation for more information about how Deployments gates in Azure DevOps.

- That’s it. You can close this panel.
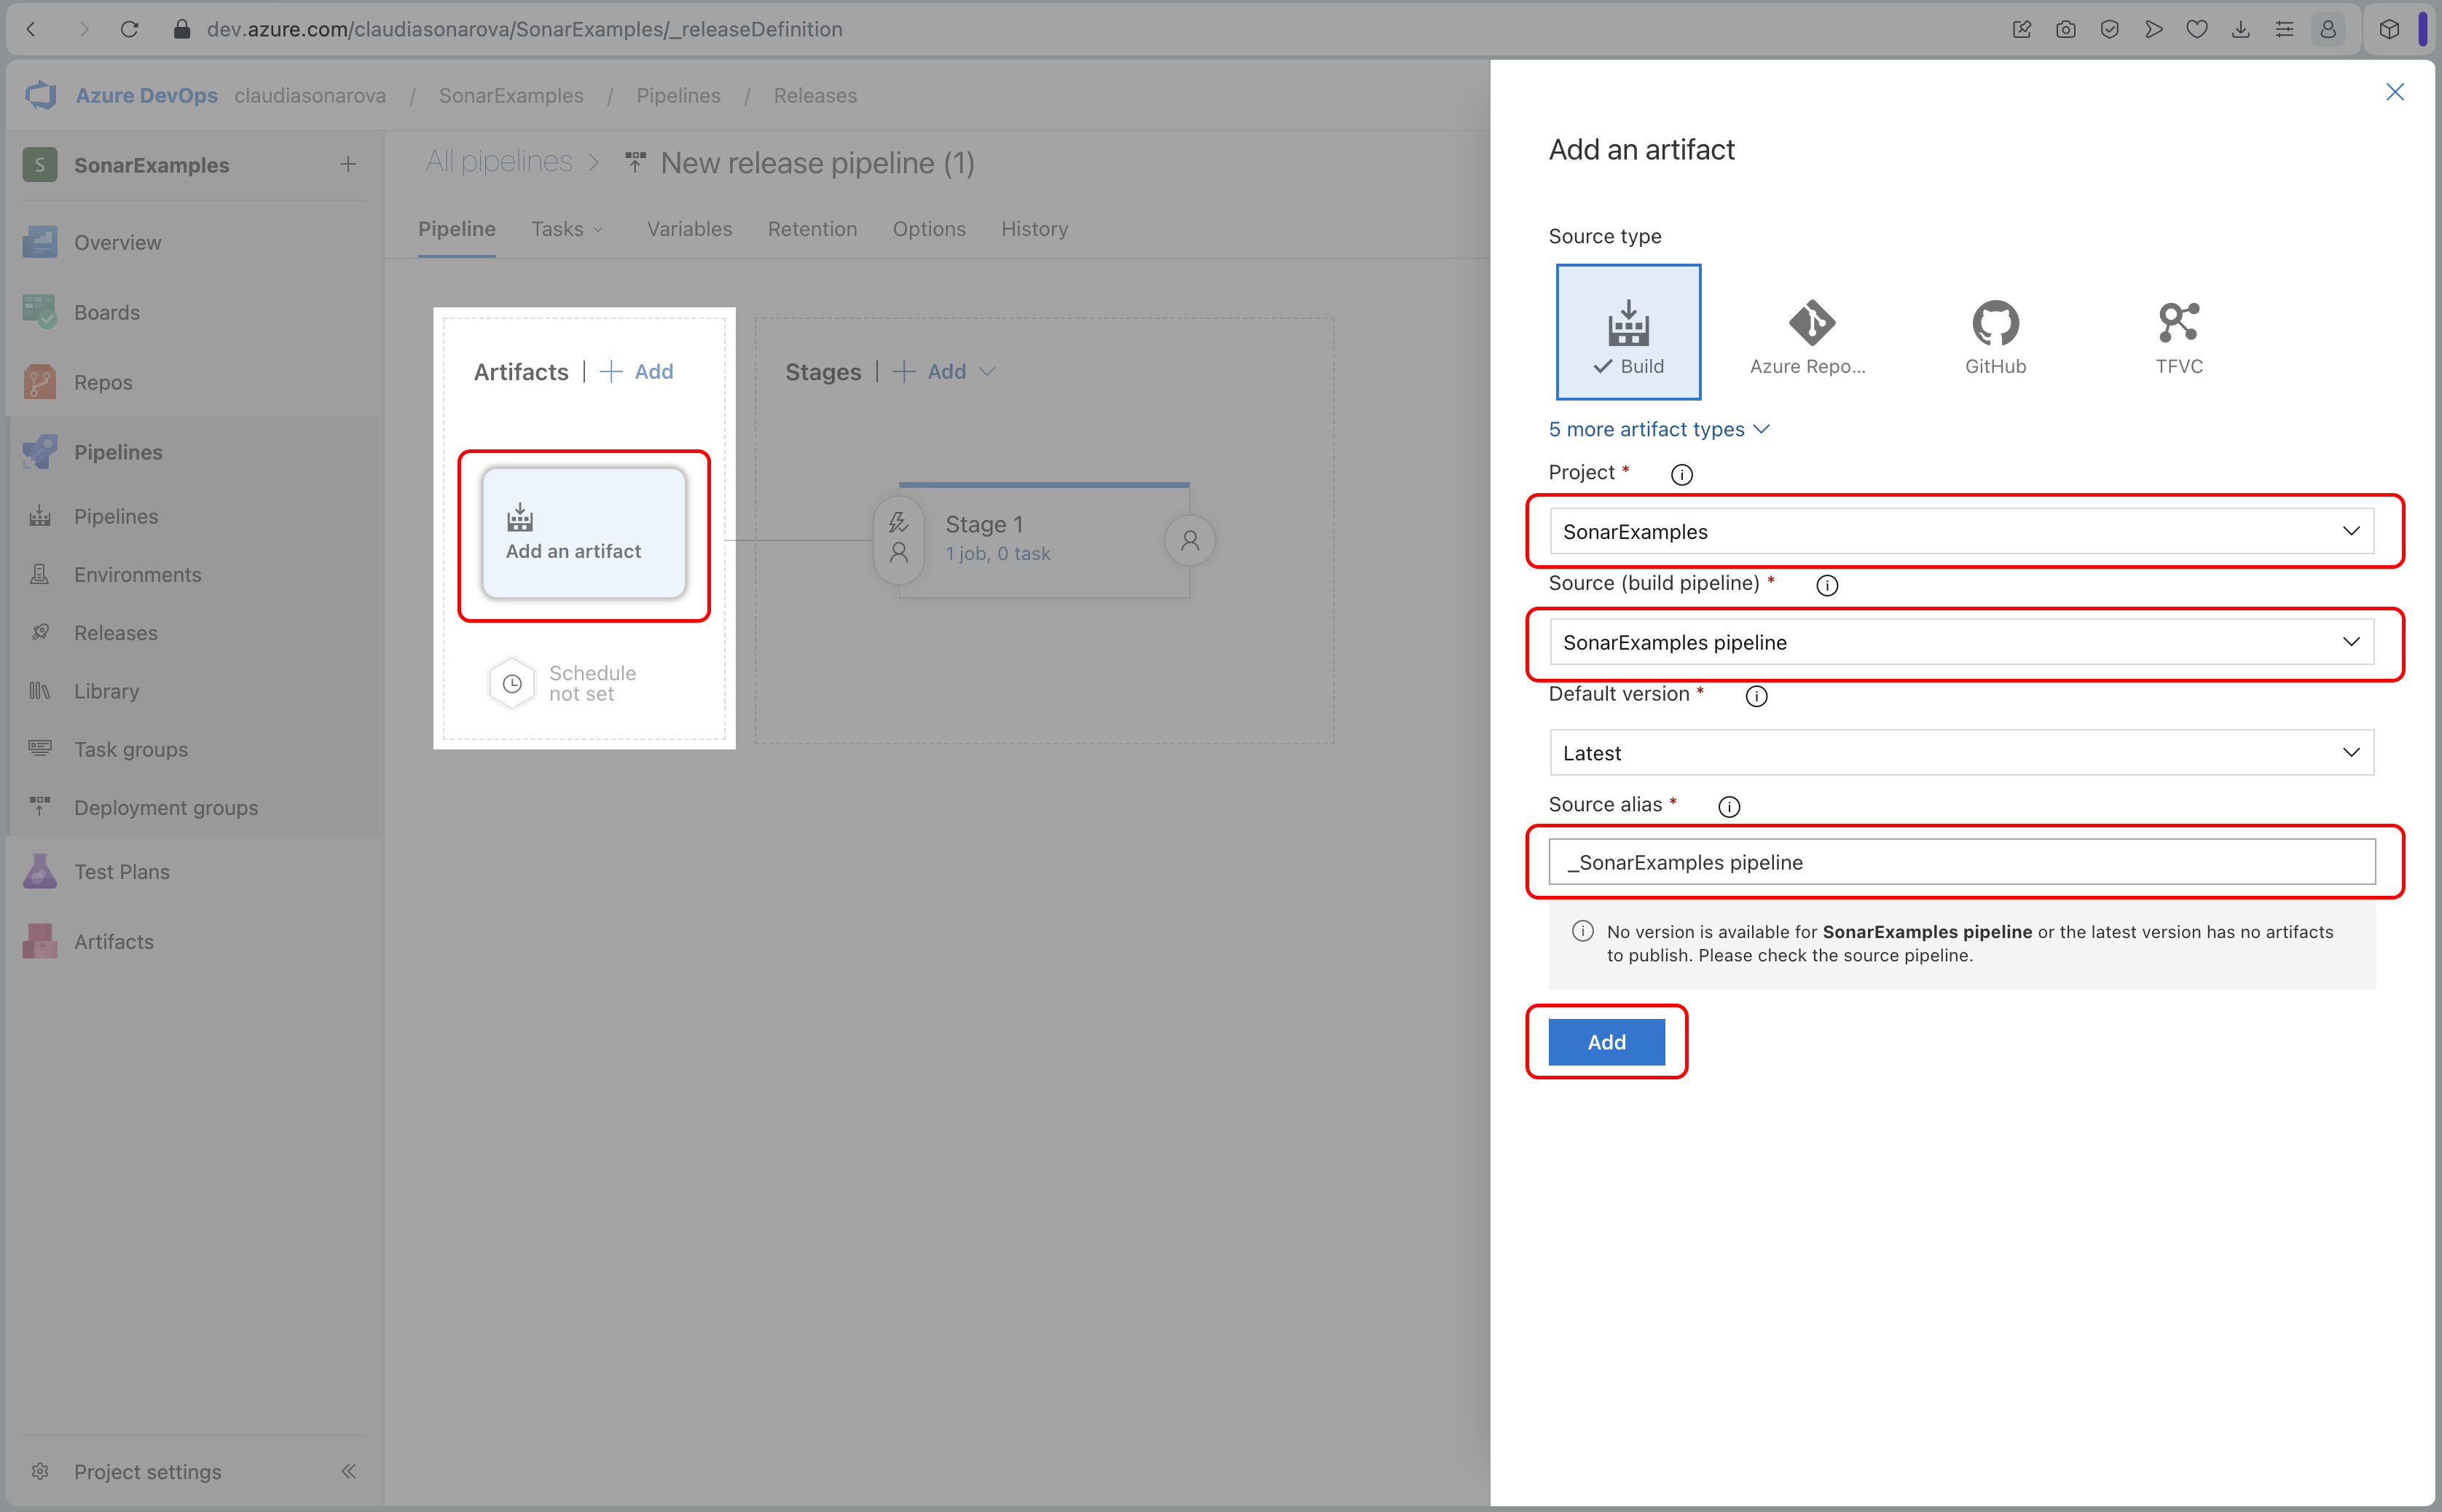
- Next, select Add an artifact on the left. Currently, only build artifacts are supported. Choose the project and the source (the build pipeline) of your artifact; its alias should match the name of the artifact published in the build pipeline.
-
When finished defining the Project, Source, and alias, select Add to continue.
-
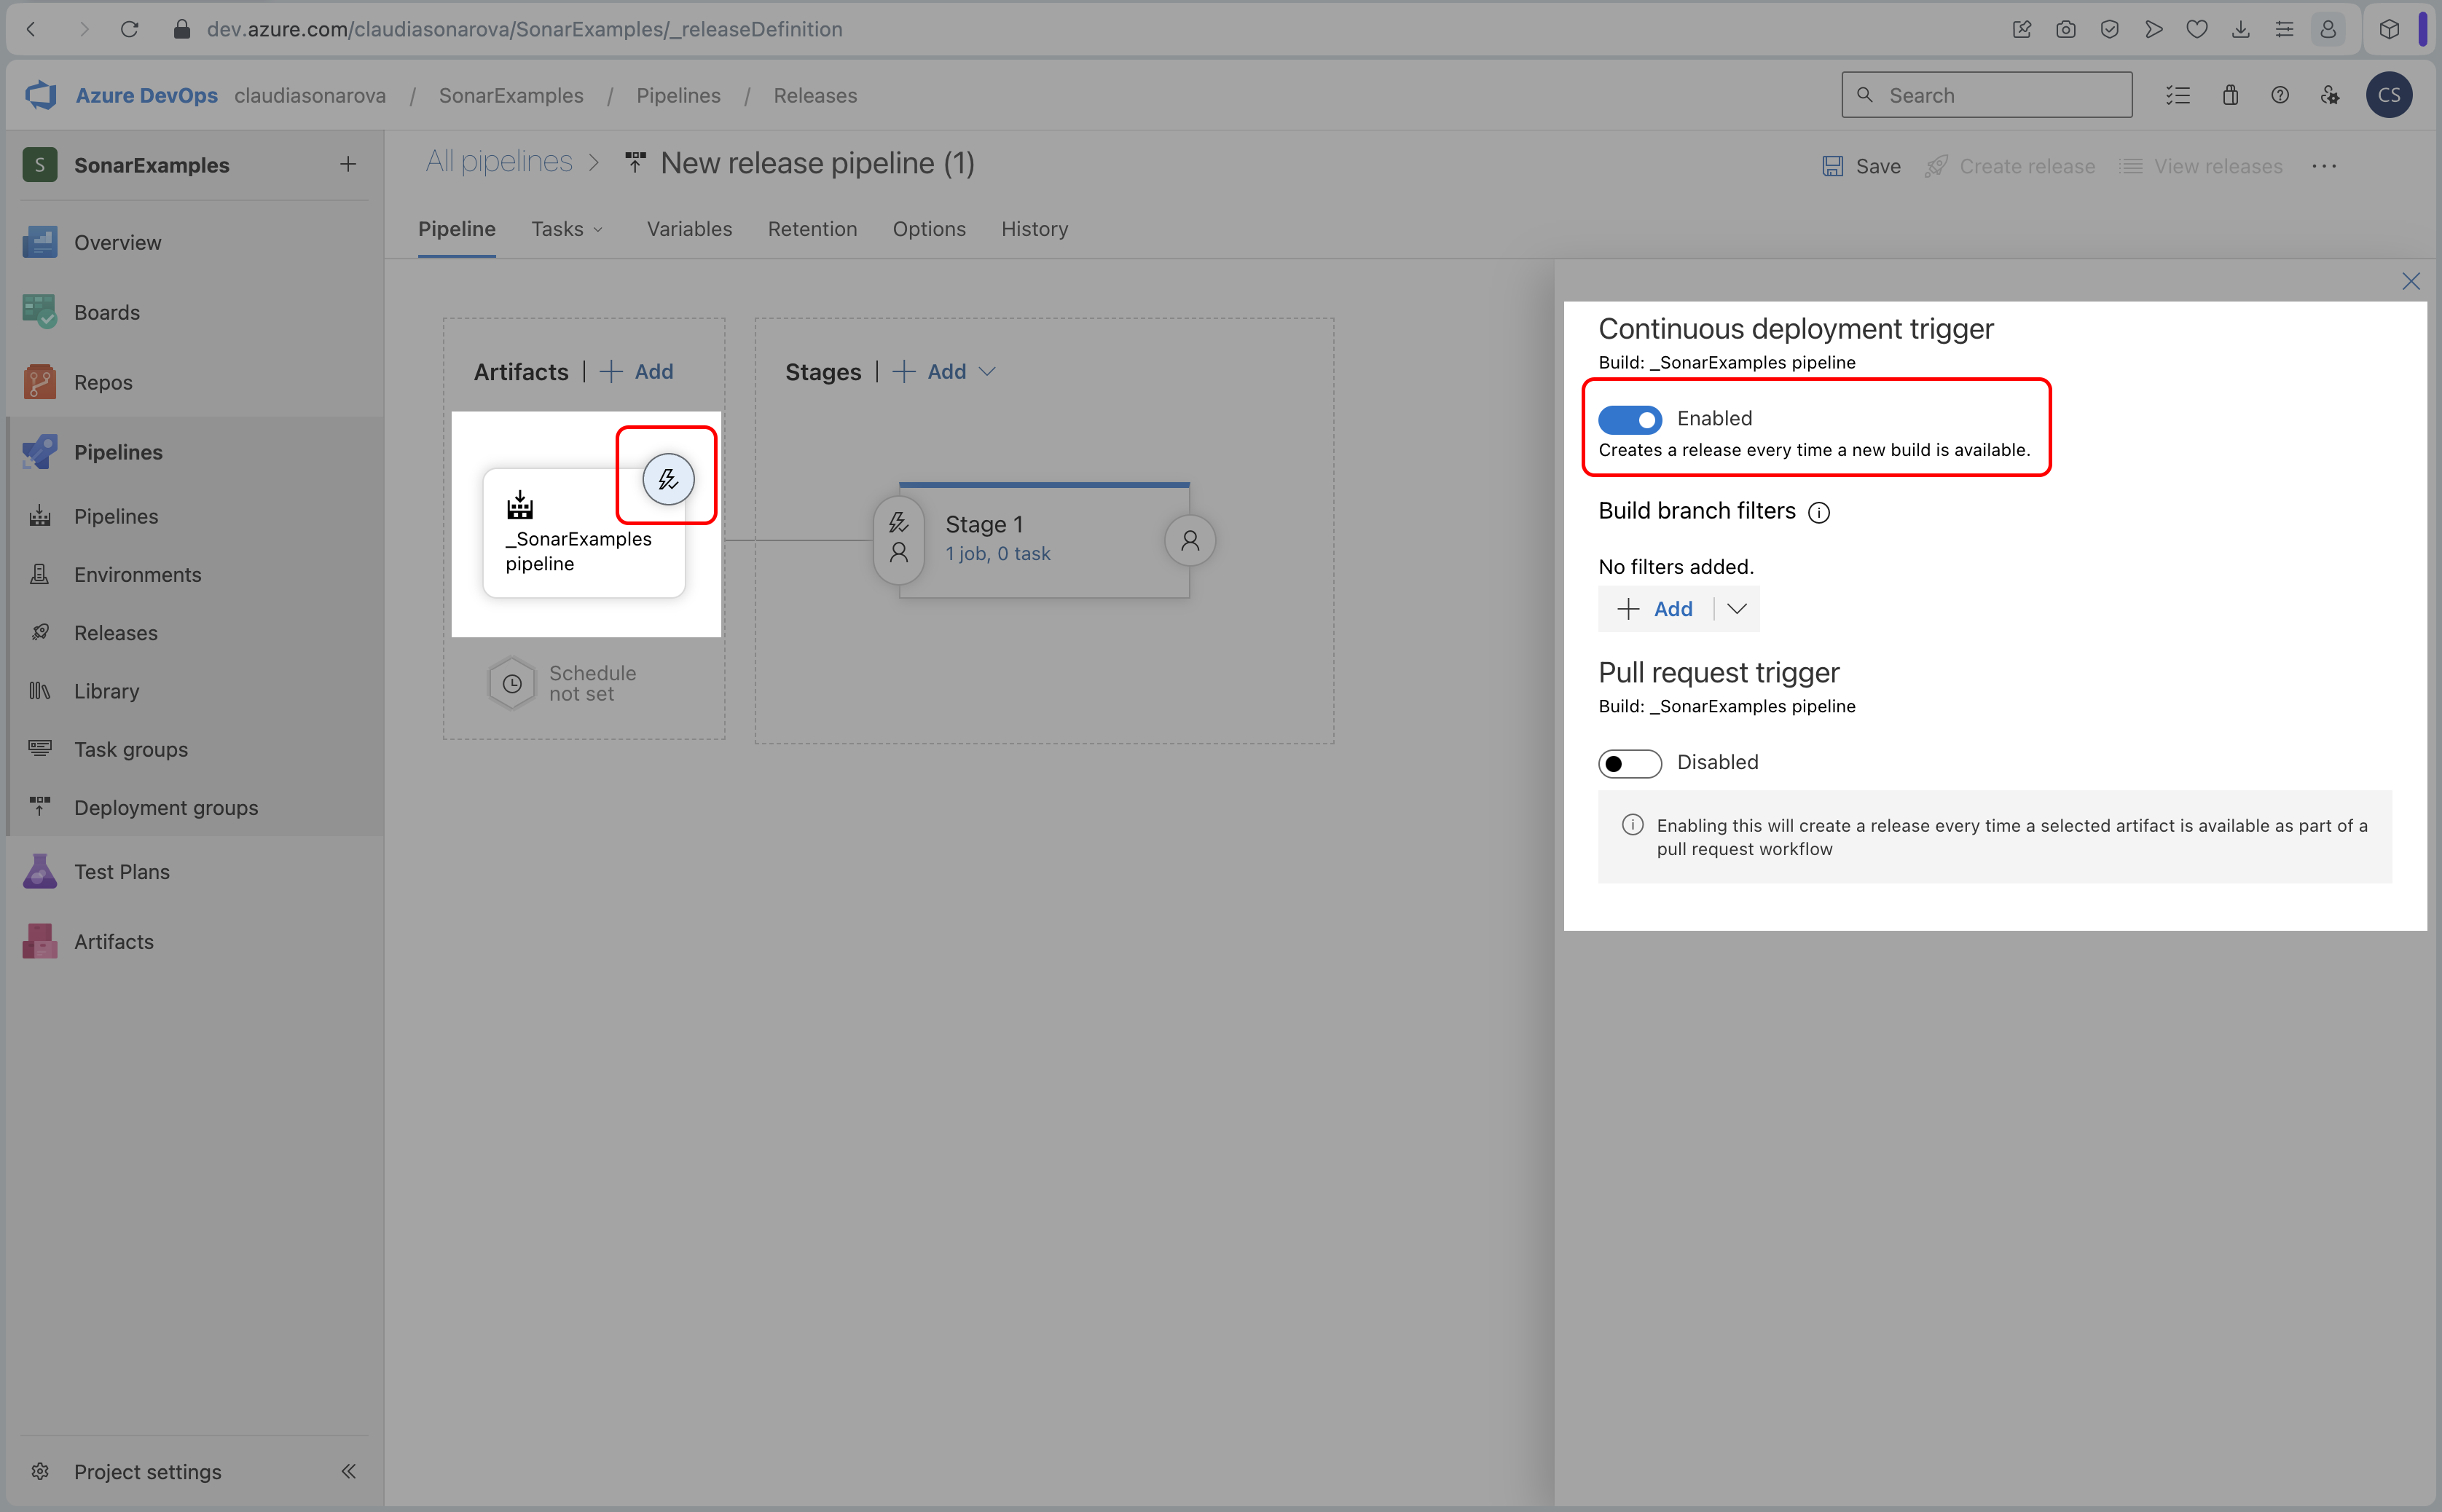
Enable the Continuous deployment trigger.
- You can now Save your pipeline.
-
Go back to the build pipeline section and trigger a build of the pipeline that creates CD artifact. Once the build is completed and succeeded, it will trigger the CD automatically.
-
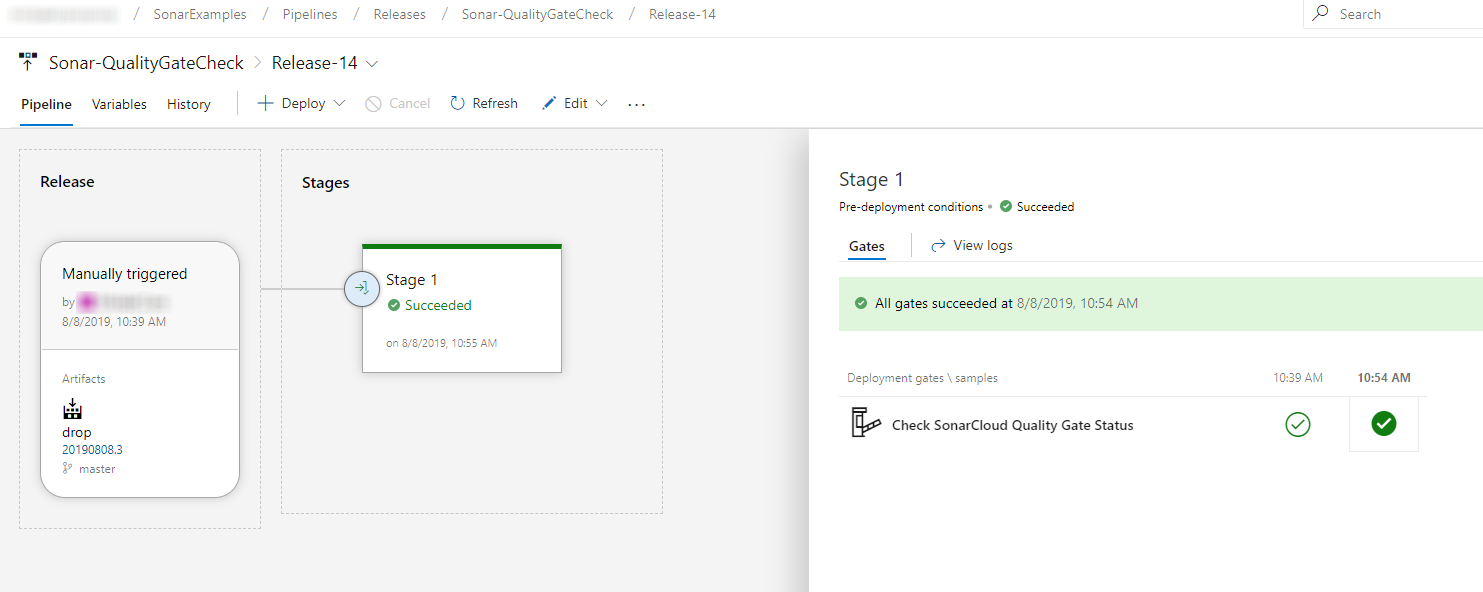
Go to the Pipelines > Releases page. After few minutes, (as defined by adding an artifact in step 8 of this exercise) your Quality Gate check should have been performed at least twice to get a ‘go/nogo’ for the stage. If it’s green, it should look like this:
Otherwise, if it’s failed, then read the important notes below to find out what happened and how to get a green Sonar Quality Gate.
Important notes about this feature
- The Publish Quality Gate Result task in your build pipeline has to be enabled in order for the release gate to work.
- If the Sonar Quality Gate is in the failed state, it will not be possible to get the pre-deployment gate passing because the initial status will remain unchanged. You will have to execute another build with either the current issues corrected in SonarCloud, or with another commit that fixed those issues.
- Please note also that the current default behavior of pre-deployment gates in release pipelines is to check the status every 5 minutes, for a duration of 1 day. However, if a Sonar Quality Gate for a build has failed, it will remain failed so there is no point in re-checking the status. Knowing this, you can either set the timeout after which gates fail to a maximum of 6 minutes so the gate will be evaluated only twice, or just cancel the release itself.
- Only the primary build artifact-related quality gate of the release will be checked.
- If multiple analyses are performed during a build, all of the related quality gates are checked. If one of the checks has the status either WARN, ERROR, or NONE, then the quality gate status on the Release Pipeline will be Failed.
Summary
With the SonarCloud extension for Azure DevOps Services, you can embed automated testing in your CI/CD pipeline to automate the measurement of your technical debt including code semantics, testing coverage, vulnerabilities. etc. You can also integrate the analysis into the Azure DevOps pull request process so that issues are discovered before they are merged.
Do you want to see more examples of SonarCloud in action? Please explore current open-source projects in SonarCloud that use the Clean as You Code methodology.